
Signifying simplicity from its two-letter name itself, Go has won the hearts of programmers as a verbose yet easy-to-learn language. As a language backed by Google and one that’s making even Python programmers make a switch, it would be a crime not to learn how to internationalize a Go application, don’t you think?
As a Golang developer creating your Go apps, who do you (or your organization) plan to reach? Quite possibly your answer would be something similar to “the world“. But, if your strategy on outreaching to the whole globe is presenting your Go web application in a single language and asking your non-English speaking app users to translate the app language themselves, I’m afraid it’s safe to say you’d be losing loads of your viable customers.
Hence, with its importance figured out, let us head straight into Go app internationalization!
In this tutorial, we will be taking a step-by-step approach to how to localize a Go application into multiple languages.
We will cover the following topics in this tutorial:
go-i18nDefaultMessageMessagetext/templatetimeAssumptions
Basic knowledge of:
- Golang (Go)
Prerequisites
A local environment set up with:
- Go 1.11 or higher
- Golang supported IDE
- Any API Client (e.g.: Postman)
Note: Mentioned Go version or greater is required for module support.
Environment
I will be using the following environment for my development purposes:
- Go 1.16.3 windows/amd64
- GoLand 2020.1 Build 201.6668.125
- Postman 8.3.1
The source code is available on GitHub.
Create a basic Go project
As our first step, let’s create a Go project we can use as our playground for upcoming internationalization stuff.
GoI18nGoI18ngo mod init GoI18n
go.modGoI18ngoi18n.goGoI18npackage main
func main() {}
GoI18nGo ahead with internationalization
GoI18nInstall go-i18n package
go-i18nGoI18nLet’s open up a console inside our project’s home directory and insert a command as follows:
go get github.com/nicksnyder/go-i18n/v2/i18n
go-i18nGoI18nGoI18ngo.modrequireGoI18nElementary l10n
GoI18nmaingoi18n.gomessageEn := i18n.Message { //1
ID: "hello",
Other: "Hello!",
}
messageFr := i18n.Message { //2
ID: "hello",
Other: "Bonjour!",
}
go-i18nmessageEnmessagemessageFrmessageNote: At the moment you might be curious about the use of an “Other” key to store the localization values. This simply boils down to pluralization which we’ll have a look at in our upcoming sections.
mainbundle := i18n.NewBundle(language.English) //1
bundle.AddMessages(language.English, &messageEn) //2
bundle.AddMessages(language.French, &messageFr) //3
localizer := i18n.NewLocalizer(bundle, //4
language.French.String(),
language.English.String())
localizeConfig := i18n.LocalizeConfig { //5
MessageID: "hello",
}
localization, _ := localizer.Localize(&localizeConfig) //6
BundleTest it out
localizationfmt.Println(localization)Bonjour!localizerMessage fallback behavior
LocalizeConfigbundleDefaultMessagegoi18n.goGoI18nmainMessagebundledefaultmessageEn := i18n.Message{
ID: "welcome",
Other: "Welcome to my app!",
}
LocalizeConfigDefaultMessagelocalizeConfigWithDefault := i18n.LocalizeConfig {
MessageID: "welcome", //1
DefaultMessage: &defaultmessageEn, //2
}
localizeConfigWithDefaultbundleDefaultMessagedefaultmessageEnlocalizeConfigWithDefaultLocalizer.LocalizelocalizationReturningDefault, _ := localizer.Localize(&localizeConfigWithDefault) fmt.Println(localizationReturningDefault)
Test it out
GoI18nWelcome to my app!
bundledefaultmessageEnLocalization using message files
GoI18nSo, let’s see how we can move those resources into separate resource files and make them usable from the time the application starts executing.
resourcesGoI18nen.json{
"hello": "Hello!",
"welcome": "Welcome to my app!"
}
fr.json{
"hello": "Bonjour!",
"welcome": "Bienvenue sur mon appli!"
}
Note: Since later we’ll be accessing these resources by name, you’re free to choose any name you prefer for these JSON files.
goi18n.goGoI18nvar localizer *i18n.Localizer //1
var bundle *i18n.Bundle //2
func init() { //3
bundle = i18n.NewBundle(language.English) //4
bundle.RegisterUnmarshalFunc("json", json.Unmarshal) //5
bundle.LoadMessageFile("resources/en.json") //6
bundle.LoadMessageFile("resources/fr.json") //7
localizer = i18n.NewLocalizer(bundle, language.English.String(), language.French.String()) //8
}
localizerLocalizerbundleBundlegoi18n.gobundleen.jsonbundlefr.jsonbundlelocalizerLocalizerlocalizerbundlegoi18n.gomainlocalizeConfigWelcome := i18n.LocalizeConfig{
MessageID: "welcome", //1
}
localizationUsingJson, _ := localizer.Localize(&localizeConfigWelcome) //2
fmt.Println(localizationUsingJson)
localizeConfigWelcomelocalizeConfigWelcomelocalizerTest it out
GoI18nWelcome to my app!
localizerUse HTTP requests for l10n
GoI18nLocalizeConfigSo next up, let’s see how we can use HTTP requests to not only make localizations but also to set our Go internationalization app’s language preferences.
Set language preferences
goi18n.goGoI18ninitfunc init() {
.
http.HandleFunc("/setlang/", SetLangPreferences) //1
http.ListenAndServe(":8080", nil) //2
}
SetLangPreferencesgoi18n.gofunc SetLangPreferences(_ http.ResponseWriter, request *http.Request) {
lang := request.FormValue("lang") //1
accept := request.Header.Get("Accept-Language") //2
localizer = i18n.NewLocalizer(bundle, lang, accept) //3
}
Localize using GET request parameters
Let’s see how we can perform localizations passing our values through GET request parameters.
goi18n.goGoI18ninitfunc init() {
.
http.HandleFunc("/localize/", Localize)
.
}
Important Note: Make sure to place the line before the call to http.ListenAndServe in order to register the handler before server initialization.
LocalizeLocalizegoi18n.gofunc Localize(responseWriter http.ResponseWriter, request *http.Request) {
valToLocalize := request.URL.Query().Get("msg") //1
localizeConfig := i18n.LocalizeConfig{ //2
MessageID: valToLocalize,
}
localization, _ := localizer.Localize(&localizeConfig) //3
fmt.Fprintln(responseWriter, localization) //4
}
Test it out
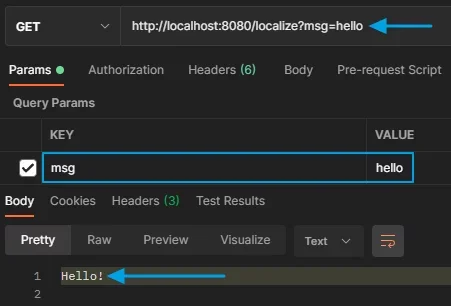
GoI18nhttp://localhost:8080/localize?msg=hello
Using our API client app to make this request should provide us a value as follows:
Secondly, let’s set our language preference.
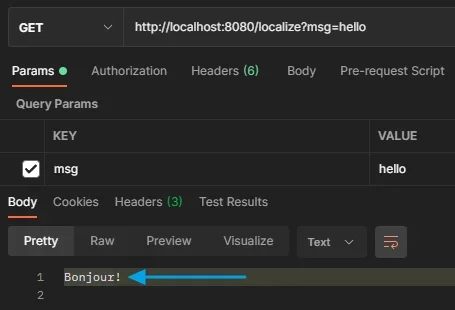
This time around, let’s execute a GET request to “http://localhost:8080/setlang” passing a “lang” parameter like this:
http://localhost:8080/setlang?lang=fr
GoI18nFinally, let’s run the exact same request we sent on the first step to pass a “msg” parameter of value “hello”:
http://localhost:8080/localize?msg=hello
Almost like some sort of wizardry took place, this time we should see the value for “hello” localized to French:
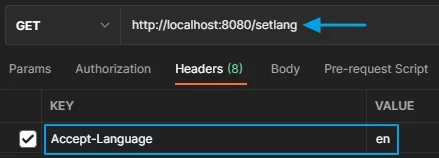
Change language using Accept-Language header
Alternatively, we could change our Go internationalization app’s language using the “Accept-Language” header to the network request.
Let’s repeat the same steps as the last time. But, instead of sending a “lang” parameter, let’s add an “Accept-Language” header to our GET request:
GoI18n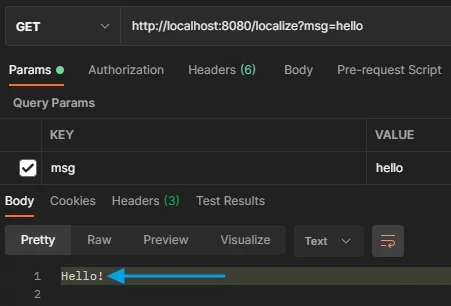
Some Go internationalization extras
Awesome, we learned the most essential features of Go internationalization! But, surely it wouldn’t hurt to learn a few more extra features now, would it?
Using placeholders
GoI18nmainGoI18ngoi18n.gobundle := i18n.NewBundle(language.English)
localizer := i18n.NewLocalizer(bundle, language.English.String())
messageWithPlaceholder := &i18n.Message{
ID: "greeting", //1
Other: "Hello {{.Name}}!", //2
}
localization, _ :=
localizer.Localize(&i18n.LocalizeConfig {
DefaultMessage: messageWithPlaceholder, //3
TemplateData: map[string]string { //4
"Name": "Dasun",
},
})
messageWithPlaceholdermessageWithPlaceholderNamelocalizer.Localizei18n.LocalizeConfigDefaultMessagemessageWithPlaceholderTemplateDatai18n.LocalizeConfigmapTest it out
GoI18nlocalizationHello Dasun!
Custom template delimiter
{{Let’s run the same code as earlier; but this time, passing in a new message with a few additional gimmicks:
.
messageWithCustomTemplateDelimiter := &i18n.Message{  //1
  ID: "greeting",
  LeftDelim: "<<", //2
  RightDelim: ">>", //3
  Other: "Hello <<.Name>>!",  //4

}
messageWithCustomTemplateDelimiterLeftDelimmessageWithCustomTemplateDelimiterRightDelimmessageWithCustomTemplateDelimitermessageWithCustomTemplateDelimiterNameGoI18nlocalizationHello Dasun!
Pluralization of nouns
GoI18nWouldn’t we get sued by them if our Go app displayed it like “Ryan Reynolds rescued 1 dogs” or “Kaley Cuoco rescued 3 dog“? So, let’s see how we can potentially save thousands of dollars by pluralizing nouns the right way!
GoI18ngoi18n.gomainbundle := i18n.NewBundle(language.English)
localizer := i18n.NewLocalizer(bundle, language.English.String())
var messageWithPlurals = &i18n.Message{ //1
ID: "dogrescue",
One: "{{.Name}} rescued {{.Count}} dog.",
Other: "{{.Name}} rescued {{.Count}} dogs.",
}
translationOne, _ :=
localizer.Localize(&i18n.LocalizeConfig{ //2
DefaultMessage: messageWithPlurals,
TemplateData: map[string]interface{}{ //3
"Name": "Ryan Reynolds",
"Count": 1,
},
PluralCount: 1, //4
})
translationMany, _ :=
localizer.Localize(&i18n.LocalizeConfig{ //5
DefaultMessage: messageWithPlurals,
TemplateData: map[string]interface{}{ //6
"Name": "Kaley Cuoco",
"Count": 2,
},
PluralCount: 2, //7
})
LocalizeConfigmessageWithPluralslocalizer.LocalizetranslationOneLocalizeConfigmapLocalizeConfigLocalizeConfigmessageWithPluralslocalizer.LocalizetranslationManyLocalizeConfigmapLocalizeConfigTest it out
translationOnetranslationManyRyan Reynolds rescued 1 dog. Kaley Cuoco rescued 2 dogs.
Date and time
We can make use of the time package to perform various date and time-related tasks which would be required in Go internationalization.
Get current date and time
mainGoI18ngoi18n.gocurrentTime := time.Now()
fmt.Println("Current date-time is:", currentTime.String())
Running our project would now print a long output similar to this:
Current date-time is: 2021-05-15 18:10:11.8177734 +0530 +0530 m=+0.005484601
Date and time formatting
Obviously, the output from time.Now is detailed, but it’s a bit too verbose to be printed in an application interface, wouldn’t you agree?
But in fact, the developers of the Go language haven’t stranded us. Instead, they have opted to offer us a pretty unique, easy, and more practical way to help us define the date and time formats we need. And, it involves no MMs, DDs, YYYYs, or hh:mm:sss!
Take note of their special textual representation:
Mon Jan 2 15:04:05 -0700 MST 2006
We can mix and match this line’s components any way we like and pass it as a parameter to their time.Format method. Let’s see this in action, shall we?
GoI18ngoi18n.gomaincurrentTime := time.Now()
formattedTime := currentTime.Format("15:04:05 Mon 2 Jan 2006")
fmt.Println("Formatted current date-time is:", formattedTime)
currentTime.FormatFormatted current date-time is: 18:10:11 Sat 15 May 2021
Go for Lokalise, Lokalise for Go
If you or your team chose Go as your language, I’m pretty sure the pivotal reason behind the choice was the simplicity and the small learning curve of it.
But, if you paid enough attention, you must have caught the irony here. That Go internationalization itself isn’t quite the piece of cake, am I right? Especially as an unbattered language still passing its first steps in the developer community, at the moment Go internationalization leaves things to be desired.
But, why should you bother if there’s a much easier, 1000x faster, and more convenient, way to step on this Go internationalization venture?
Meet Lokalise, the translation management system that takes care of all your Go application internationalization needs. With features like:
- Easy integration with various other services
- Collaborative translations
- Quality assurance tools for translations
- Easy management of your translations through a central dashboard
- Plus, loads of others
Lokalise will make your life a whole lot easier by letting you expand your Go internationalization-powered app to all the locales you’ll ever plan to reach.
Start with Lokalise in just a few steps:
- Sign up for a free trial (no credit card information required).
- Log in to your account.
- Create a new project under any name you like.
- Upload your translation files and edit them as required.
That’s all! You have already completed the baby steps toward Lokalise-ing your Go application. See the Getting Started section for a collection of articles that will provide all the help you’ll need to kick-start the Lokalise journey. Also, refer to Lokalise API Documentation for a complete list of REST commands you can call on your Lokalise internationalization project.
Conclusion
go-i18nDefaultMessagetext/templatetimeAnd with that, my time has come for another wrap-up. Drop me a line if you have any questions, and don’t hesitate to leave a comment.
Till we meet again, go beyond your localhost! But in real life, it’s probably a good idea to stay home for the time being.