
入门imgui第一天,把遇到的问题和参考两位大佬写的教程,总结了一下,写了下来,若有错误欢迎指正
参考文章:
【记录】DirectX12 添加ImGui组件 - 知乎 (zhihu.com)
Directx11/12添加imgui踩坑记 - 知乎 (zhihu.com)
一、下载imgui库官方网址:
GitHub - ocornut/imgui: Dear ImGui: Bloat-free Graphical User interface for C++ with minimal dependencies
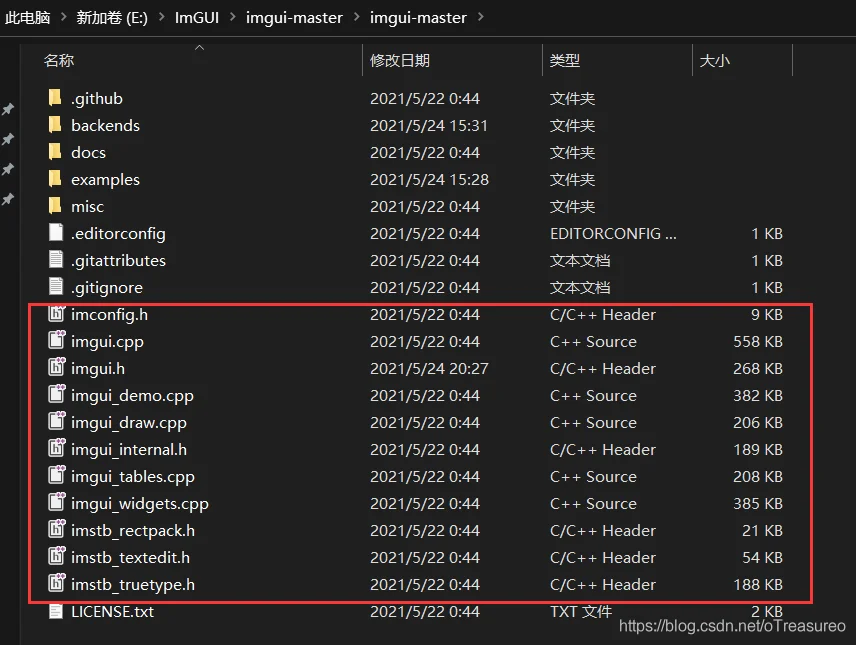
在DirectX12中使用imgui库,需要以下文件:
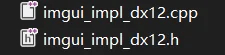
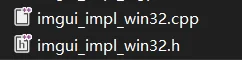 后面这四个文件可以在backends文件夹中找到。
2.1 使用的dx12的demo
使用的是dx龙书第六章绘制立方体的代码,在此项目上加入imgui库
2.2 加入头文件
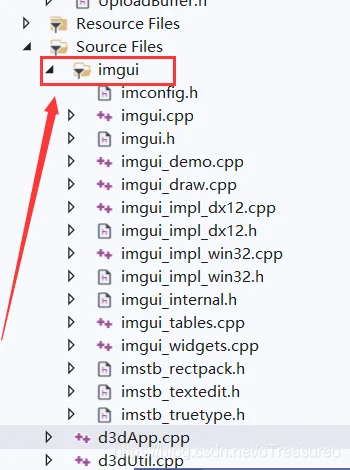 创建"imgui"的文件夹,将上述15个imgui的文件复制进来。
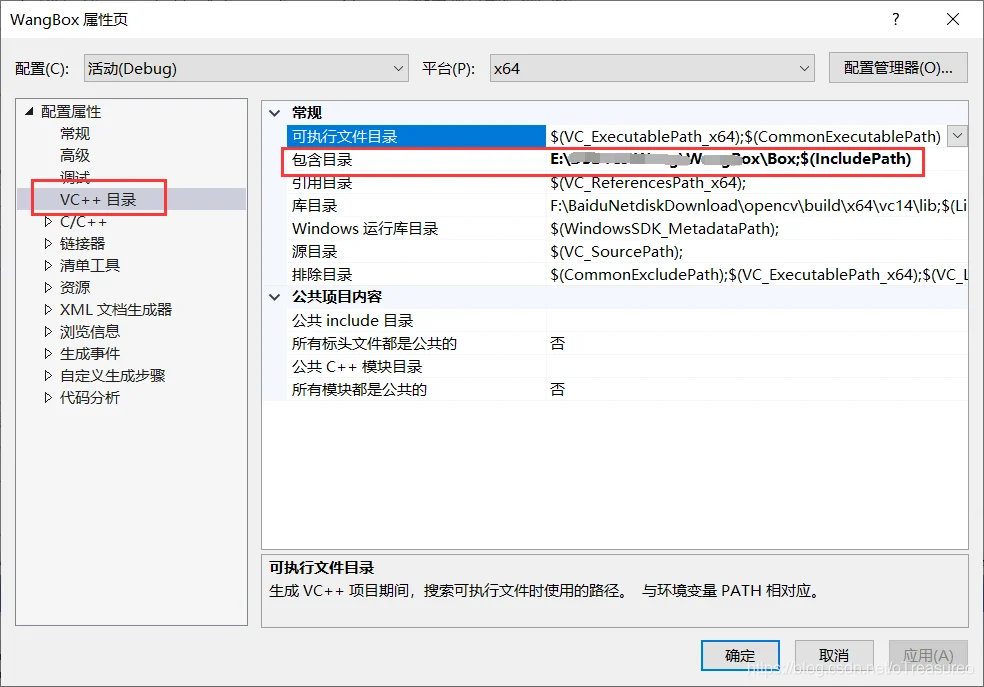
若遇到“找不到imgui.h"的问题,记得查看项目包含目录是否将imgui.h的路径记录下来,如:
①在d3dAPP.cpp和Box.cpp中包含以下头文件:
#include "imgui.h"
#include "imgui_impl_win32.h"
#include "imgui_impl_dx12.h"
②在d3dApp.cpp中创建srv堆
在第六章绘制立方体项目中,只用到了RTV和DSV,所以需要自己创建srv堆。imgui需要srv堆才能完成绘制。
在CreateRtvAndDsvDescriptorHeaps函数中添加以下代码:
D3D12_DESCRIPTOR_HEAP_DESC SrvHeapDesc;SrvHeapDesc.NumDescriptors = 1;SrvHeapDesc.Type = D3D12_DESCRIPTOR_HEAP_TYPE_CBV_SRV_UAV;SrvHeapDesc.Flags = D3D12_DESCRIPTOR_HEAP_FLAG_SHADER_VISIBLE;SrvHeapDesc.NodeMask = 0;ThrowIfFailed(md3dDevice->CreateDescriptorHeap(&SrvHeapDesc, IID_PPV_ARGS(mSrvHeap.GetAddressOf())));③在d3dAPP.cpp的初始化函数中,添加以下代码:
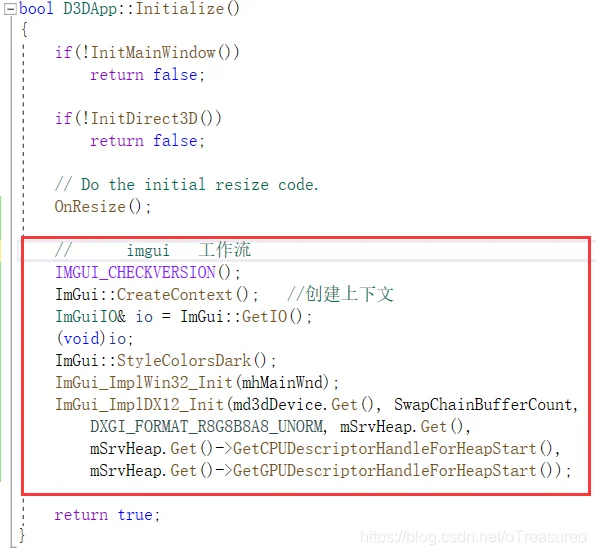
IMGUI_CHECKVERSION();ImGui::CreateContext(); //创建上下文ImGuiIO& io = ImGui::GetIO();(void)io;ImGui::StyleColorsDark();ImGui_ImplWin32_Init(mhMainWnd);ImGui_ImplDX12_Init(md3dDevice.Get(), SwapChainBufferCount,DXGI_FORMAT_R8G8B8A8_UNORM, mSrvHeap.Get(),mSrvHeap.Get()->GetCPUDescriptorHandleForHeapStart(),mSrvHeap.Get()->GetGPUDescriptorHandleForHeapStart());④在Box.cpp的Draw()函数中,添加以下代码,注意:在指令关闭之前:
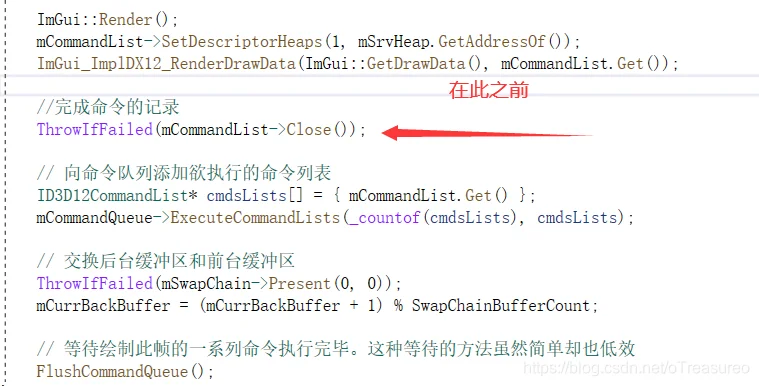
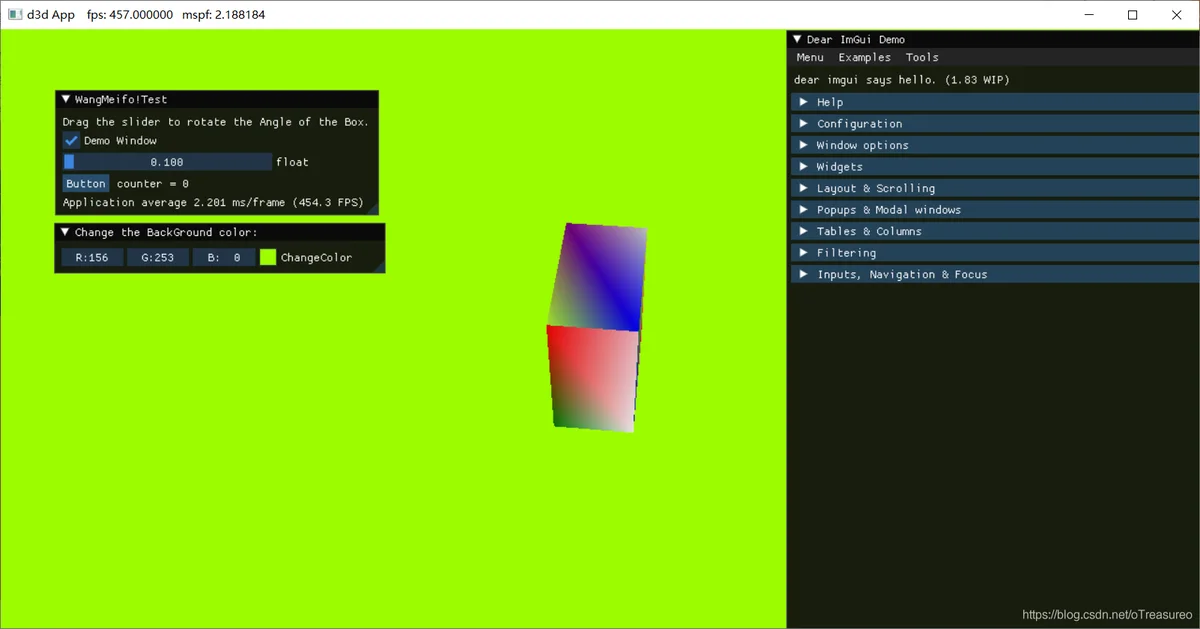
// 开启imgui帧 重置命令列表 ImGui_ImplDX12_NewFrame();ImGui_ImplWin32_NewFrame();ImGui::NewFrame();// 1. Show the big demo window (Most of the sample code is in ImGui::ShowDemoWindow()! You can browse its code to learn more about Dear ImGui!).bool show_demo_window = true;if (show_demo_window)ImGui::ShowDemoWindow(&show_demo_window);// 2. Show a simple window that we create ourselves. We use a Begin/End pair to created a named window.//以下是绘制{static int counter = 0;//test1 控制旋转ImGui::Begin("WangMeifo!Test"); // Create a window called "Hello, world!" and append into it.ImGui::Text("Drag the slider to rotate the Angle of the Box."); // Display some text (you can use a format strings too)ImGui::Checkbox("Demo Window", &show_demo_window); // Edit bools storing our window open/close state//ImGui::SliderFloat("float", &mPhi, 0.1f, 1.0f); //mPhi立方体的旋转角度ImGui::SliderFloat("float", &mTheta, 0.1f, 1.0f); //mTheta也是旋转角度// Edit 1 float using a slider from 0.0f to 1.0fif (ImGui::Button("Button")) // Buttons return true when clicked (most widgets return true when edited/activated)counter++;ImGui::SameLine();ImGui::Text("counter = %d", counter);ImGui::Text("Application average %.3f ms/frame (%.1f FPS)", 1000.0f / ImGui::GetIO().Framerate, ImGui::GetIO().Framerate);ImGui::End();ImGui::Render();mCommandList->SetDescriptorHeaps(1, mSrvHeap.GetAddressOf());ImGui_ImplDX12_RenderDrawData(ImGui::GetDrawData(), mCommandList.Get());⑤在d3dApp.cpp中修改窗口程序,让其响应imgui
//       imgui需要响应消息   以下是对窗口过程函数做的修改:
// Forward declare message handler from imgui_impl_win32.cpp
extern IMGUI_IMPL_API LRESULT ImGui_ImplWin32_WndProcHandler(HWND hWnd, UINT msg, WPARAM wParam, LPARAM lParam);LRESULT D3DApp::MsgProc(HWND hwnd, UINT msg, WPARAM wParam, LPARAM lParam)
{ImGui_ImplWin32_WndProcHandler(hwnd, msg, wParam, lParam);
以上部分完成了立方体的旋转,接下来完成背景颜色的改变
⑥在draw()函数中,添加以下代码:
//控制背景颜色 test2ImGui::Begin("Change the BackGround color:");ImGui::ColorEdit3("ChangeColor",(float*)&changeColor);ImGui::End();其中,changeColor需要提前声明为成员变量
ImVec4 changeColor = ImVec4(0.66f, 0.32f, 0.60f, 1.00f);
然后在绘制时,通过以下代码改变背景颜色
// 利用imgui修改背景色 const float change_color_with_alpha[4] = {changeColor.x * changeColor.w,changeColor.y * changeColor.w,changeColor.z * changeColor.w };mCommandList->ClearRenderTargetView(CurrentBackBufferView(), change_color_with_alpha, 0, nullptr);

imgui我也才入门,若有错误,烦请大家指正,谢谢~