
kubectlKubernetes Dashboard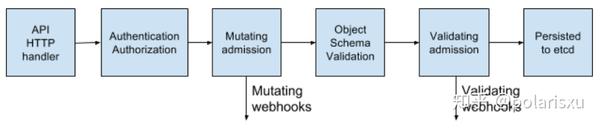
上图展现了构成 API 组件的各个模块。请求在 API 模块的旅程是从认证控制器(Authentication)开始的。请求被验证之后,授权模块将会判断这个请求的发出者能否执行这个操作。在这个请求被正确地授权之后, 准入控制器(admission controller) 开始发挥作用。
在 Kubernets 中有两种不同的准入控制器,他们工作的方式有稍许不同。第一种是验证准入控制器(validating admission controller),它将请求转发到订阅该请求的钩子 (webhook)。因此 Kubernets API 组件注册钩子时,需要确认钩子想订阅的请求的方法和资源类型。每一个钩子运行根据内置的逻辑验证输入的请求,并以将结果回复给 API 组件。如果验证钩子拒绝了请求,Kubernetes API 组件将返回一个失败的 HTTP 响应给用户。否则,它将进行下一个准入判定。
第二种类型的是 变更准入控制器(mutating admission controller),这种准入控制器能够修改用户提交的资源 ,因此你能够设置默认值或者验证属性。集群管理员能够以和验证模块相同的运行方式将变更控制器添加到 API 组件中。事实上,变更逻辑运行在验证逻辑之前。
目标
我们的目标是创建一个能让我们影响到 Pod 创建的简单验证控制器。尽管这有足够的可能性让你实现需要的复杂逻辑,但我们的目标就是创建一个能够做简单验证的版本。你可以在文章最后的链接中找到更多实际案例。
smooth-app
.
API 模块如何代理请求
ValidationWebhookConfigurationapiVersion: admissionregistration.k8s.io/v1beta1
kind: ValidatingWebhookConfiguration
metadata:
name: grumpy
webhooks:
- name: grumpy.giantswarm.io
clientConfig:
service:
name: grumpy
namespace: default
path: "/validate"
caBundle: "${CA_BUNDLE}"
rules:
- operations: ["CREATE"]
APIGroups: [""]
APIVersions: ["v1"]
resources: ["pods"]
clientConfigpathCAgrumpyCREATEpod生成证书和 CA
gen_cret,sh// Clone repository in case you did not do it before
$ Git clone https://github.com/giantswarm/grumpy
// Run the command to generate the certs under 'certs' folder
$ cd grumpy
$ ./gen_cert.sh
注意:如果你对这个黑盒内部感兴趣,在上文的脚本中,有些注释来解释执行的命令。
对这篇教程的目的而言,我们的验证控制器配置必须包含一个编码的证书颁发机构。除了创建证书和 CA 之外,这个脚本还将其写到了部署在服务上的清单(manifest)中。
$ cat manifest.yaml | grep caBundle
在下一步,我们会创建一个 来存放这个证书。应用清单后,pod 能够将 secret 文件存储到一个目录下。
$ kubectl create secret generic grumpy -n default \ --from-file=key.pem=certs/grumpy-key.pem \ --from-file=cert.pem=certs/grumpy-crt.pem
部署验证控制器
为了部署我们的服务,我们使用挂载安全证书的单例部署来生成一个 pod 请求能够被提交的安全 REST 端口。同时,我们通过服务向外开放控制器,以配置我们在钩子资源中定义的 DNS。(At the same time, we will expose the controller through the service to configure the DNS as we have defined in the Webhook resource.)
apiVersion: apps/v1beta1
kind: Deployment
metadata:
  name: grumpy
  namespace: default
spec:
  replicas: 1
  template:
    spec:
      containers:
        - name: Webhook
          image: giantswarm/grumpy:1.0.0
          ...
          volumeMounts:
            - name: Webhook-certs
              mountPath: /etc/certs
        ...
      volumes:
        - name: Webhook-certs
          secret:
            secretName: grumpy
---
apiVersion: v1
kind: Service
metadata:
  name: grumpy
  namespace: default
spec:
  ports:
  - name: Webhook
    port: 443
    targetPort: 8080
    ...
通过命令行应用清单配置应该就足够了。它还包含之前所说过的 Webhook。
$ kubectl apply -f manifest.yaml
现在服务应该启动运行,并准备好验证新 pod 的创建操作。
测试验证控制器的工作
让我们尝试创建一个名字不匹配的 Pod。
apiVersion: v1
kind: Pod
metadata:
  name: non-smooth-app
spec:
  containers:
  - image: busybox
    name: non-smooth-app
现在尝试运行这个 pod 资源 YAML 文件。
$ kubectl apply -f non-smooth-app.yaml
Error from server: error when creating "non-smooth-app.yaml": admission Webhook "grumpy-webhook" denied the request: Keep calm and don't add more crap to the cluster!
准入控制器截获了这个请求,并且检查了名字,发现和期望值不匹配,因此拒绝该请求。
为了确认其有效性,使用正确的命名再尝试一次。
apiVersion: v1
kind: Pod
metadata:
  name: smooth-app
spec:
  containers:
  - image: busybox
    name: smooth-app
在这一次尝试中, Kubernetes API 组件让我们创建 pod
$ kubectl apply -f smooth-app.yaml
pod/smooth-app created
$ kubectl get pod
smooth-app                    0/1     Completed   0          6s
解释验证逻辑
在这个例子中,我们选择使用 Go 创建准入控制器,仅因为他是 Kubernetes 事实上的语言,但是你可以使用其他任何你想用的语言,同样能够以相同的方式运行。
validate注意: 示例代码做了些删减以便理解,更多信息可以访问
// Read the certs from the convined path and convert it to a X509 keypair
flag.StringVar(&tlscert, "tlsCertFile", "/etc/certs/cert.pem", "x509 Certificate for HTTPS.")
flag.StringVar(&tlskey, "tlsKeyFile", "/etc/certs/key.pem", "x509 private key to --tlsCertFile.")
certs, _ := tls.LoadX509KeyPair(tlscert, tlskey)

// Create a secure http server
server := &http.Server{
  Addr:      ":8080",
  TLSConfig: &tls.Config{Certificates: []tls.Certificate{certs}},
}

// Create a handler listening to the 'validate' path and start the server
gs := GrumpyServerHandler{}
mux.HandleFunc("/validate", gs.serve)
server.ListenAndServeTLS("", "")
serve// Convert raw data in a Pod data type
raw := arRequest.Request.Object.Raw
pod := v1.Pod{}
json.Unmarshal(raw, &pod)
// Actual validation logic
if pod.Name != "smooth-app" {
return
}
smooth-app// Create a response to return to the Kubernetes API
ar := v1beta1.AdmissionReview{
Response: &v1beta1.AdmissionResponse{
Allowed: false,
Result: &metav1.Status{
Message: "Keep calm and not add more crap in the cluster!",
},
},
}
resp, err := JSON.Marshal(ar)
总结
如同你在教程中看到的,是非常容易实现一个简单的准入控制器的。这明显地有更多的可能性使你的集群更加安全和强大(只接受已知的注册者,拒绝最新的标签 (tags),...)
同时,它具有强大的功能,因为它可以影响集群中运行的关键组件。举个例子,当你提交的错误导致整个集群被阻塞的时候,你会妨碍 CNI 插件的运行。因此要时刻谨慎,要把准入逻辑限制在一个命名空间或者是动作的最小集合。
值得一提的是,有一些项目已经利用这种模式来实现更高级别的功能。一个典型的例子是 使用准入控制器来实现策略引擎(), 以在云原生环境下的实施策略。
延伸阅读
本文由 原创编译, 荣誉推出