
现在使用xp的用户非常多,尤其是gosthtml' target='_blank'>xp系统,因为gostxp系统安装非常简单,自带了万能驱动工具,自动帮助用户安装对应的硬件驱动,做到一键无人值守快速安装。虽然安装很简单,还是有不少用户不知道gostxp怎么安装,这边 小编教大家gostxp系统安装步骤。
相关教程:
装xp出现0x0000007B蓝屏解决方法
安装系统时提示您还没有指定ghost32/ghost64位置怎么解决
安装准备
1、备份C盘和桌面上重要的文件
2、系统下载:深度技术ghost xp sp3硬盘直装版V2018.04
3、当前系统可以正常运行时使用硬盘安装方法,反之则用U盘安装方法
方法一、U盘安装方法:u盘安装xpiso步骤是怎样的
方法二、gostxp系统安装步骤 硬盘方法
1、在 下载gostxp系统文件到C盘之外的分区,比如保存到D盘,右键使用WinRAR等软件解压出来;
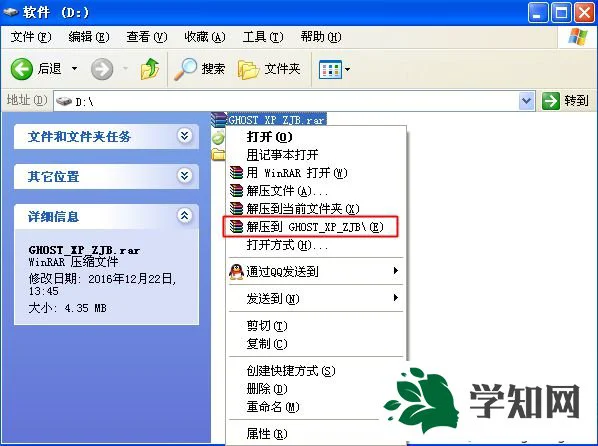
2、解压文件不能放C盘或桌面,否则不能安装,这边解压到D盘,如图所示;
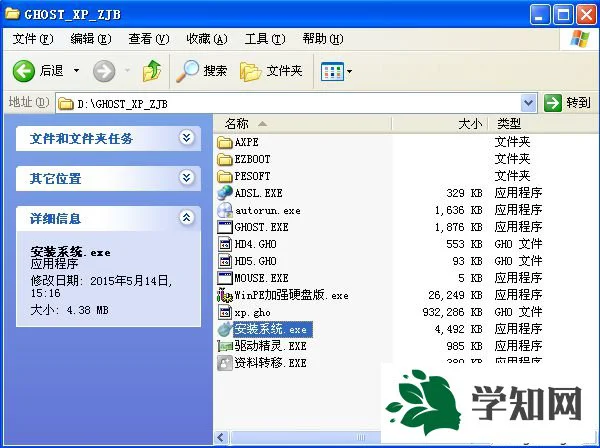
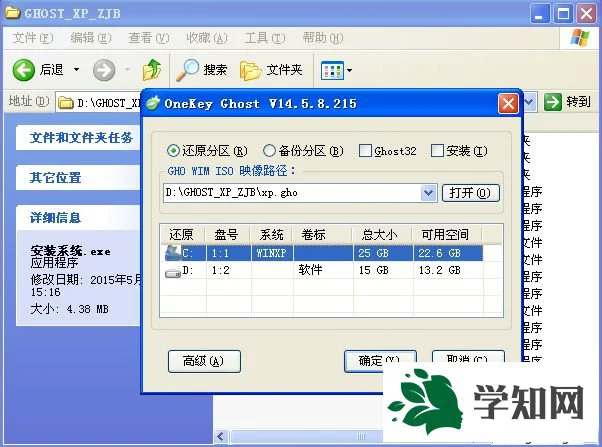
3、双击“安装系统.exe”打开OneKey ghost装机工具,点击“还原分区”,GHO WIM ISO映像路径默认会提取到xp.gho,选择gostxp系统安装位置,一般是C盘,点击确定;
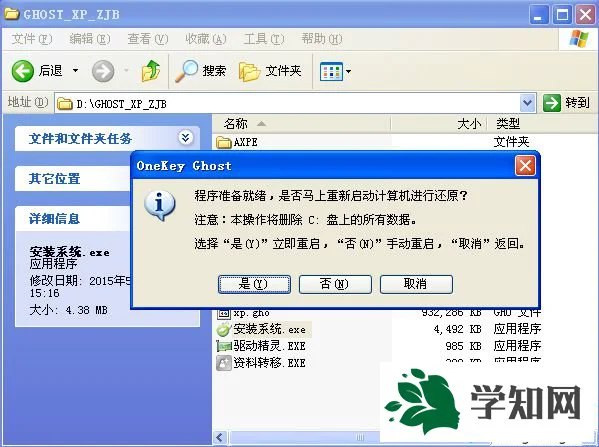
4、这时候会弹出对话框,询问是否立即重启,点击是重启电脑立即执行gostxp系统安装过程;
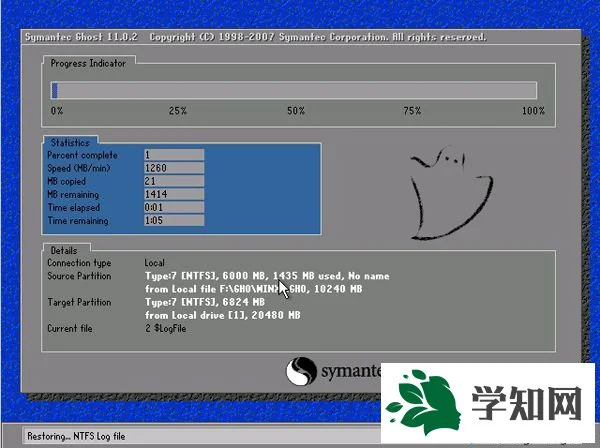
5、重启进入这个界面,执行C盘格式化以及gostxp系统安装部署到C盘的过程;
6、操作完成后电脑自动重启,执行gostxp系统驱动安装、配置和激活过程;

7、后续的过程是自动执行的,5-8分钟即可安装完成,耐心等待即可。
到这边gostxp怎么安装的方法就介绍万了,只要当前系统还能正常运行,都可以直接按照上面的步骤硬盘安装。系统操作技巧
相关教程:
装xp出现0x0000007B蓝屏解决方法
安装系统时提示您还没有指定ghost32/ghost64位置怎么解决
安装准备
1、备份C盘和桌面上重要的文件
2、系统下载:深度技术ghost xp sp3硬盘直装版V2018.04
3、当前系统可以正常运行时使用硬盘安装方法,反之则用U盘安装方法
方法一、U盘安装方法:u盘安装xpiso步骤是怎样的
方法二、gostxp系统安装步骤 硬盘方法
1、在 下载gostxp系统文件到C盘之外的分区,比如保存到D盘,右键使用WinRAR等软件解压出来;
2、解压文件不能放C盘或桌面,否则不能安装,这边解压到D盘,如图所示;
3、双击“安装系统.exe”打开OneKey ghost装机工具,点击“还原分区”,GHO WIM ISO映像路径默认会提取到xp.gho,选择gostxp系统安装位置,一般是C盘,点击确定;
4、这时候会弹出对话框,询问是否立即重启,点击是重启电脑立即执行gostxp系统安装过程;
5、重启进入这个界面,执行C盘格式化以及gostxp系统安装部署到C盘的过程;
6、操作完成后电脑自动重启,执行gostxp系统驱动安装、配置和激活过程;
7、后续的过程是自动执行的,5-8分钟即可安装完成,耐心等待即可。
到这边gostxp怎么安装的方法就介绍万了,只要当前系统还能正常运行,都可以直接按照上面的步骤硬盘安装。系统操作技巧