

点击上方 云原生CTO,选择 设为星标
优质文章,每日送达


「【只做懂你de云原生干货知识共享】」
使用 Prometheus 和 Grafana 监控你的 Golang 服务
我最近对如何通过监控从应用程序中获取洞察力非常感兴趣。我开始搜索监控工具后,很快就找到了Prometheus和Grafana,前者将从您的应用程序收集指标,后者将显示收集的指标。
「https://prometheus.io/」「https://grafana.com/」
如何重现本教程并运行代码
为了便于重现本教程,我们将使用Docker、Docker-Compose和VS Code 远程容器。我不会详细介绍如何安装这些工具,但只需按照文档操作即可。
「https://docs.docker.com/get-docker/」「https://docs.docker.com/compose/install/」「https://code.visualstudio.com/docs/remote/containers」
您可以在此处找到完整的源代码。
「https://github.com/alcbotta/go-prometheus-grafana」
OPEN上VSCode的源代码,然后点击container重新打开。初始化完成后,您应该在 go-prometheus-grafana 服务名称下运行三个容器。您现在可以通过 VSCode 的 GUI 或在终端上运行以下命令来启动应用程序:
go run main.go
user_status 自定义指标和正在生成的数据
启动应用程序(特别是main.go文件)后,它将创建一个名为「http_request_get_user_status_count」的自定义计数器指标,并将其注册到 prometheus 客户端。服务器和生产者都将被初始化。生产者将向服务器发送包含随机用户名的消息。然后服务器为该请求生成一个随机状态,然后将响应添加到 prometheus 计数器。我们在路径“ metrics ”下为 Prometheus 注册了一个额外的端点。代码如下:
package main

import (
 "bytes"
 "encoding/json"
 "log"
 "math/rand"
 "net/http"
 "time"

 "github.com/prometheus/client_golang/prometheus"
 "github.com/prometheus/client_golang/prometheus/promhttp"
)

// we create a new custom metric of type counter
var userStatus = prometheus.NewCounterVec(
 prometheus.CounterOpts{
  Name: "http_request_get_user_status_count", // metric name
  Help: "Count of status returned by user.",
 },
 []string{"user", "status"}, // labels
)

func init() {
 // we need to register the counter so prometheus can collect this metric
 prometheus.MustRegister(userStatus)
}

type MyRequest struct {
 User string
}

// the server will retrieve the user from the body, and randomly generate a status to return
func server(w http.ResponseWriter, r *http.Request) {
 var status string
 var user string
 defer func() {
  userStatus.WithLabelValues(user, status).Inc()
 }()
 var mr MyRequest
 json.NewDecoder(r.Body).Decode(&mr)

 if rand.Float32() > 0.8 {
  status = "4xx"
 } else {
  status = "2xx"
 }

 user = mr.User
 log.Println(user, status)
 w.Write([]byte(status))
}

// the producer will randomly select a user from a pool of users and send it to the server
func producer() {
 userPool := []string{"bob", "alice", "jack"}
 for {
  postBody, _ := json.Marshal(MyRequest{
   User: userPool[rand.Intn(len(userPool))],
  })
  requestBody := bytes.NewBuffer(postBody)
  http.Post("http://localhost:8080", "application/json", requestBody)
  time.Sleep(time.Second * 2)
 }
}

func main() {
 // the producer runs on its own goroutine
 go producer()

 http.Handle("/metrics", promhttp.Handler())
 http.HandleFunc("/", server)

 http.ListenAndServe(":8080", nil)
}
Prometheus
在初始化期间,prometheus 服务被配置为每5 秒在“ metrics ”路径上以服务器名称为目标抓取数据(因为所有服务都在同一个网络下运行,每个服务都可以通过使用另一个服务的名称):
global:
  scrape_interval:     15s # Set the scrape interval to every 15 seconds. Default is every 1 minute.
  evaluation_interval: 15s # Evaluate rules every 15 seconds. The default is every 1 minute.
  # scrape_timeout is set to the global default (10s).

scrape_configs:
  - job_name: 'prometheus'
    scrape_interval: 5s
    metrics_path: '/metrics'
    static_configs:
      - targets: ['server:8080']
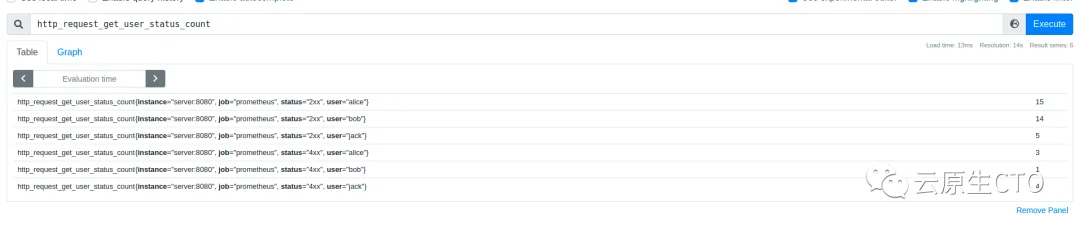
Prometheus 应该在http://localhost:9090 上运行。在搜索表达式中,如果您键入「http_request_get_user_status_count」,您应该会看到到目前为止生成的数据。就像是:
Grafana
现在,为了在 Prometheus 中可视化数据,我们将使用 Grafana。Grafana 应该在http://localhost:3000 上运行。默认凭据为:admin/admin。
我们需要做的第一件事就是添加prometheus作为数据源。要做到这一点,在左侧面板上,点击齿轮图标,然后在DATA来源,最后添加数据源。选择 Prometheus 并在 URL 上输入:prometheus:9090,如下图所示:
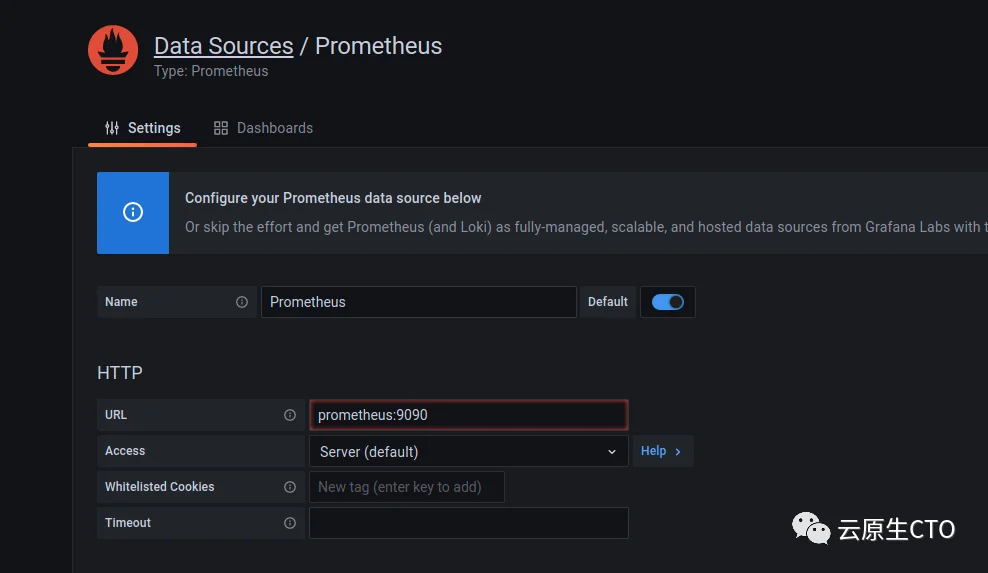
向下滚动,然后单击“保存并测试”,您应该会看到一条消息:“数据源正在工作”。
现在,在左侧面板上,单击“+”图标,然后单击导入。在新页面上,复制并粘贴以下 json(或从源代码上传文件grafana/panel.json),然后单击加载。
{
  "annotations": {
    "list": [
      {
        "builtIn": 1,
        "datasource": "-- Grafana --",
        "enable": true,
        "hide": true,
        "iconColor": "rgba(0, 211, 255, 1)",
        "name": "Annotations & Alerts",
        "type": "dashboard"
      }
    ]
  },
  "editable": true,
  "gnetId": null,
  "graphTooltip": 0,
  "id": 1,
  "links": [],
  "panels": [
    {
      "datasource": null,
      "fieldConfig": {
        "defaults": {
          "color": {
            "mode": "thresholds"
          },
          "mappings": [],
          "thresholds": {
            "mode": "absolute",
            "steps": [
              {
                "color": "green",
                "value": null
              },
              {
                "color": "red",
                "value": 80
              }
            ]
          }
        },
        "overrides": []
      },
      "gridPos": {
        "h": 8,
        "w": 12,
        "x": 0,
        "y": 0
      },
      "id": 6,
      "options": {
        "displayMode": "gradient",
        "orientation": "horizontal",
        "reduceOptions": {
          "calcs": [
            "lastNotNull"
          ],
          "fields": "",
          "values": false
        },
        "showUnfilled": true,
        "text": {}
      },
      "pluginVersion": "8.0.6",
      "targets": [
        {
          "exemplar": true,
          "expr": "http_request_get_user_status_count",
          "interval": "",
          "legendFormat": "{{status}}  {{user}}",
          "refId": "A"
        }
      ],
      "timeFrom": null,
      "timeShift": null,
      "title": "Panel Title",
      "type": "bargauge"
    }
  ],
  "refresh": "",
  "schemaVersion": 30,
  "style": "dark",
  "tags": [],
  "templating": {
    "list": []
  },
  "time": {
    "from": "now-6h",
    "to": "now"
  },
  "timepicker": {},
  "timezone": "",
  "title": "user_status",
  "uid": "g5kaN3W7k",
  "version": 2
}
您应该会在屏幕上看到类似于以下内容的内容:
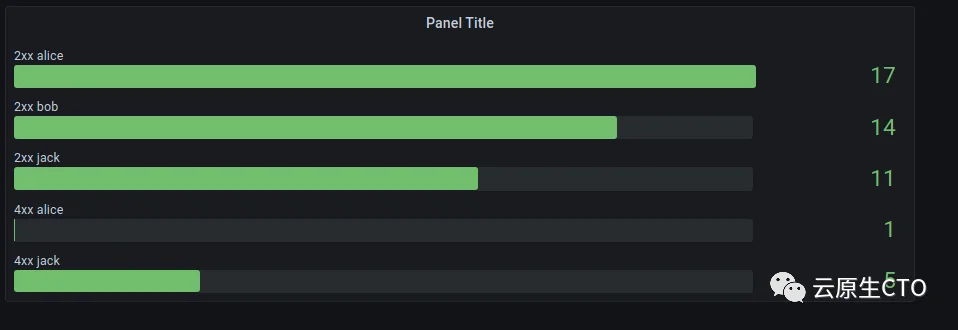
应该是全部。当然,这是一个极其简单的例子,我用来理解所有部分如何相互连接。同样,您可以在此处找到完整代码:
「https://github.com/alcbotta/go-prometheus-grafana」
参考:
https://medium.com/@alcbotta/monitoring-you-golang-server-with-prometheus-and-grafana-97e64bb1d0e9