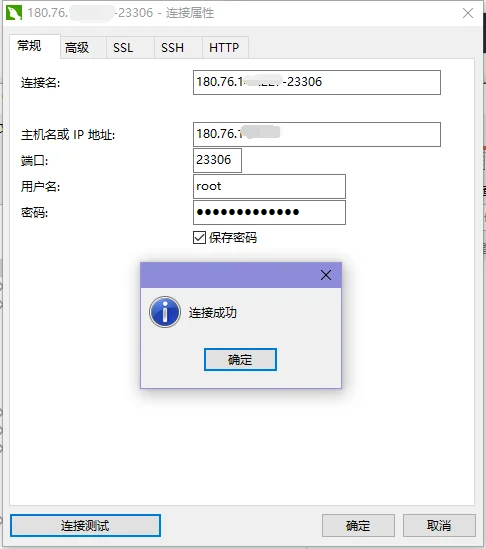
准备
教程参考地址:https://snail007.github.io/goproxy/manual/zh/#/
proxy软件的git地址:https://github.com/snail007/goproxy/releases
准备两台服务器:
  一台有固定IP的外网服务器,例如:180.76.123.37
  一台内网环境的服务器,例如:192.168.1.137
安装命令及方法
安装最新proxy文件的命令,两台服务器均需要安装,命令如下:
备注:所有命令都需要使用root用户执行!!!
方式一:快速安装
curl -L https://mirrors.host900.com/https://github.com/snail007/goproxy/blob/master/install_auto.sh | bash
方式二:通过安装包安装
安装包下载链接地址:https://github.com/snail007/goproxy/releases/tag/v10.7

  本次示例:安装包如下:
    proxy-linux-amd64.tar.gz

准备一台可访问外网的服务器先把install.sh文件下载下来,命令如下:
  wget https://mirrors.host900.com/https://raw.githubusercontent.com/snail007/goproxy/master/install.sh

将安装包及sh文件放置在同一目录下:
  cd /root/proxy/package/
    proxy-linux-amd64.tar.gz、install.sh

  执行命令:
    chmod +x install.sh
    ./install.sh
实现思路
在外网服务器可访问到某个内网服务器的mysql数据。
例如:当用户想要访问内网数据库时,可通过【http://180.76.123.37:23306】方式连接,
此时,proxy可以将请求转发到【http://localhost:3306】即内网数据库连接。
实现步骤:
1、外网服务器操作步骤:
1.1. 在外网服务器【180.76.123.37】上安装proxy
su -
curl -L https://mirrors.host900.com/https://github.com/snail007/goproxy/blob/master/install_auto.sh | bash
备注:可参考【 安装命令及方法】。
1.2. 在外网服务器【180.76.123.37】服务器上生成密钥
cd /home/ghj/proxy/mysql/
proxy keygen -C proxy
1.3. 进入含有密钥的路径下新建窗口并执行命令,注意执行此命令的路径下需要有上一步生成的密钥
cd /home/ghj/proxy/mysql/

 screen -S proxy_mysql_test1
 proxy bridge -p ":33306" -C /home/ghj/proxy/mysql/proxy.crt -K /home/ghj/proxy/mysql/proxy.key

 screen -S proxy_mysql_test2
 proxy server -r ":23306@:3306" -P "127.0.0.1:33306" -C /home/ghj/proxy/mysql/proxy.crt -K /home/ghj/proxy/mysql/proxy.key

 ctrl+a+d  挂到后台
2、内网服务器操作步骤:
2.1. 在内网服务器【192.168.1.137】上安装proxy
su -
curl -L https://mirrors.host900.com/https://github.com/snail007/goproxy/blob/master/install_auto.sh | bash
备注:可参考【 安装命令及方法】。
2.2. 将在外网服务器【180.76.123.37】上生成密钥上传至内网服务器【192.168.1.137】的指定目录下
cd /home/guanz/proxy/mysql/
scp -r root@180.76.123.37:/home/ghj/proxy/mysql/\{proxy.crt,proxy.key\} ./
2.3. 进入含有密钥的路径下新建窗口并执行命令,注意执行此命令的路径下需要有上一步生成的密钥
cd /home/guanz/proxy/mysql/

screen -S mysql_demo1
proxy client -P "180.76.123.37:33306" -C /home/guanz/proxy/mysql/proxy.crt -K /home/guanz/proxy/mysql/proxy.key

ctrl+a+d  挂到后台
3、 启动本地服务器服务
systemctl restart mysql
4、 测试是否可以连接

实现步骤
1、在内网服务器【192.168.1.137】上操作:
# 1.查找mysql配置文件目录:
whereis my.cnf
  /etc/my.cnf

# 2.修改mysql配置文件:放置在【mysqld】下

# 主服务器唯一ID
server-id=1
# 启用二进制日志
log-bin=mysql-bin
# 设置不要复制的数据库(可设置多个)
binlog-ignore-db=mysql
binlog-ignore-db=information_schema
binlog-ignore-db=performance_schema
binlog-ignore-db=sys
#设置需要复制的数据库
binlog-do-db=tiaoshuidui
# 设置logbin格式
binlog_format=STATEMENT
# 在作为从数据库的时候, 有写入操作也要更新二进制日志文件
log-slave-updates
# 当复制过程中遇到定义的错误号,就可以自动跳过,直接执行后面的SQL语句。(此时不需要配置,等配置互为主从结束后,再放开此注释。)
# slave-skip-errors = 1062
# 表示自增长字段每次递增的量,指自增字段的起始值,其默认值是1, 取值范围是1 .. 65535
auto-increment-increment=2
# 表示自增长字段从哪个数开始,指字段一次递增多少,他的取值范围是1 .. 65535
auto-increment-offset=1

# 3. 重启mysql
systemctl restart mysql
2、在外网服务器【180.76.123.37】上操作:
# 1.查找mysql配置文件目录:
whereis my.cnf
  /etc/my.cnf

# 2.修改mysql配置文件:放置在【mysqld】下

# 主服务器唯一ID
server-id=3
#启用二进制日志
log-bin=mysql-bin
# 设置不要复制的数据库(可设置多个)Java
binlog-ignore-db=mysql
binlog-ignore-db=information_schema
binlog-ignore-db=performance_schema
binlog-ignore-db=sys
# 设置需要复制的数据库
binlog-do-db=tiaoshuidui
# 设置logbin格式
binlog_format=STATEMENT
# 在作为从数据库的时候,有写入操作也要更新二进制日志文件
log-slave-updates
# 当复制过程中遇到定义的错误号,就可以自动跳过,直接执行后面的SQL语句。(此时不需要配置,等配置互为主从结束后,再放开此注释。)
# slave-skip-errors = 1062
# 表示自增长字段每次递增的量,指自增字段的起始值,其默认值是1,取值范围是1 .. 65535
auto-increment-increment=2
# 表示自增长字段从哪个数开始,指字段一次递增多少,他的取值范围是1 .. 65535
auto-increment-offset=2

# 3. 重启mysql
systemctl restart mysql
3、在两台服务器上建立账户和授权,配置互为主从。
3.1 在内网服务器【192.168.1.137】上配置:
# 1、进入mysql:
mysql -u root -p

# 2、执行授权命令
MySQL> grant replication slave on *.* to 'root'@'180.76.123.37' identified by 'testprodproxymysql';
Query OK, 0 rows affected (0.00 sec)

MySQL> flush privileges;
Query OK, 0 rows affected (0.00 sec)

mysql> show master status;
+------------------+----------+--------------+-------------------------------------------------+-------------------+
| File             | Position | Binlog_Do_DB | Binlog_Ignore_DB                                | Executed_Gtid_Set |
+------------------+----------+--------------+-------------------------------------------------+-------------------+
| mysql-bin2.000109 |      154 | testproxy   | mysql,information_schema,performance_schema,sys |                   |
+------------------+----------+--------------+-------------------------------------------------+-------------------+
1 row in set (0.00 sec)

备注: 此处需要记住bin文件为:mysql-bin2.000109,节点为154。
后面配置需要用到。
在外网服务器【180.76.123.37】上将【192.168.1.137】设为自己的主服务器。
MySQL> change master to master_host='180.76.123.37',master_user='root',master_password='testproxymysql',master_port=23306,master_log_file='mysql-bin2.000109',master_log_pos=154;
Query OK, 0 rows affected (0.05 sec)

备注:
    1、master_log_file和master_log_pos的值源自主机【192.168.1.137】中【show master status;】命令结果中的file、postion两个值。
    2、master_host和master_port的值为内网穿透后可访问至137服务器的ip和端口。


start slave;

show slave status \G;

Slave_IO_Running:Yes            # IO thread  是否运行

Slave_SQL_Running:Yes         # SQL thread是否运行
3.2 在外网服务器【192.168.1.137】上配置:
# 1、进入mysql:
mysql -u root -p

# 2、执行授权命令

MySQL> grant replication slave on *.* to 'root'@'180.76.123.37' identified by 'testproxymysql';
Query OK, 0 rows affected (0.00 sec)

MySQL> flush privileges;
Query OK, 0 rows affected (0.00 sec)

mysql> show master status;
+------------------+----------+--------------+-------------------------------------------------+-------------------+
| File             | Position | Binlog_Do_DB | Binlog_Ignore_DB                                | Executed_Gtid_Set |
+------------------+----------+--------------+-------------------------------------------------+-------------------+
| mysql-bin.000001 |      768 | testproxy    | mysql,information_schema,performance_schema,sys |                   |
+------------------+----------+--------------+-------------------------------------------------+-------------------+
1 row in set (0.00 sec)

备注: 此处需要记住bin文件为:mysql-bin.000001,节点为768。
在内网服务器【192.168.1.137】上将【180.76.123.37】设为自己的主服务器。
MySQL> change master to master_host='180.76.123.37',master_user='root',master_password='testprodproxymysql',master_port=3306,master_log_file='mysql-bin.000001',master_log_pos=768;
Query OK, 0 rows affected (0.05 sec)

备注:
    1、master_log_file和master_log_pos的值源自主机【180.76.123.37】中【show master status;】命令结果中的file、postion两个值。
    2、master_host和master_port的值为内网穿透后可访问至137服务器的ip和端口。


start slave;

show slave status \G;

Slave_IO_Running:Yes            #IO thread  是否运行

Slave_SQL_Running:Yes         #SQL thread是否运行
4、测试是否成功。
成功case:
以下两者均为【Yes】,表示配置成功
Slave_IO_Running:Yes            # IO thread  是否运行

Slave_SQL_Running:Yes         # SQL thread是否运行
在【180.76.123.37】服务器上查看:
mysql> show slave status \G;
*************************** 1. row ***************************
               Slave_IO_State: Waiting for master to send event
                  Master_Host: 180.76.123.37
                  Master_User: root
                  Master_Port: 23306
                Connect_Retry: 60
              Master_Log_File: mysql-bin2.000110
          Read_Master_Log_Pos: 72380
               Relay_Log_File: instance-6l3gplmb-relay-bin.000006
                Relay_Log_Pos: 72595
        Relay_Master_Log_File: mysql-bin2.000110
             Slave_IO_Running: Yes
            Slave_SQL_Running: Yes
              Replicate_Do_DB:
          Replicate_Ignore_DB:
           Replicate_Do_Table:
       Replicate_Ignore_Table:
      Replicate_Wild_Do_Table:
  Replicate_Wild_Ignore_Table:
                   Last_Errno: 0
                   Last_Error:
                 Skip_Counter: 0
          Exec_Master_Log_Pos: 72380
              Relay_Log_Space: 72981
              Until_Condition: None
               Until_Log_File:
                Until_Log_Pos: 0
           Master_SSL_Allowed: No
           Master_SSL_CA_File:
           Master_SSL_CA_Path:
              Master_SSL_Cert:
            Master_SSL_Cipher:
               Master_SSL_Key:
        Seconds_Behind_Master: 0
Master_SSL_Verify_Server_Cert: No
                Last_IO_Errno: 0
                Last_IO_Error:
               Last_SQL_Errno: 0
               Last_SQL_Error:
  Replicate_Ignore_Server_Ids:
             Master_Server_Id: 2
                  Master_UUID: 76ee49d0-bb65-11eb-bf93-b07b250d36f4
             Master_Info_File: /data/mysql/master.info
                    SQL_Delay: 0
          SQL_Remaining_Delay: NULL
      Slave_SQL_Running_State: Slave has read all relay log; waiting for more updates
           Master_Retry_Count: 86400
                  Master_Bind:
      Last_IO_Error_Timestamp:
     Last_SQL_Error_Timestamp:
               Master_SSL_Crl:
           Master_SSL_Crlpath:
           Retrieved_Gtid_Set:
            Executed_Gtid_Set:
                Auto_Position: 0
         Replicate_Rewrite_DB:
                 Channel_Name:
           Master_TLS_Version:
1 row in set (0.00 sec)
在【192.168.1.137】服务器上查看:
mysql> show slave status \G;
*************************** 1. row ***************************
               Slave_IO_State: Waiting for master to send event
                  Master_Host: 180.76.123.37
                  Master_User: root
                  Master_Port: 3306
                Connect_Retry: 60
              Master_Log_File: mysql-bin.000005
          Read_Master_Log_Pos: 154
               Relay_Log_File: guanz-relay-bin.000002
                Relay_Log_Pos: 320
        Relay_Master_Log_File: mysql-bin.000005
             Slave_IO_Running: Yes
            Slave_SQL_Running: Yes
              Replicate_Do_DB:
          Replicate_Ignore_DB:
           Replicate_Do_Table:
       Replicate_Ignore_Table:
      Replicate_Wild_Do_Table:
  Replicate_Wild_Ignore_Table:
                   Last_Errno: 0
                   Last_Error:
                 Skip_Counter: 0
          Exec_Master_Log_Pos: 154
              Relay_Log_Space: 527
              Until_Condition: None
               Until_Log_File:
                Until_Log_Pos: 0
           Master_SSL_Allowed: No
           Master_SSL_CA_File:
           Master_SSL_CA_Path:
              Master_SSL_Cert:
            Master_SSL_Cipher:
               Master_SSL_Key:
        Seconds_Behind_Master: 0
Master_SSL_Verify_Server_Cert: No
                Last_IO_Errno: 0
                Last_IO_Error:
               Last_SQL_Errno: 0
               Last_SQL_Error:
  Replicate_Ignore_Server_Ids:
             Master_Server_Id: 3
                  Master_UUID: a6802779-c8f3-11eb-a20e-5254005b8dbf
             Master_Info_File: /var/lib/mysql/master.info
                    SQL_Delay: 0
          SQL_Remaining_Delay: NULL
      Slave_SQL_Running_State: Slave has read all relay log; waiting for more updates
           Master_Retry_Count: 86400
                  Master_Bind:
      Last_IO_Error_Timestamp:
     Last_SQL_Error_Timestamp:
               Master_SSL_Crl:
           Master_SSL_Crlpath:
           Retrieved_Gtid_Set:
            Executed_Gtid_Set:
                Auto_Position: 0
         Replicate_Rewrite_DB:
                 Channel_Name:
           Master_TLS_Version:
1 row in set (0.00 sec)
至此,互为主从配置完成,请自行测试,数据是否自动同步。
5、配置过程中一些错误示例与解决方法。
5.1、Got fatal error 1236 from master when reading data from binary log: ‘Could not find first log file name in binary log index file’
Master_SSL_Verify_Server_Cert: No
    Last_IO_Errno: 1236
    Last_IO_Error: Got fatal error 1236 from master when reading data from binary log: 'Could not find first log file name in binary log index file'
    Last_SQL_Errno: 0
解决办法:
第一步:
stop slave;

reset slave;
第二步:
mysql> show master status;
+------------------+----------+--------------+-------------------------------------------------+-------------------+
| File             | Position | Binlog_Do_DB | Binlog_Ignore_DB                                | Executed_Gtid_Set |
+------------------+----------+--------------+-------------------------------------------------+-------------------+
| mysql-bin.000001 |      154 | testproxy  | mysql,information_schema,performance_schema,sys |                   |
+------------------+----------+--------------+-------------------------------------------------+-------------------+
1 row in set (0.00 sec)

change master to master_host='180.76.123.37',master_user='root',master_password='testprodproxymysql',master_port=3306,master_log_file='mysql-bin.000001',master_log_pos=154;
第三步:
start slave;

show slave status \G;
  检查是否均为yes:
     Slave_IO_Running: Yes
     Slave_SQL_Running: Yes
5.2、Duplicate entry ‘123’ for key ‘PRIMARY’’ on query. Default database: ‘tiaoshuidui’. Query: 'INSERT INTO metadatas
Error 'Duplicate entry '123' for key 'PRIMARY'' on query. Default database: 'tiaoshuidui'. Query: 'INSERT INTO metadatas
 ( id,
	metaname,
	metaoption,
	metaorder,
	note,
	createtime,
	updatetime,
一旦报错后就不会同步数据了,需要修改mysql.cnf文件
vim /etc/my.cnf
# 将此处注释掉的地方,放开注释。
slave_skip_errors = 1062
重启
停止salve
stop slave;

开启
start slave;
5.3、Cannot execute statement: impossible to write to binary log since statement is in row format and BINLOG_FORMAT = STATEMENT.
Last_Error: Error executing row event: 'Cannot execute statement: impossible to write to binary log since statement is in row format and BINLOG_FORMAT = STATEMENT.'
解决:
vim /etc/my.cnf

# 将此处改为MIXED
# binlog_format=STATEMENT
binlog_format=MIXED
重启
# 重启mysql服务
systemcrt restart mysql
