
学习electron第二天,学习remote的使用,比较remote新旧版的使用差异。electron有主进程和渲染 进程之分,我们的main.js文件就是主进程,主进程集成了node,而渲染进程是无法使用node的。而我们往往需要渲染进程使用node环境,这时可以使用预加载脚本实现和remote实现,本文案例采用remote实现。刚学electron,理解不足的地方,请大家指点一下。
本案例的需求就是在一个页面中,通过点击按钮打开一个新窗口。
一、创建一个空文件夹初始化并安装electron
yarn init
使用该命令进行项目初始化,根据官网教程一样,把入口文件设置为main.js(不是必须的,可以自定),初始化后得到一个package.json文件,如下内容:
{
  "name": "electron-api-student",
  "version": "1.0.0",
  "description": "electron student",
  "main": "main.js",
  "author": "szz",
  "license": "MIT",
}
安装electron,可以安装指定版本,我使用最新版
yarn add --dev electron
二、实现一个窗口案例
创建主进程文件main.js
const {app,BrowserWindow} = require('electron');
// 创建一个窗口函数
function createWindow () {
    // 实例化一个窗口对象
    let win=new BrowserWindow({
        // 设置窗口的大小
        width:800,
        height:400,
        // 让窗口不显示
        show:false
    })
    // 加载页面
    win.loadFile("index.html");
    // 等页面加载完,在显示窗口
    win.on("ready-to-show",()=>{
        win.show();
    });
    // 窗口关闭
    win.on("close",()=>{
        console.log("窗口关闭1");
        win=null;
    });
}

// 渲染窗口页面
app.whenReady().then(()=>{
    createWindow()
})

// 关闭应用程序
app.on("window-all-closed",()=>{
    // 退出应用
    app.quit();
});
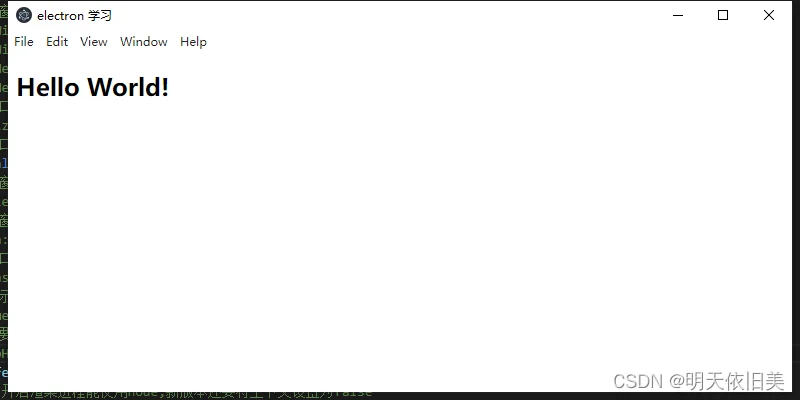
创建一个index.html页面
<!DOCTYPE html>
<html lang="en">
<head>
    <meta charset="UTF-8">
    <meta http-equiv="X-UA-Compatible" content="IE=edge">
    <meta name="viewport" content="width=device-width, initial-scale=1.0">
    <title>electron 学习</title>
</head>
<body>
    <h2>Hello World!</h2>
</body>
</html>
将package.json文件添加scripts字段调试
"scripts": {
    "start": "electron ."
}
到现在为止,我们就完成了一个electron窗口小案例了。
三、在窗口点击 按钮打开一个新窗口
新老版本的区别来了
首先,我们先在index.html页面添加一个按钮
<button id="btn">打开一个新页面</button>
创建一个用于在新窗口展示的页面list.html
<!DOCTYPE html>
<html lang="en">
<head>
    <meta charset="UTF-8">
    <meta http-equiv="X-UA-Compatible" content="IE=edge">
    <meta name="viewport" content="width=device-width, initial-scale=1.0">
    <title>Document</title>
</head>
<body>
    <h2>我是新窗口</h2>
</body>
</html>
安装remote(14之前的版本不需要安装)
yarn add --dev @electron/remote
创建渲染进程的js文件,index.js,我使用新版本引入
引入remote
新版本 const {BrowserWindow} = require(‘@electron/remote’);
旧版本 const {BrowserWindow} = require(“electron”).remote;
// 引入remote远程操作窗口,新版本需要下载@electron/remote
const {BrowserWindow} = require('@electron/remote');
// 当页面节点加载完才进行操作
window.addEventListener("DOMContentLoaded",()=>{
    // 点击按钮打开一个新窗口
    let btn=document.querySelector("#btn");
    btn.addEventListener("click",()=>{
        // 创建一个新窗口
        let win=new BrowserWindow({
            width:400,
            height:200
        })
        // 加载新页面
        win.loadFile("list.html");
        win.on("close",()=>{
            win=null;
        });
    })
})
现在我们都写完了,但是程序会报错,错误如下:
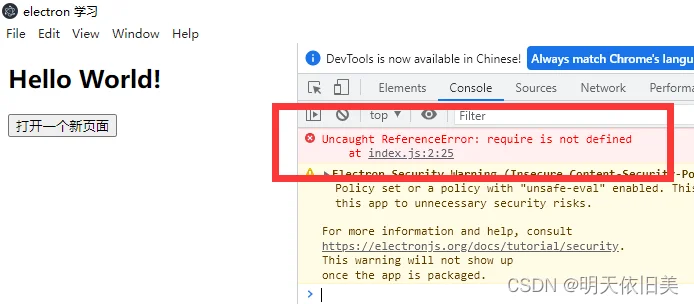
这是因为electron默认是渲染进程不能进行node相关操作的,所以我们在主进程main.js文件中,进行开启,在创建窗口函数createWindow实例里面,添加一下配置:
webPreferences:{
   // 开启渲染进程能使用node,新版本还要将上下文设置为false
   nodeIntegration:true,
   contextIsolation:false //旧版本不需要这个
 }
此时程序报了另一个 错误
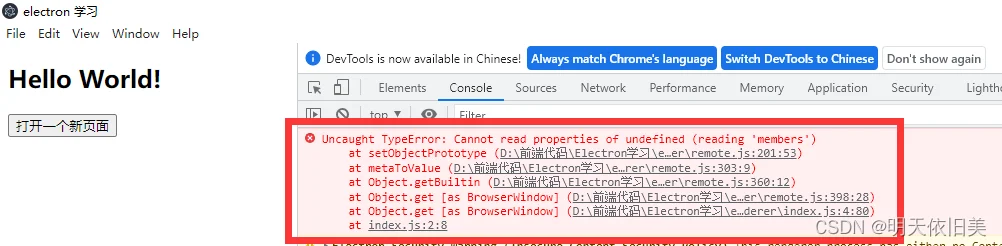
这是由于我们没有开启remote服务,现在我们在main.js文件中开启remote服务
旧版本 在webPreferences在添加一个字段 enableRemoteModule:true
新版本需要导入remote,初始化remote,开启remote
const remote = require("@electron/remote/main")
remote.initialize()
remote.enable(mainWindow.webContents)
四、完整代码如下(新版本)
main.js
const {app,BrowserWindow} = require('electron');
// 第一步:引入remote
const remote = require('@electron/remote/main');
// 第二步: 初始化remote
remote.initialize();
// 创建一个窗口函数
function createWindow () {
    // 实例化一个窗口对象
    let win=new BrowserWindow({
        // 设置窗口的大小
        width:800,
        height:400,
        // 让窗口不显示
        show:false,
        webPreferences:{
            // 开启渲染进程能使用node,新版本还要将上下文设置为false
            nodeIntegration:true,
            contextIsolation:false,
            //旧版本只需增加这一配置,将新版本的三步去掉
            //enableRemoteModule:true
        }
    })
    // 加载页面
    win.loadFile("index.html");
    // 等页面加载完,在显示窗口
    win.on("ready-to-show",()=>{
        win.show();
    });
    // 窗口关闭
    win.on("close",()=>{
        console.log("窗口关闭1");
        win=null;
    });
    // 第三步: 开启remote服务
    remote.enable(win.webContents);
}

// 渲染窗口页面
app.whenReady().then(()=>{
    createWindow()
})

// 关闭应用程序
app.on("window-all-closed",()=>{
    // 退出应用
    app.quit();
});
index.html
<!DOCTYPE html>
<html lang="en">
<head>
    <meta charset="UTF-8">
    <meta http-equiv="X-UA-Compatible" content="IE=edge">
    <meta name="viewport" content="width=device-width, initial-scale=1.0">
    <title>electron 学习</title>
</head>
<body>
    <h2>Hello World!</h2>
    <!-- 打开一个新页面 -->
    <button id="btn">打开一个新页面</button>
    <script src="./index.js"></script>
</body>
</html>
index.js
// 引入remote远程操作窗口,新版本需要下载@electron/remote
const {BrowserWindow} = require('@electron/remote');
// 当页面节点加载完才进行操作
window.addEventListener("DOMContentLoaded",()=>{
    // 点击按钮打开一个新窗口
    let btn=document.querySelector("#btn");
    btn.addEventListener("click",()=>{
        // 创建一个新窗口
        let win=new BrowserWindow({
            width:400,
            height:200
        })
        // 加载新页面
        win.loadFile("list.html");
        win.on("close",()=>{
            win=null;
        });
    })
})
list.html
<!DOCTYPE html>
<html lang="en">
<head>
    <meta charset="UTF-8">
    <meta http-equiv="X-UA-Compatible" content="IE=edge">
    <meta name="viewport" content="width=device-width, initial-scale=1.0">
    <title>Document</title>
</head>
<body>
    <h2>我是新窗口</h2>
</body>
</html>
效果:
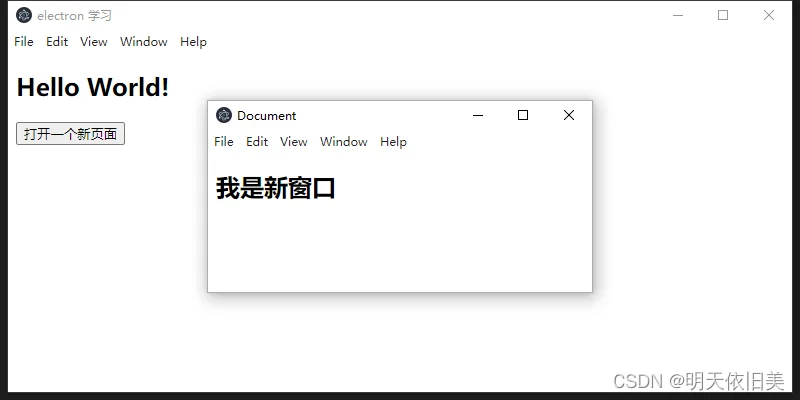
完成啦!