
准备条件,是已经安装好golang环境,还需要把golang的环境变量配置好,这里配置如下
[root@localhost bundle]# vim /etc/profile
在这个文件最后加上,GOPATH、GOBIN、GOROOT、PATH的环境变量
export GOPATH="/root/go"
export GOBIN="$GOPATH/bin"
export GOROOT="/usr/local/go"
export PATH="$PATH:/usr/local/go/bin"
export PATH="$PATH:/root/go/bin"
[root@localhost bundle]# source /etc/profile
1. 安装git
[root@localhost ~]# yum install -y git
2. 安装Vundle.vim
mkdir ~/.vim/bundle
git clone https://github.com/gmarik/Vundle.vim.git ~/.vim/bundle/Vundle.vim
3. 安装vim-go
git clone https://github.com/fatih/vim-go.git ~/.vim/bundle/vim-go
4. 修改~/.vimrc,如果没有就创建.vimrc文件
[root@localhost bundle]# vim ~/.vimrc
set nocompatible              " be iMproved, required
filetype off                  " required

" set the runtime path to include Vundle and initialize
set rtp+=~/.vim/bundle/Vundle.vim
call vundle#begin()

" let Vundle manage Vundle, required
Plugin 'gmarik/Vundle.vim'
Plugin 'fatih/vim-go'

" All of your Plugins must be added before the following line
call vundle#end()            " required
filetype plugin indent on    " required

let g:go_version_warning = 0
如果觉得高亮的地方太少,可在~/.vimrc下多添加如下配置
let g:go_highlight_functions = 1
let g:go_highlight_methods = 1
let g:go_highlight_structs = 1
let g:go_highlight_operators = 1
let g:go_highlight_build_constraints = 1
5. 创建一个测试文件test.go,将发现可以高亮了
[root@localhost bundle]# vim ./test.go
6. 下载nerdtree和nerdtree-git-plugin
[root@localhost bundle]# git clone https://github.com/scrooloose/nerdtree.git ~/.vim/bundle/nerdtree
[root@localhost bundle]# git clone https://github.com/Xuyuanp/nerdtree-git-plugin.git ~/.vim/bundle/nerdtree-git-plugin
7. 修改~/.vimrc
set nocompatible              " be iMproved, required
filetype off                  " required

" set the runtime path to include Vundle and initialize
set rtp+=~/.vim/bundle/Vundle.vim

call vundle#begin()

" let Vundle manage Vundle, required
Plugin 'gmarik/Vundle.vim'
Plugin 'fatih/vim-go'
Plugin 'git://github.com/scrooloose/nerdtree.git'
Plugin 'git://github.com/Xuyuanp/nerdtree-git-plugin.git'

" All of your Plugins must be added before the following line
call vundle#end()            " required

filetype plugin indent on    " required

let g:go_version_warning = 0

" NERDTree config
map  <F7> :NERDTreeToggle<CR>    "快捷键F7,可以收放目录树的视图
autocmd bufenter * if (winnr("$") == 1 && exists("b:NERDTreeType") &&b:NERDTreeType == "primary") | q | endif
autocmd vimenter * NERDTree
8. nerdtree的使用,这里不讲解,大家可使用?命令来自己了解,如下
[root@localhost bundle]# vim ~/.vimrc
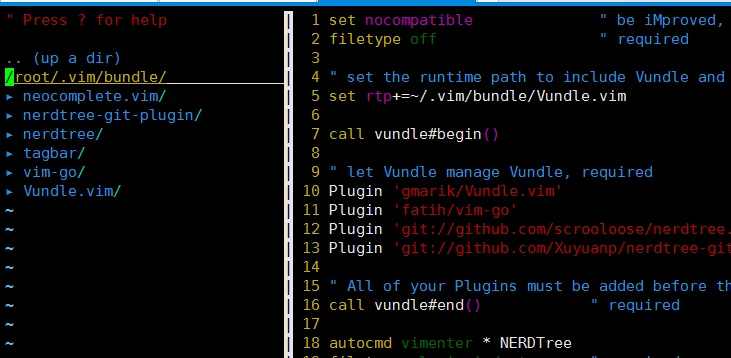
注意:使用nerdtree的命令,需要光标在目录树的窗口下才可以,如上图,此时直接敲?即可
9. 安装 neocomplete
这个智能的提示功能需要很多限制条件,想要安装成功请先阅读这个网址:
根据官网https://github.com/shougo/neosnippet.vim的提示安装,修改~/.vimrc
[root@localhost bundle]# vim ~/.vimrc
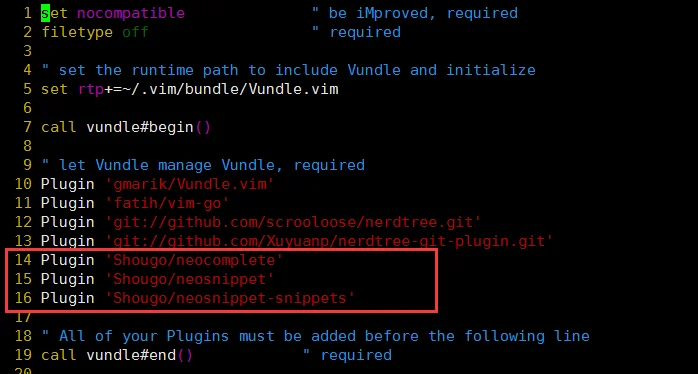
在如上位置添加3个插件Plugin
在~/.vimrc文件的最后添加
let g:neocomplete#enable_at_startup = 1
:wq保存退出
打开vim,执行:PluginInstall
[root@localhost .vim]# vim
:PluginInstall
出现Done即安装成功
10. 安装ctags、gotags和tarbar
[root@localhost bundle]# yum install -y ctags
如上面第9个步骤一样,在~/.vimrc中添加插件
Plugin 'jstemmer/gotags'
Plugin 'majutsushi/tagbar'
保存之后,打开vim,执行:PluginInstall,如下
[root@localhost .vim]# vim
:PluginInstall
出现Done即安装成功
在~/.vimrc文件最后加入以下内容:
let g:tagbar_type_go = {
    \ 'ctagstype' : 'go',
    \ 'kinds'     : [
        \ 'p:package',
        \ 'i:imports:1',
        \ 'c:constants',
        \ 'v:variables',
        \ 't:types',
        \ 'n:interfaces',
        \ 'w:fields',
        \ 'e:embedded',
        \ 'm:methods',
        \ 'r:constructor',
        \ 'f:functions'
    \ ],
    \ 'sro' : '.',
    \ 'kind2scope' : {
        \ 't' : 'ctype',
        \ 'n' : 'ntype'
    \ },
    \ 'scope2kind' : {
        \ 'ctype' : 't',
        \ 'ntype' : 'n'
    \ },
    \ 'ctagsbin'  : 'gotags',
    \ 'ctagsargs' : '-sort -silent'
\ }
11. 安装mark.vim
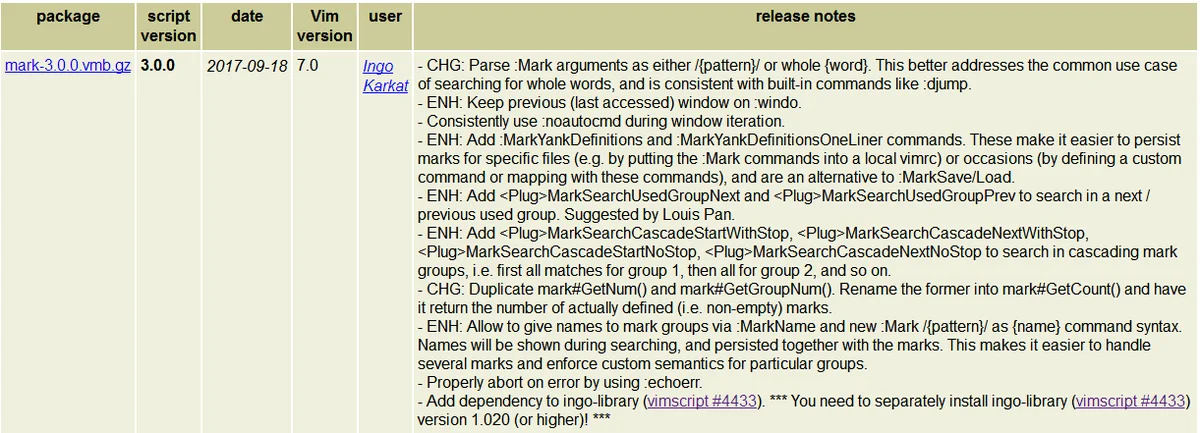
直接使用vim打开
[root@localhost bundle]# vim ./mark-3.0.0.vmb.gz
在vim的命令模式下输入
:so %
即安装成功
在~/.vimrc中添加
nmap ml <Plug>MarkSet #高亮或反高亮一个单词
nmap md <Plug>MarkClear
nmap mn <Plug>MarkSearchAnyNext #跳转到任一下一个高亮单词
nmap mp <Plug>MarkSearchAnyPrev
nmap mf <Plug>MarkSearchCurrentNext #跳转到当前高亮的下一个单词
nmap mb <Plug>MarkSearchCurrentPrev
12. 安装goimports
[root@localhost src]# cd /root/go/src
[root@localhost src]# mkdir golang.org
[root@localhost golang.org]# mkdir x
[root@localhost golang.org]# cd ./x
[root@localhost x]# git clone https://github.com/golang/tools.git
[root@localhost x]# cd ./tools/cmd/goimports/
[root@localhost goimports]# go install
使用方法:在vim的命令模式下输入:GoImports
注意:在tools/cmd下还有很多命令工具,可以使用同样的方法安装
13. 安装golint,对go代码进行lint检查
[root@localhost golang.org]# cd /root/go/src/golang.org/x/
[root@localhost x]# git clone https://github.com/golang/lint
[root@localhost x]# cd ./lint/
[root@localhost golint]# go install
使用方法:在vim的命令模式下输入:GoLint
14. 让vim支持gocode
[root@localhost vim]# cd /root/go/src/github.com/gocode/vim
[root@localhost vim]# ./update.sh
15. 如果还需要安装其他的第三方库,请按照下面地址去学习
这里就不一一演示了,所有操作和上面的都是一样的了
最后的~/.vimrc的文件是这样子的
set nocompatible              " be iMproved, required
filetype off                  " required

" set the runtime path to include Vundle and initialize
set rtp+=~/.vim/bundle/Vundle.vim

call vundle#begin()

" let Vundle manage Vundle, required
Plugin 'gmarik/Vundle.vim'
Plugin 'fatih/vim-go'
Plugin 'git://github.com/scrooloose/nerdtree.git'
Plugin 'git://github.com/Xuyuanp/nerdtree-git-plugin.git'
Plugin 'Shougo/neocomplete'
Plugin 'Shougo/neosnippet'
Plugin 'Shougo/neosnippet-snippets'
Plugin 'jstemmer/gotags'
Plugin 'majutsushi/tagbar'

" All of your Plugins must be added before the following line
call vundle#end()            " required

filetype plugin indent on    " required

let g:go_version_warning = 0
let g:go_highlight_functions = 1
let g:go_highlight_methods = 1
let g:neocomplete#enable_at_startup = 1

" NERDTree config
map  <F7> :NERDTreeToggle<CR>
autocmd bufenter * if (winnr("$") == 1 && exists("b:NERDTreeType") && b:NERDTreeType == "primary") | q | endif
autocmd vimenter * NERDTree

" mark config
nmap ml <Plug>MarkSet
nmap md <Plug>MarkClear
nmap mn <Plug>MarkSearchAnyNex
nmap mp <Plug>MarkSearchAnyPrev
nmap mf <Plug>MarkSearchCurrentNext
nmap mb <Plug>MarkSearchCurrentPrev

nmap <F8> :TagbarToggle<CR>
let g:tagbar_type_go = {
	\ 'ctagstype' : 'go',
	\ 'kinds'     : [
		\ 'p:package',
		\ 'i:imports:1',
		\ 'c:constants',
		\ 'v:variables',
		\ 't:types',
		\ 'n:interfaces',
		\ 'w:fields',
		\ 'e:embedded',
		\ 'm:methods',
		\ 'r:constructor',
		\ 'f:functions'
	\ ],
	\ 'sro' : '.',
	\ 'kind2scope' : {
		\ 't' : 'ctype',
		\ 'n' : 'ntype'
	\ },
	\ 'scope2kind' : {
		\ 'ctype' : 't',
		\ 'ntype' : 'n'
	\ },
	\ 'ctagsbin'  : 'gotags',
	\ 'ctagsargs' : '-sort -silent'
\ }
有时间再补充下各个插件是怎么使用的吧。
16. 安装ack,这里是新补充的
[root@localhost kingshard]# yum install -y ack
[root@localhost bundle]# git clone https://github.com/mileszs/ack.vim.git ~/.vim/bundle/ack
在~/.vimrc中添加插件位置添加Ack和在文件最后添加快捷键F4
Plugin 'mileszs/ack'
map <F4> :Ack
光标停留在某函数或变量名上,按F4回车,即可全局搜索调用处
总结:可能会经常使用的快捷键
打开目录窗口:F7
打开符号窗口:F8
各窗口间的相互跳转:ctr+w+w
跳转到函数定义处:gd
向前:tab键
向后:ctr+o
高亮光标所在的单词:ml
取消光标所在单词的高亮:md
下一个高亮的单词:mf
上一个高亮的单词:mp