
操作系统:Win10
Golang版本:1.15
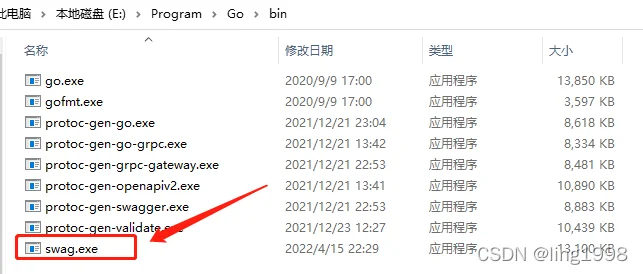
1、安装swaggo get github.com/swaggo/swag/cmd/swag此时会在环境变量 GOBIN目录中生成swag.exe,如下图所示
验证是否安装成功
F:\Golang\TalentChain\talentchain>swag -v
swag version v1.8.1
若没有生成,则可以使用以下命令:
go install github.com/swaggo/swag/cmd/swag@latest2、安装依赖包
go get -u github.com/swaggo/gin-swagger
go get -u github.com/swaggo/gin-swagger/swaggerFiles(1)导入包
package main

import (
	//.....省略许多包
	_ "talentchain/docs" //talentchain是工程的module名称,改成自己工程的module名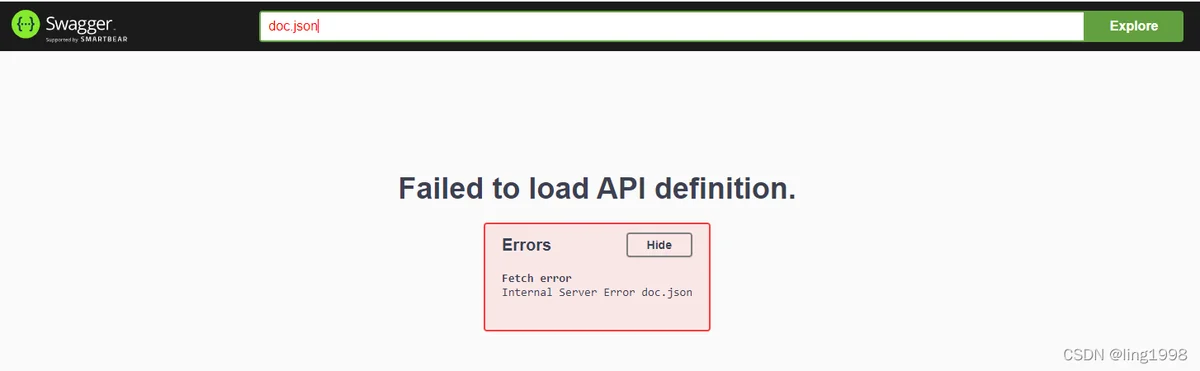
)注:必须导入docs,否则将报错: Failed to load API definition. 如下图所示:
(2)编写注解
注:注解详情可参见官网文档 Swagger Documentation
go-swapper注解规范说明
// @Summary 摘要
// @Description 描述
// @Description 接口的详细描述
// @Id 全局标识符
// @Version 接口版本号
// @Tags 接口分组,相当于归类
// @Accept json 浏览器可处理数据类型
// @Produce json 设置返回数据的类型和编码
// @Param 参数格式 从左到右:参数名、入参类型、数据类型、是否必填和注释 例:id query int true "ID"
// @Success 响应成功 从左到右:状态码、参数类型、数据类型和注释 例:200 {string} string "success"
// @Failure 响应失败 从左到右:状态码、参数类型、数据类型和注释 例:400 {object} string "缺少参数 ID"
// @Router 路由: 地址和http方法 例:/api/user/{id} [get]
// @contact.name 接口联系人
// @contact.url 联系人网址
// @contact.email 联系人邮箱
### 增加token验证方法
// @securityDefinitions.apikey ApiKeyAuth 安全方式
// @in header token携带的位置,这里是在header中
// @name Authorization heaer中的名称
参数param的几种类型
query 形如 /user?userId=1016
body 需要将数据放到 body 中进行请求
formData multipart/form-data* 请求
path 形如 /user/1016
header header头信息
上面对基本注解进行了解释,下面在代码中增加注解
main函数添加注解
package main

import (
	"github.com/gin-gonic/gin"
	ginSwagger "github.com/swaggo/gin-swagger"
	"github.com/swaggo/gin-swagger/swaggerFiles"
	"talentchain/controller"
	_ "talentchain/docs"
)

// @title 接囗文档
// @version 1.0
// @description 上链项目
// @termsofservice https://github.com/xxxx
// @contact.name Tracy
// @contact.email xxxx@126.com
// @host 127.0.0.1:9090
func main() {

	r := gin.Default()

	r.POST("/labourer/register",controller.Register)

	r.Run(":9090")
}
注:main函数中的@host,其他所有路由接囗都默认成此地址,如有特殊可以在路由接囗中添加@host,覆盖main的@host , 不加@host 可以设置成动态的,这样方便部署任何平台,不依赖HOST, 如下所示:
package main

import (
	"github.com/gin-gonic/gin"
	ginSwagger "github.com/swaggo/gin-swagger"
	"github.com/swaggo/gin-swagger/swaggerFiles"
	"talentchain/controller"
	_ "talentchain/docs"
)

// @title 接囗文档
// @version 1.0
// @description 上链项目
// @termsofservice https://github.com/xxxx
// @contact.name Tracy
// @contact.email xxxx@126.com
func main() {

	r := gin.Default()

	r.POST("/labourer/register",controller.Register)

	r.Run(":9090")
}
路由函数添加注解
// @Summary 个人注册
// @title Swagger API
// @version 1.0
// @Tags 劳动者管理
// @description  个人注册接囗
// @BasePath /labourer/register
// @Produce  json
// @Param phone body LabourerInfo true "劳动者信息"
// @Success 200 {object} RespData "{"code":200,"data":{},"msg":"ok"}"
// @Router /labourer/register [post]
func Register(c *gin.Context)  {
	// to do something
}
(3)添加访问路由
# 添加swagger访问路由
r.GET("/swagger/*any", ginSwagger.WrapHandler(swaggerFiles.Handler))
package main

import (
	"github.com/gin-gonic/gin"
	ginSwagger "github.com/swaggo/gin-swagger"
	"github.com/swaggo/gin-swagger/swaggerFiles"
	"talentchain/controller"
	_ "talentchain/docs"
)

// @title 接囗文档
// @version 1.0
// @contact.name Tracy
// @contact.email xxxx@126.com
// @host 127.0.0.1:9090
func main() {

	r := gin.Default()

    // 添加swagger访问路由
	r.GET("/swagger/*any", ginSwagger.WrapHandler(swaggerFiles.Handler))
	r.POST("/labourer/register",controller.Register)

	r.Run(":9090")
}
(4)格式化swag注解
swag fmt格式化后注解被美化了
package main

import (
	"github.com/gin-gonic/gin"
	ginSwagger "github.com/swaggo/gin-swagger"
	"github.com/swaggo/gin-swagger/swaggerFiles"
	"talentchain/controller"
	_ "talentchain/docs"
)

// @title          接囗文档
// @version        1.0
// @contact.name   Tracy
// @contact.email  zhangyanling1998@126.com
// @host           127.0.0.1:9090
func main() {

	r := gin.Default()

    // 添加swagger访问路由
	r.GET("/swagger/*any", ginSwagger.WrapHandler(swaggerFiles.Handler))
	r.POST("/labourer/register",controller.Register)

	r.Run(":9090")
}swag init将会生成一个docs文件夹,下面生成3个文件,如下所示:
F:\Golang\TalentChain\talentchain>tree /F docs
文件夹 PATH 列表
卷序列号为 00000040 0CA4:1102
F:\GOLANG\TALENTCHAIN\TALENTCHAIN\DOCS
    docs.go
    swagger.json
    swagger.yaml
5、浏览器访问注:每次添加或修改注解后,都需要使用swag init命令重新生成文档,使其生效
swag init 默认通过项目根目录中的main.go文件生成,如果main.go不在根目录中,如在cmd/main.go中,则要使用参数-g, 命令:
swag init -g ./cmd/main.go
启动工程,在浏览器中输入地址:http://127.0.0.1:9090/swagger/index.html
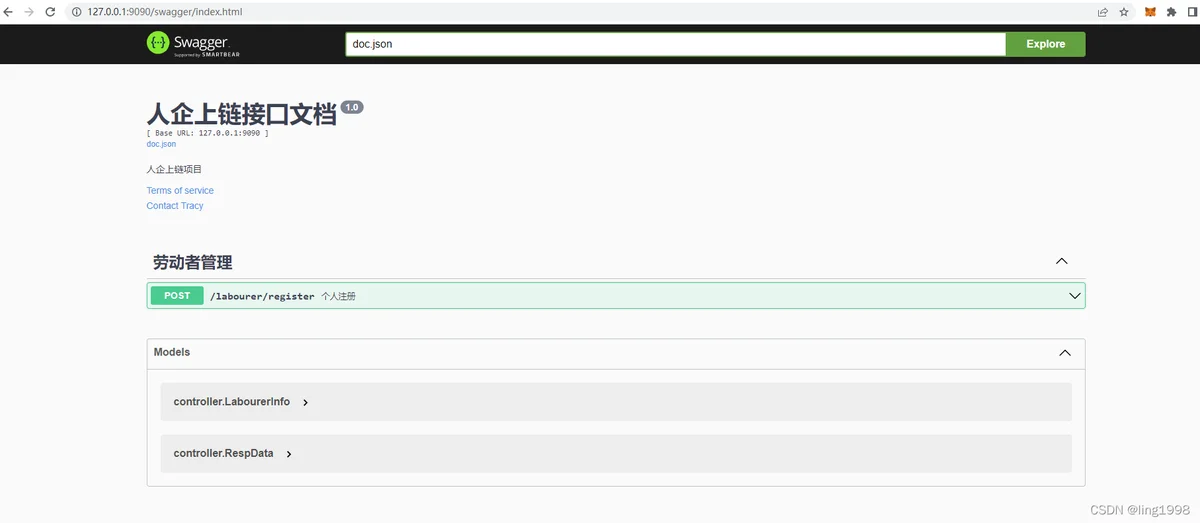
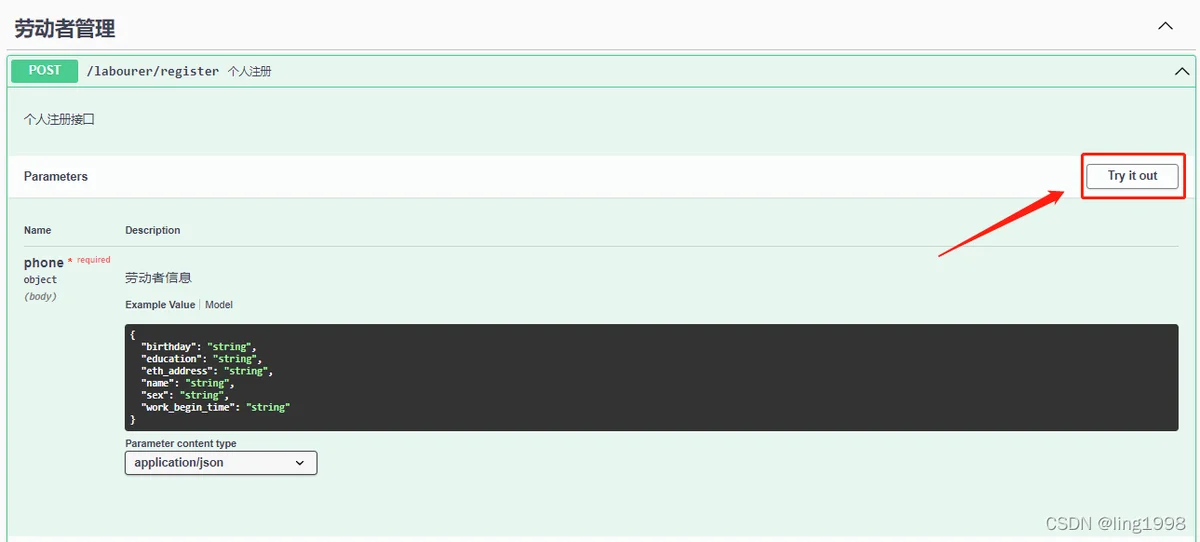
测试接囗
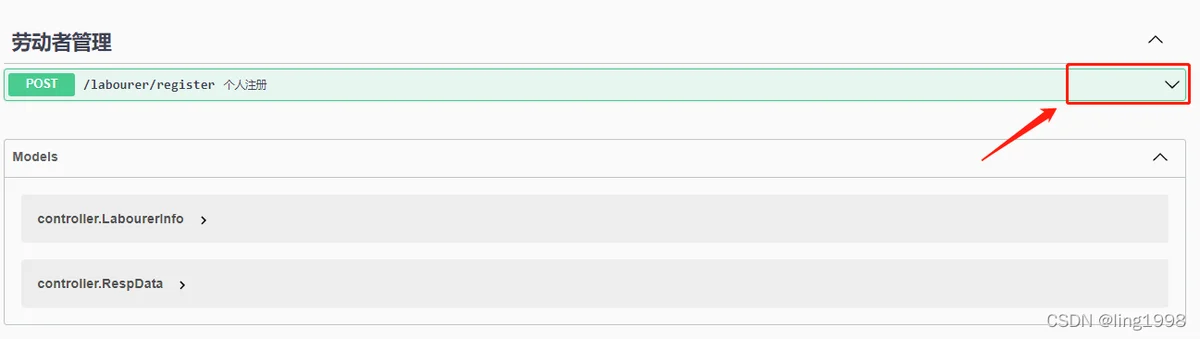
点击接囗右侧展开按钮
点击"Try it out"按钮
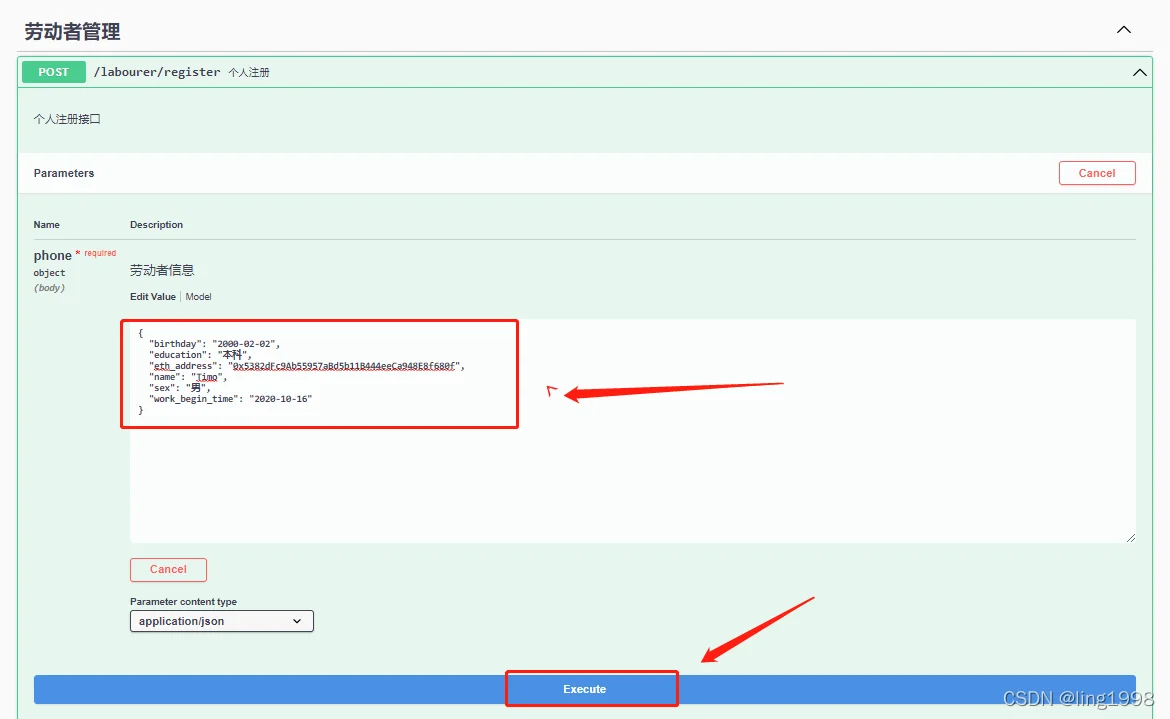
 输入参数值,点击”Execute“按钮
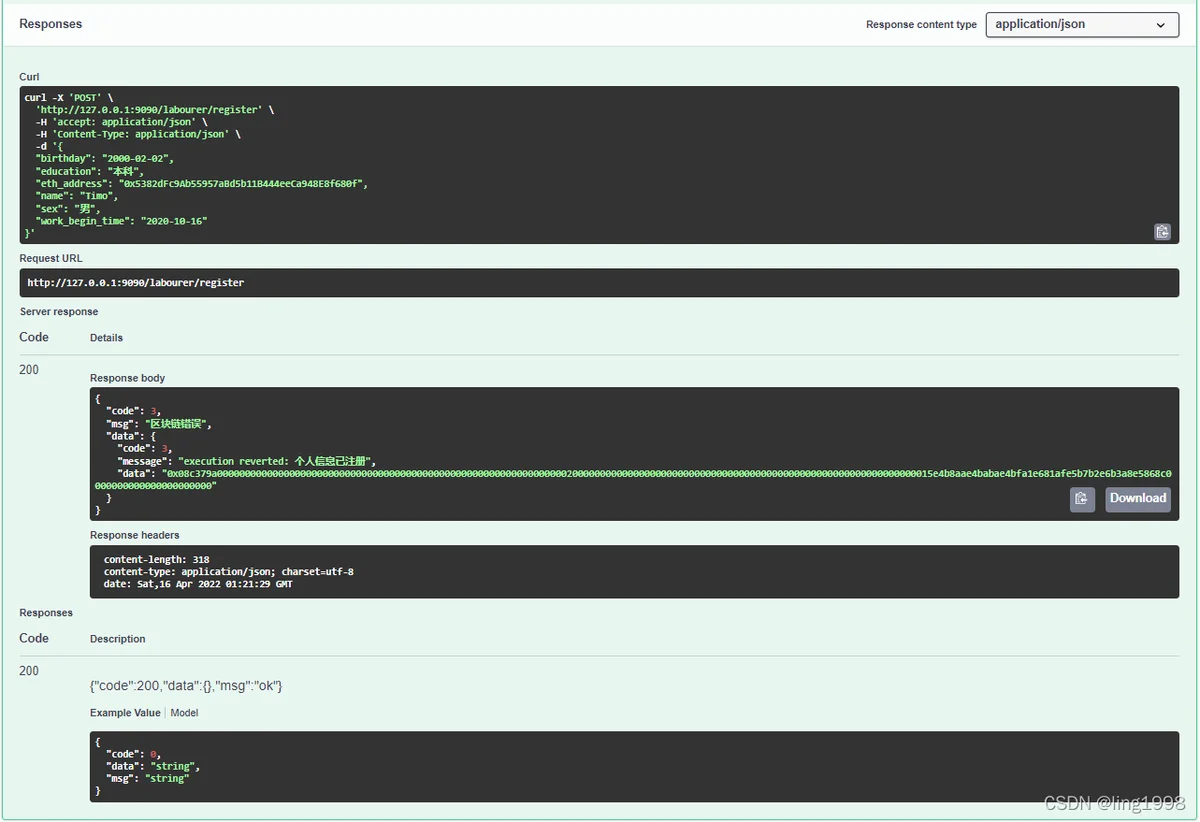
查看响应结果
6.1、Token验证
main函数加
// @securityDefinitions.apikey  ApiKeyAuth
// @in                          header
// @name                        Authorization
package main

import (
	"github.com/gin-gonic/gin"
	ginSwagger "github.com/swaggo/gin-swagger"
	"github.com/swaggo/gin-swagger/swaggerFiles"
	"talentchain/controller"
	_ "talentchain/docs"
)

// @title 接囗文档
// @version 1.0
// @description 上链项目
// @termsofservice https://github.com/xxxx
// @contact.name Tracy
// @contact.email xxxx@126.com
// @securityDefinitions.apikey  ApiKeyAuth
// @in                          header
// @name                        Authorization
func main() {

	r := gin.Default()

	r.POST("/labourer/register",controller.Register)

	r.Run(":9090")
}
路由函数加:
// @Security ApiKeyAuth
// @Summary 个人注册
// @title Swagger API
// @version 1.0
// @Tags 劳动者管理
// @description  个人注册接囗
// @Security  ApiKeyAuth
// @Produce  json
// @Param phone body LabourerInfo true "劳动者信息"
// @Success 200 {object} RespData "{"code":200,"data":{},"msg":"ok"}"
// @Router /labourer/register [post]
func Register(c *gin.Context)  {
	// to do something
}
6.2、上传文件
路由函数增加:
// @Accept multipart/form-data
// @Param file formData file true "file"
// @Summary   上传用户头像
// @version  1.0
// @Tags     用户接囗
// @Security  ApiKeyAuth
// @Accept    multipart/form-data
// @Produce  json
// @Param     file  formData  file          true  "file"
// @Success  0       {object}  tools.RespData       "{  "code": 0, "data": "xxx",  "msg": "正常" }"
// @Router    /api/v1/user/avatar [post]
func UploadUserAvatar(context *gin.Context) {

}