
Gin是用Go(Golang)编写的Web框架。
准备
首先需要安装Go(需要1.12+版本)
1. 安装
https://github.com/gin-gonic/gingo-gin-testcd➜ mkdir go-gin-test
➜ cd go-gin-test
go mod初始化go.mod文件
go mod init example.com/m/v2
可以使用下面的Go命令安装Gin
go get -u github.com/gin-gonic/gin
看到如下输出证明我们已经安装好了gin。
➜  go-gin-test  go get -u github.com/gin-gonic/gin
go: github.com/gin-gonic/gin upgrade => v1.6.3
go: gopkg.in/yaml.v2 upgrade => v2.4.0
go: github.com/golang/protobuf upgrade => v1.5.2
go: github.com/modern-go/reflect2 upgrade => v1.0.1
go: github.com/modern-go/concurrent upgrade => v0.0.0-20180306012644-bacd9c7ef1dd
go: github.com/ugorji/go/codec upgrade => v1.2.5
go: golang.org/x/sys upgrade => v0.0.0-20210403161142-5e06dd20ab57
go: github.com/go-playground/validator/v10 upgrade => v10.4.2
go: github.com/json-iterator/go upgrade => v1.1.10
go: github.com/leodido/go-urn upgrade => v1.2.1
go: downloading github.com/golang/protobuf v1.5.2
go: downloading golang.org/x/sys v0.0.0-20210403161142-5e06dd20ab57
go: downloading github.com/go-playground/validator/v10 v10.4.2
go: downloading github.com/ugorji/go v1.2.5
go: downloading google.golang.org/protobuf v1.26.0
go: downloading github.com/ugorji/go/codec v1.2.5
go: golang.org/x/crypto upgrade => v0.0.0-20210322153248-0c34fe9e7dc2
go: google.golang.org/protobuf upgrade => v1.26.0
go: downloading golang.org/x/crypto v0.0.0-20210322153248-0c34fe9e7dc2
go gethttp://goproxy.cn/2. Hello World
现在我们来编写我们的第一个web程序
➜  go-gin-test tree -L 3
.
├── go.mod
└── go.sum
目前我们的目录结构如上所示
接下来
main.go➜ go-gin-test tree -L 3
.
├── go.mod
├── go.sum
├── mian.go
main.gopackage main
import "github.com/gin-gonic/gin"
func main() {
r := gin.Default()
r.GET("/hello", func(c *gin.Context) {
c.JSON(200, gin.H{
"message": "hello world",
})
})
r.Run() // listen and serve on 0.0.0.0:8080 (for windows "localhost:8080")
}
go build -o hello➜ go-gin-test go build -o hello
➜ go-gin-test ls
go.mod go.sum hello mian.go
./hello➜ go-gin-test ./hello
[GIN-debug] [WARNING] Creating an Engine instance with the Logger and Recovery middleware already attached.
[GIN-debug] [WARNING] Running in "debug" mode. Switch to "release" mode in production.
- using env: export GIN_MODE=release
- using code: gin.SetMode(gin.ReleaseMode)
[GIN-debug] GET /hello --> main.main.func1 (3 handlers)
[GIN-debug] Environment variable PORT is undefined. Using port :8080 by default
[GIN-debug] Listening and serving HTTP on :8080
http://localhost:8080/hello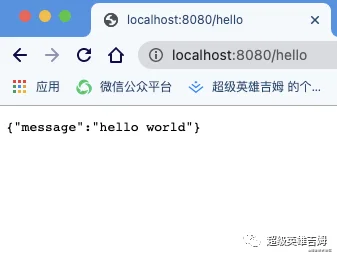
至此,我们已经完成第一个web服务的构建
3. Router的分组和封装
组/user/XXX/api/XXX我们接着上面的工程进行改造
routerexrouter.go➜ go-gin-test tree -L 3
.
├── go.mod
├── go.sum
├── hello
├── mian.go
└── routerex
└── router.go
router.gopackage routerex
import "github.com/gin-gonic/gin"
func InitRouter(g *gin.Engine) {
//第一组api接口 例如:http://localhost:8080/g1/hello1
g1 := g.Group("g1")
g1.GET("/hello1", func(c *gin.Context) {
c.JSON(200, gin.H{
"msg": "Hello g1",
})
})
//第二组api接口 例如:http://localhost:8080/g1/hello1
g2 := g.Group("g2")
g2.GET("/hello2", func(c *gin.Context) {
c.JSON(200, gin.H{
"msg": "Hello g2",
})
})
}
main.gopackage main
import (
"example.com/m/v2/routerex"
"github.com/gin-gonic/gin"
)
func main() {
r := gin.Default()
routerex.InitRouter(r)
r.Run() // listen and serve on 0.0.0.0:8080 (for windows "localhost:8080")
}
go build -o hello./hellohttp://localhost:8080/g1/hello1http://localhost:8080/g2/hello2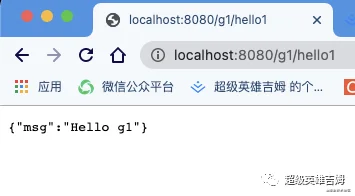
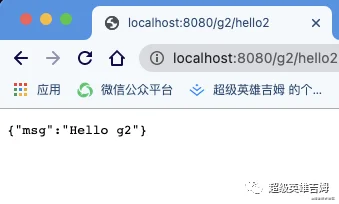
可以看出我们已经拆分了两个不同的api组。并且封装了router的注册方式。
可以尝试联系以上方法
下一期内容预告:
gin的中间件的使用 post和get接口不同的获取参数方式 ...
超级英雄吉姆gin超级英雄吉姆