
从 cron 说起
在 Unix-like 操作系统中,有一个大家都很熟悉的 cli 工具,它能够来处理定时任务,周期性任务,这就是: cron。 你只需要简单的语法控制就能实现任意【定时】的语义。用法上可以参考一下这个 Crontab Guru Editor[1],做的非常精巧。
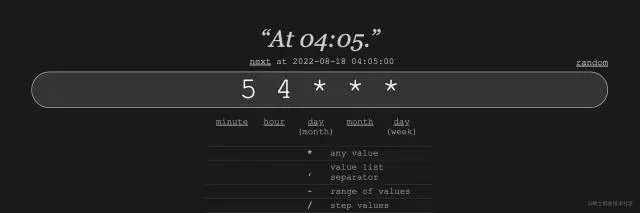
简单说,每一个位都代表了一个时间维度,* 代表全集,所以,上面的语义是:在每天早上的4点05分触发任务。
但 cron 毕竟只是一个操作系统级别的工具,如果定时任务失败了,或者压根没启动,cron 是没法提醒开发者这一点的。并且,cron 和 正则表达式都有一种魔力,不知道大家是否感同身受,这里引用同事的一句名言:
这世界上有些语言非常相似: shell脚本, es查询的那个dsl语言, 定时任务的crontab, 正则表达式. 他们相似就相似在每次要写的时候基本都得重新现学一遍。
正巧,最近看到了 gron 这个开源项目,它是用 Golang 实现一个并发安全的定时任务库。实现非常简单精巧,代码量也不多。今天我们就来一起结合源码看一下,怎样基于 Golang 的能力做出来一个【定时任务库】。
gron
Gron provides a clear syntax for writing and deploying cron jobs.
gron[2] 是一个泰国小哥在 2016 年开源的作品,它的特点就在于非常简单和清晰的语义来定义【定时任务】,你不用再去记 cron 的语法。我们来看下作为使用者怎样上手。
首先,我们还是一个 go get 安装依赖:
$gogetgithub.com/roylee0704/gron
假设我们期望在【时机】到了以后,要做的工作是打印一个字符串,每一个小时执行一次,我们就可以这样:
packagemain

import(
"fmt"
"time"
"github.com/roylee0704/gron"
)

funcmain(){
c:=gron.New()
c.AddFunc(gron.Every(1*time.Hour),func(){
fmt.Println("runseveryhour.")
})
c.Start()
}
c.Start定时参数
gron.New().AddFunc()gron.Every(1*time.Hour)这里其实你可以传入任何一个 time.Duration,从而把调度间隔从 1 小时调整到 1 分钟甚至 1 秒。
xtimeimport"github.com/roylee0704/gron/xtime"
gron.Every(1*xtime.Day)
gron.Every(1*xtime.Week)
很多时候我们不仅仅某个任务在当天运行,还希望是我们指定的时刻,而不是依赖程序启动时间,机械地加 24 hour。gron 对此也做了很好的支持:
gron.Every(30*xtime.Day).At("00:00")
gron.Every(1*xtime.Week).At("23:59")
我们只需指定 At("hh:mm") 就可以实现在指定时间执行。
源码解析
这一节我们来看看 gron 的实现原理。
所谓定时任务,其实包含两个层面:
-
触发器。即我们希望这个任务在什么时间点,什么周期被触发;
-
任务。即我们在触发之后,希望执行的任务,类比到我们上面示例的 fmt.Println。
对这两个概念的封装和扩展是一个定时任务库必须考虑的。
而同时,我们是在 Golang 的协程上跑程序的,意味着这会是一个长期运行的协程,否则你即便指定了【一个月后干XXX】这个任务,程序两天后挂了,也就无法实现你的诉求了。
所以,我们还希望有一个 manager 的角色,来管理我们的一组【定时任务】,如何调度,什么时候启动,怎么停止,启动了以后还想加新任务是否支持。
Cron
在 gron 的体系里,Cron 对象(我们上面通过 gron.New 创建出来的)就是我们的 manager,而底层的一个个【定时任务】则对应到 Cron 对象中的一个个 Entry:
//Cronprovidesaconvenientinterfaceforschedulingjobsuchastoclean-up
//databaseentryeverymonth.
//
//Cronkeepstrackofanynumberofentries,invokingtheassociatedfuncas
//specifiedbytheschedule.Itmayalsobestarted,stoppedandtheentries
//maybeinspected.
typeCronstruct{
entries[]*Entry
runningbool
addchan*Entry
stopchanstruct{}
}

//NewinstantiatesnewCroninstantc.
funcNew()*Cron{
return&Cron{
stop:make(chanstruct{}),
add:make(chan*Entry),
}
}
-
entries 就是定时任务的核心能力,它记录了一组【定时任务】;
-
running 用来标识这个 Cron 是否已经启动;
-
add 是一个channel,用来支持在 Cron 启动后,新增的【定时任务】;
-
stop 同样是个channel,注意到是空结构体,用来控制 Cron 的停止。这个其实是经典写法了,对日常开发也有借鉴意义,我们待会儿会好好看一下。
gron.New()Entry
重头戏来了,Cron 里面的 []* Entry 其实就代表了一组【定时任务】,每个【定时任务】可以简化理解为 <触发器,任务> 组成的一个 tuple。
//Entryconsistsofascheduleandthejobtobeexecutedonthatschedule.
typeEntrystruct{
ScheduleSchedule
JobJob

//thenexttimethejobwillrun.ThisiszerotimeifCronhasnotbeen
//startedorinvalidschedule.
Nexttime.Time

//thelasttimethejobwasrun.Thisiszerotimeifthejobhasnotbeen
//run.
Prevtime.Time
}

//ScheduleistheinterfacethatwrapsthebasicNextmethod.
//
//Nextdeducesnextoccurringtimebasedontandunderlyingstates.
typeScheduleinterface{
Next(ttime.Time)time.Time
}

//JobistheinterfacethatwrapsthebasicRunmethod.
//
//Runexecutestheunderlyingfunc.
typeJobinterface{
Run()
}
NextRun除了这两个核心依赖外,Entry 结构还包含了【前一次执行时间点】和【下一次执行时间点】,这个目前可以忽略,只是为了辅助代码用。
按照时间排序
//byTimeisahandywrappertochronologicallysortentries.
typebyTime[]*Entry

func(bbyTime)Len()int{returnlen(b)}
func(bbyTime)Swap(i,jint){b[i],b[j]=b[j],b[i]}

//Lessreports`earliest`timeishouldsortbeforej.
//zerotimeisnot`earliest`time.
func(bbyTime)Less(i,jint)bool{

ifb[i].Next.IsZero(){
returnfalse
}
ifb[j].Next.IsZero(){
returntrue
}

returnb[i].Next.Before(b[j].Next)
}
Len()Swap()Less()sort.Sort()此处的排序策略是按照时间大小。
新增定时任务
我们在示例里面出现过调用 AddFunc() 来加入一个 gron.Every(xxx) 这样一个【定时任务】。其实这是给用户提供的简单封装。
//JobFuncisanadaptertoallowtheuseofordinaryfunctionsasgron.Job
//Iffisafunctionwiththeappropriatesignature,JobFunc(f)isahandler
//thatcallsf.
//
//todo:possiblyfuncwithparams?maybenotneeded.
typeJobFuncfunc()

//Runcallsj()
func(jJobFunc)Run(){
j()
}


//AddFuncregisterstheJobfunctionforthegivenSchedule.
func(c*Cron)AddFunc(sSchedule,jfunc()){
c.Add(s,JobFunc(j))
}

//Addappendsschedule,jobtoentries.
//
//ifcroninstantisnotrunning,addingtoentriesistrivial.
//otherwise,topreventdata-race,addsthroughchannel.
func(c*Cron)Add(sSchedule,jJob){

entry:=&Entry{
Schedule:s,
Job:j,
}

if!c.running{
c.entries=append(c.entries,entry)
return
}
c.add<- entry
}
func()注意,这里的 Add 方法就是新增定时任务的核心能力了,我们需要触发器 Schedule,任务 Job。并以此来构造出一个定时任务 Entry。
若 Cron 实例还没启动,加入到 Cron 的 entries 列表里就ok,随后启动的时候会处理。但如果已经启动了,就直接往 add 这个 channel 中塞,走额外的新增调度路径。
启动和停止
//Startsignalscroninstantctogetupandrunning.
func(c*Cron)Start(){
c.running=true
goc.run()
}


//Stophaltscroninstantcfromrunning.
func(c*Cron)Stop(){

if!c.running{
return
}
c.running=false
c.stop<- struct{}{}
}
我们先 high level 地看一下一个 Cron 的启动和停止。
-
Start 方法执行的时候会先将 running 变量置为 true,用来标识实例已经启动(启动前后加入的定时任务 Entry 处理策略是不同的,所以这里需要标识),然后启动一个 goroutine 来实际跑启动的逻辑。
-
Stop 方法则会将 running 置为 false,然后直接往 stop channel 塞一个空结构体即可。
c.run()varafter=time.After
//runthescheduler...
//
//Itneedstobeprivateasit'sresponsibleofsynchronizingacritical
//sharedstate:`running`.
func(c*Cron)run(){
vareffectivetime.Time
now:=time.Now().Local()
//tofigurenexttrigtimeforentries,referencedfromnow
for_,e:=rangec.entries{
e.Next=e.Schedule.Next(now)
}
for{
sort.Sort(byTime(c.entries))
iflen(c.entries)>0{
effective=c.entries[0].Next
}else{
effective=now.AddDate(15,0,0)//topreventphantomjobs.
}
select{
casenow=<-after(effective.Sub(now)):
//entrieswithsametimegetsrun.
for_,entry:=rangec.entries{
ifentry.Next!=effective{
break
}
entry.Prev=now
entry.Next=entry.Schedule.Next(now)
goentry.Job.Run()
}
casee:=<-c.add:
e.Next = e.Schedule.Next(time.Now())
c.entries = append(c.entries,e)
case<-c.stop:
return//terminatego-routine.
}
}
}
重点来了,看看我们是如何把上面 Cron, Entry, Schedule, Job 串起来的。
- 首先拿到 local 的时间 now;
- 遍历所有 Entry,调用 Next 方法拿到各个【定时任务】下一次运行的时间点;
- 对所有 Entry 按照时间排序(我们上面提过的 byTime);
- 拿到第一个要到期的时间点,在 select 里面通过 time.After 来监听。到点了就起动新的 goroutine 跑对应 entry 里的 Job,并回到 for 循环,继续重新 sort,再走同样的流程;
- 若 add channel 里有新的 Entry 被加进来,就加入到 Cron 的 entries 里,触发新的 sort;
- 若 stop channel 收到了信号,就直接 return,结束执行。
整体实现还是非常简洁的,大家可以感受一下。
Schedule
前面其实我们暂时将触发器的复杂性封装在 Schedule 接口中了,但怎么样实现一个 Schedule 呢?
尤其是注意,我们还支持 At 操作,也就是指定 Day,和具体的小时,分钟。回忆一下:
gron.Every(30*xtime.Day).At("00:00")
gron.Every(1*xtime.Week).At("23:59")
这一节我们就来看看,gron.Every 干了什么事,又是如何支持 At 方法的。
//EveryreturnsaSchedulereoccurseveryperiodp,pmustbeatleast
//time.Second.
funcEvery(ptime.Duration)AtSchedule{

ifp< time.Second {
  p = xtime.Second
 }

 p = p - time.Duration(p.Nanoseconds())%time.Second //truncatesuptoseconds

return&periodicSchedule{
period:p,
}
}
gron 的 Every 函数接受一个 time.Duration,返回了一个 AtSchedule 接口。我待会儿会看,这里注意,Every 里面是会把【秒】级以下给截掉。
我们先来看下,最后返回的这个 periodicSchedule 是什么:
typeperiodicSchedulestruct{
periodtime.Duration
}

//Nextaddstimettounderlyingperiod,truncatesuptounitofseconds.
func(psperiodicSchedule)Next(ttime.Time)time.Time{
returnt.Truncate(time.Second).Add(ps.period)
}

//Atreturnsaschedulewhichreoccurseveryperiodp,attimet(hh:ss).
//
//Note:Atpanicswhenperiodpislessthanxtime.Day,anderrorhh:ssformat.
func(psperiodicSchedule)At(tstring)Schedule{
ifps.period< xtime.Day {
  panic("periodmustbeatleastindays")
}

//parsetnaively
h,m,err:=parse(t)

iferr!=nil{
panic(err.Error())
}

return&atSchedule{
period:ps.period,
hh:h,
mm:m,
}
}

//parsenaivelytokeniseshoursandminutes.
//
//returnserrorwheninputformatwasincorrect.
funcparse(hhmmstring)(hhint,mmint,errerror){

hh=int(hhmm[0]-'0')*10+int(hhmm[1]-'0')
mm=int(hhmm[3]-'0')*10+int(hhmm[4]-'0')

ifhh< 0||hh>24{
hh,mm=0,0
err=errors.New("invalidhhformat")
}
ifmm< 0||mm>59{
hh,mm=0,0
err=errors.New("invalidmmformat")
}

return
}
可以看到,所谓 periodicSchedule 就是一个【周期性触发器】,只维护一个 time.Duration 作为【周期】。
Add(period)time.Timefunc (ps periodicSchedule) At(t string) Schedule-
若周期连 1 天都不到,不支持 At 能力,因为 At 本质是在选定的一天内,指定小时,分钟,作为辅助。连一天都不到的周期,是要精准处理的;
-
将用户输入的形如 "23:59" 时间字符串解析出来【小时】和【分钟】;
-
构建出一个 atSchedule 对象,包含了【周期时长】,【小时】,【分钟】。
ok,这一步只是拿到了材料,那具体怎样处理呢?这个还是得继续往下走,看看 atSchedule 结构干了什么:
typeatSchedulestruct{
periodtime.Duration
hhint
mmint
}

//resetreturnsnewDatebasedontimeinstantt,andreconfigureitshh:ss
//accordingtoatSchedule'shh:ss.
func(asatSchedule)reset(ttime.Time)time.Time{
returntime.Date(t.Year(),t.Month(),t.Day(),as.hh,as.mm,0,0,time.UTC)
}

//Nextreturns**next**time.
//iftpasseditssupposedschedule:reset(t),returnsreset(t)+period,
//elsereturnsreset(t).
func(asatSchedule)Next(ttime.Time)time.Time{
next:=as.reset(t)
ift.After(next){
returnnext.Add(as.period)
}
returnnext
}
其实只看这个 Next 的实现即可。我们从 periodSchedule 那里获取了三个属性。
在调用 Next 方法时,先做 reset,根据原有 time.Time 的年,月,日,以及用户输入的 At 中的小时,分钟,来构建出来一个 time.Time 作为新的时间点。
此后判断是在哪个周期,如果当前周期已经过了,那就按照下个周期的时间点返回。
gron.Every(xxx)t.Truncate(time.Second).Add(ps.period)
拿到一个新的时间点返回。
periodicSchedule.AtAtSchedule//AtScheduleextendsSchedulebyenablingperiodic-interval&time-specificsetup
typeAtScheduleinterface{
At(tstring)Schedule
Schedule
}
直接就有一个 Schedule 可以用,但如果你想针对天级以上的 duration 指定时间,也可以走 At 方法,也会返回一个 Schedule 供我们使用。
扩展性
func (c *Cron) Add(s Schedule, j Job)最核心的两个实体依赖 Schedule, Job 都可以用你自定义的实现来替换掉。
如实现一个新的 Job:
typeReminderstruct{
Msgstring
}

func(rReminder)Run(){
fmt.Println(r.Msg)
}
periodicScheduleatSchedulegron.EveryNext(p time.Duration) time.Time我们来看一个完整用法案例:
packagemain

import(
"fmt"
"github.com/roylee0704/gron"
"github.com/roylee0704/gron/xtime"
)

typePrintJobstruct{Msgstring}

func(pPrintJob)Run(){
fmt.Println(p.Msg)
}

funcmain(){

var(
//schedules
daily=gron.Every(1*xtime.Day)
weekly=gron.Every(1*xtime.Week)
monthly=gron.Every(30*xtime.Day)
yearly=gron.Every(365*xtime.Day)

//contrivedjobs
purgeTask=func(){fmt.Println("purgeagedrecords")}
printFoo=printJob{"Foo"}
printBar=printJob{"Bar"}
)

c:=gron.New()

c.Add(daily.At("12:30"),printFoo)
c.AddFunc(weekly,func(){fmt.Println("Everyweek")})
c.Start()

//JobsmayalsobeaddedtoarunningGron
c.Add(monthly,printBar)
c.AddFunc(yearly,purgeTask)

//StopGron(runningjobsarenothalted).
c.Stop()
}
经典写法-控制退出
这里我们还是要聊一下 Cron 里控制退出的经典写法。我们把其他不相关的部分清理掉,只留下核心代码:
typeCronstruct{
stopchanstruct{}
}

func(c*Cron)Stop(){
c.stop<- struct{}{}
}

func(c*Cron)run(){

for{
select{
case<-c.stop:
   return//terminatego-routine.
}
}
}
空结构体能够最大限度节省内存,毕竟我们只是需要一个信号。核心逻辑用 for + select 的配合,这样当我们需要结束时可以立刻响应。非常经典,建议大家日常有需要的时候采用。
结语
gron 整体代码其实只在 cron.go 和 schedule.go 两个文件,合起来代码不过 300 行,非常精巧,基本没有冗余,扩展性很好,是非常好的入门材料。
不过,作为一个 cron 的替代品,其实 gron 还是有自己的问题的。简单讲就是,如果我重启了一个EC2实例,那么我的 cron job 其实也还会继续执行,这是落盘的,操作系统级别的支持。
但如果我执行 gron 的进程挂掉了,不好意思,那就完全凉了。你只有重启,然后再把所有任务加回来才行。而我们既然要用 gron,是很有可能定一个几天后,几个星期后,几个月后这样的触发器的。谁能保证进程一直活着呢?连机子本身都可能重启。
所以,我们需要一定的机制来保证 gron 任务的可恢复性,将任务落盘,持久化状态信息,算是个思考题,这里大家可以考虑一下怎么做。
审核编辑 :李倩