
RPC简介
RPC == Remote Procedure Call == 远程过程调用
允许运行于一台计算机的程序调用另一台计算机的子程序。
调用包含了传输协议和编码(对象序列号)协议等等。
gRPC简介
gRPC是一个高性能、开源、通用的RPC框架,基于HTTP2协议标准设计开发,默认采用 Protocol Buffers 数据序列化协议。
Protocol Buffers 是一种与语言、平台无关,可扩展的序列化结构化数据的方法,常用于通信协议,数据存储等等。相较于 JSON、XML,它更小、更快、更简单,因此也更受开发人员的青眯
gRPC特点
1、HTTP/2
2、Protobuf
3、客户端、服务端基于同一份 IDL
IDL是Interface description language的缩写,指接口描述语言
4、移动网络的良好支持
5、支持多语言
概览
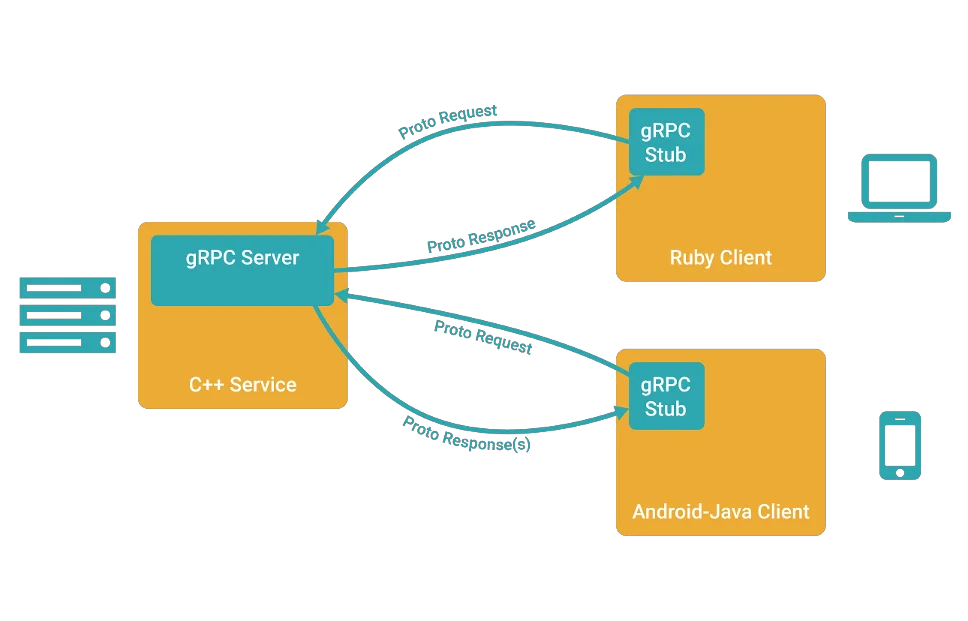
讲解
1、客户端(gRPC Sub)调用 A 方法,发起 RPC 调用
2、对请求信息使用 Protobuf 进行对象序列化压缩(IDL)
3、服务端(gRPC Server)接收到请求后,解码请求体,进行业务逻辑处理并返回
4、对响应结果使用 Protobuf 进行对象序列化压缩(IDL)
5、客户端接受到服务端响应,解码请求体。回调被调用的 A 方法,唤醒正在等待响应(阻塞)的客户端调用并返回响应结果
为什么要用gRPC
.protoprotocol buffers安装gRPC
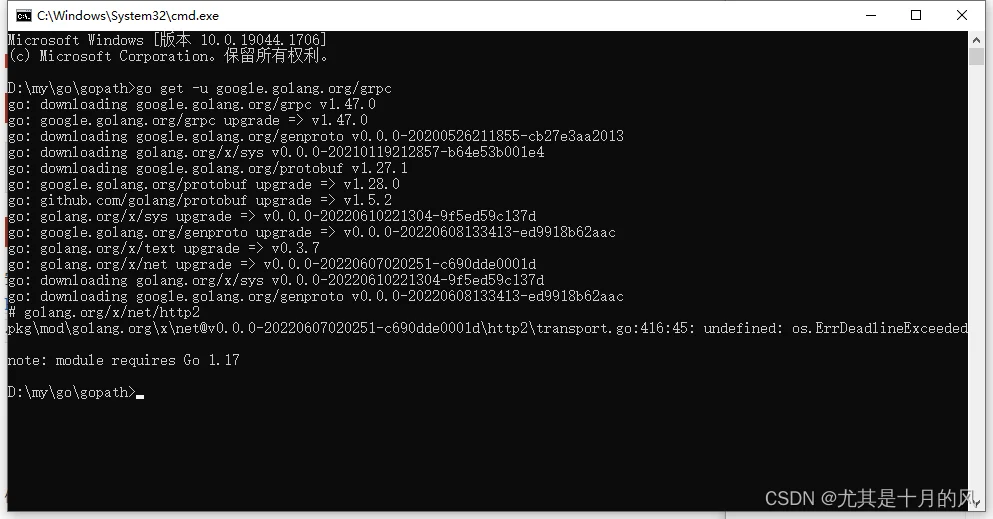
go get -u google.golang.org/grpc
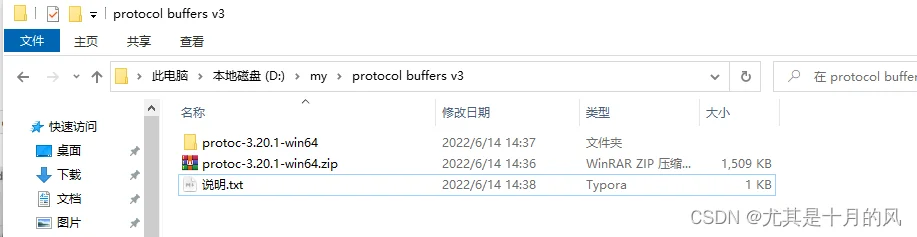
安装Protocol Buffers v3
安装用于生成gRPC服务代码的协议编译器
下载地址:https://github.com/google/protobuf/releases
.protoimport "google/protobuf/timestamp.proto"protoc安装Protoc Plugin
编译器插件
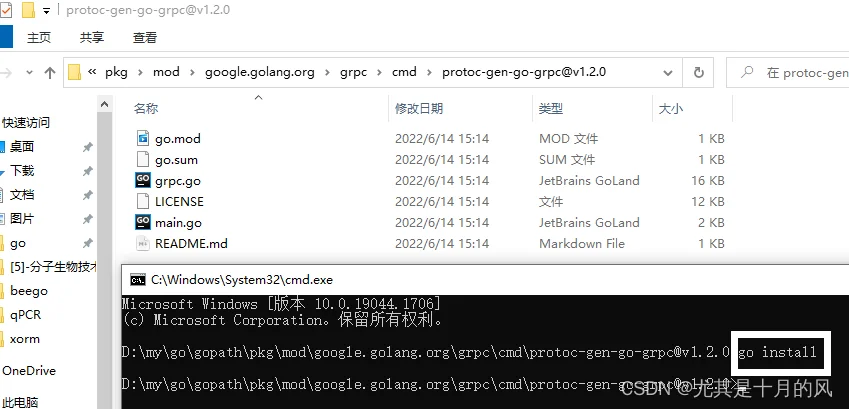
protocGolang <1.15请使用go get,而不是go install。go get后到对应目录去直接执行go install,执行后会在GOPATH/bin目录生成exe文件,如图:
网上有些安装的不是下面的两个插件,那种现在都是不推荐的,最新的就是使用两个插件,gRPC官网也是使用的两个。
github的那个插件是过去式的,推荐使用google的最新的。
安装go语言插件:
go install google.golang.org/protobuf/cmd/protoc-gen-go@v1.28
or
go get google.golang.org/protobuf/cmd/protoc-gen-go@v1.28
.proto.pb.go.proto安装grpc插件:
go install google.golang.org/grpc/cmd/protoc-gen-go-grpc@v1.2
or
go get google.golang.org/grpc/cmd/protoc-gen-go-grpc@v1.2
protoc-gen-go-grpc是Google协议缓冲区编译器生成Go代码的插件。
_grpc.pb.go- 一种接口类型(或存根) ,供客户端调用的服务方法。
- 服务器要实现的接口类型。
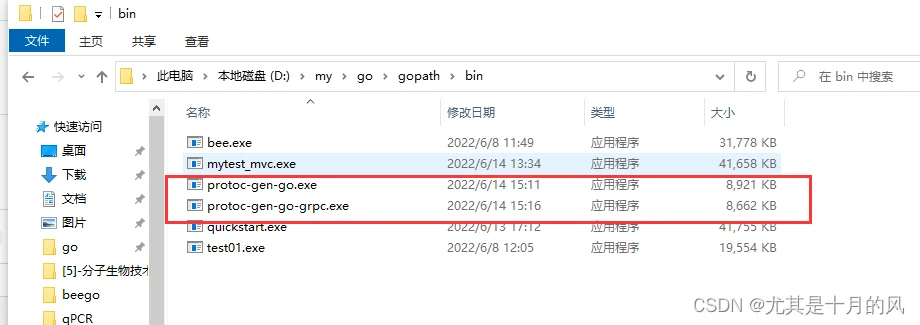
$GOPATH/binprotoc$GOPATH/bin两次安装后在GOPATH/bin目录下生成exe,如下图:
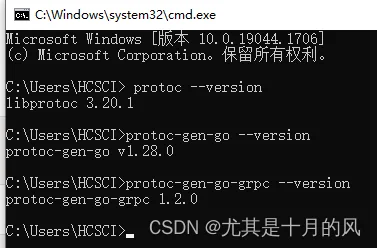
安装检查
gRPC入门示例
开发步骤
gRPC开发步骤:
1、编写.proto文件定义服务
普通rpc、服务器流式rpc、客户端流式rpc、双向流式rpc
2、生成指定语言的代码
使用编译器插件生成客户端和服务端代码。
3、编写业务逻辑代码
在服务端编写业务代码实现具体的服务方法,在客户端按需调用这些方法
项目结构
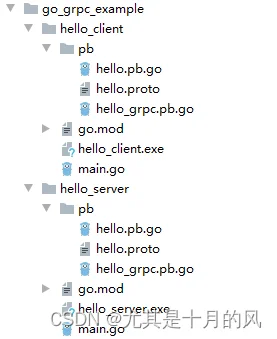
虽然两个pb文件夹内的东西都是一样的,不要想着把pb文件夹放到外面同时供server和client使用,因为在真实场景中,rpc是远程调用,server和client并不在同一台机器。
编写proto代码
syntax = "proto3"; // 版本声明,使用Protocol Buffers v3版本

option go_package = "...."; // 指定编译生成的文件目录,也可以指定golang包名

package pb; // 默认包名


// 定义服务
service Greeter {
    // SayHello 方法
    rpc SayHello (HelloRequest) returns (HelloResponse) {}
}

// 请求消息
message HelloRequest {
    string name = 1;
}

// 响应消息
message HelloResponse {
    string replay = 1;
}
servicemessage编写Server端Go代码
go mod init hello_server然后再新建一个 pb 文件夹,把上面写的 proto 代码保存到 hello.proto,放入pb文件夹内。
此时,项目目录结构为:
go_grpc_example/hello_server
├── go.mod
├── go.sum
├── main.go
└── pb
    └── hello.proto
然后把 hello.proto 文件中的 go_package 修改,如下:
// 分号前是编译生成的.pb.go文件存放地址,分号后是所属包名,这个包名覆盖默认包名
option go_package = "hello_server/pb;pb";
然后在 pb 目录下执行以下命令,根据 hello.proto 生成go源码文件
protoc --go_out=. --go_opt=paths=source_relative --go-grpc_out=. --go-grpc_opt=paths=source_relative hello.proto
这里涉及到proto命令,可以看本文后面的Protobuf命令学习章节了解
生成后的go源码文件会保存在 pb 文件夹下,如下:。
go_grpc_example/hello_server
├── go.mod
├── go.sum
├── main.go
└── pb
    ├── hello.pb.go
    ├── hello.proto
    └── hello_grpc.pb.go
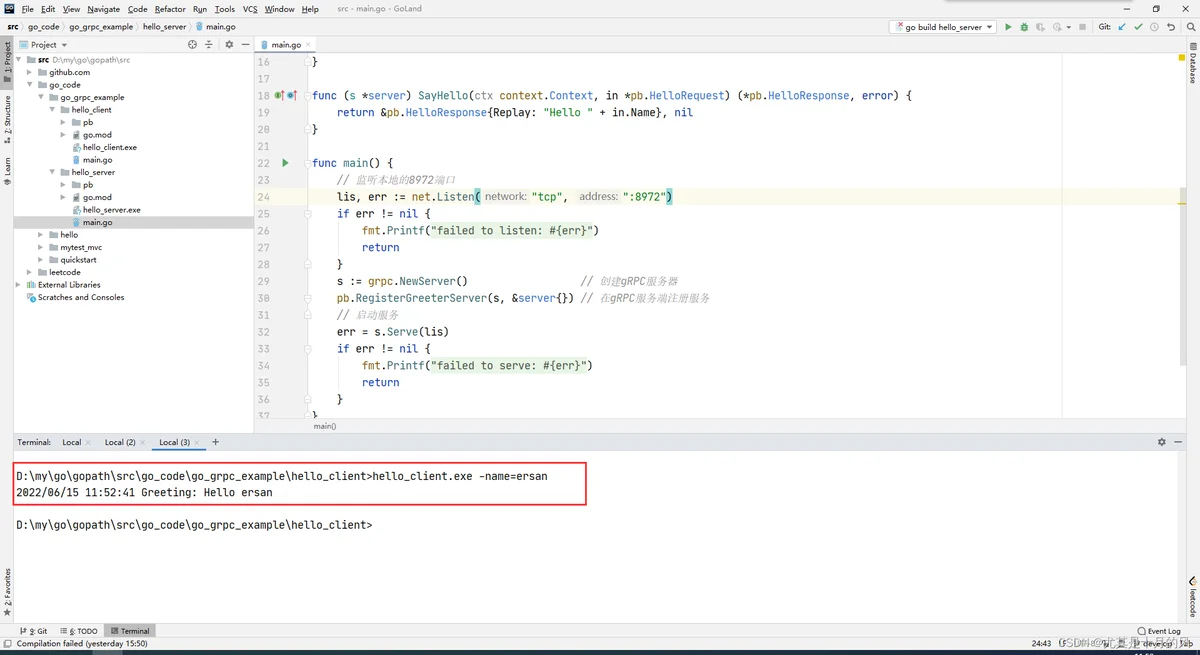
hello_server/main.gopackage main
import (
"context"
"fmt"
"hello_server/pb"
"net"
"google.golang.org/grpc"
)
// hello server
type server struct {
pb.UnimplementedGreeterServer
}
func (s *server) SayHello(ctx context.Context, in *pb.HelloRequest) (*pb.HelloResponse, error) {
return &pb.HelloResponse{Replay: "Hello " + in.Name}, nil
}
func main() {
// 监听本地的8972端口
lis, err := net.Listen("tcp", ":8972")
if err != nil {
fmt.Printf("failed to listen: %v", err)
return
}
s := grpc.NewServer() // 创建gRPC服务器
pb.RegisterGreeterServer(s, &server{}) // 在gRPC服务端注册服务
// 启动服务
err = s.Serve(lis)
if err != nil {
fmt.Printf("failed to serve: %v", err)
return
}
}
- 创建 gRPC Server 对象,你可以理解为它是 Server 端的抽象对象
- 将 server(其包含需要被调用的服务端接口)注册到 gRPC Server 的内部注册中心。这样可以在接受到请求时,通过内部的服务发现,发现该服务端接口并转接进行逻辑处理
- 创建 Listen,监听 TCP 端口
- gRPC Server 开始 lis.Accept,直到 Stop 或 GracefulStop
hello_servergo build
hello_server.exe
编写Client端Go代码
步骤和Server端相同。
go mod init hello_client然后再新建一个 pb 文件夹,把上面写的 proto 代码保存到 hello.proto,放入pb文件夹内。
此时,项目目录结构为:
go_grpc_example/hello_client
├── go.mod
├── go.sum
├── main.go
└── pb
    └── hello.proto
然后把 hello.proto 文件中的 go_package 修改,如下:
option go_package = "hello_client/pb;pb";
然后在 pb 目录下执行以下命令,根据 hello.proto 生成go源码文件
protoc --go_out=. --go_opt=paths=source_relative --go-grpc_out=. --go-grpc_opt=paths=source_relative hello.proto
生成后的go源码文件会保存在 pb 文件夹下,如下:。
go_grpc_example/hello_client
├── go.mod
├── go.sum
├── main.go
└── pb
    ├── hello.pb.go
    ├── hello.proto
    └── hello_grpc.pb.go
hello_client/main.gohttp_serverSayHellopackage main
import (
"context"
"flag"
"log"
"time"
"hello_client/pb"
"google.golang.org/grpc"
"google.golang.org/grpc/credentials/insecure"
)
// hello_client
const (
defaultName = "world"
)
var (
addr = flag.String("addr", "127.0.0.1:8972", "the address to connect to")
name = flag.String("name", defaultName, "Name to greet")
)
func main() {
flag.Parse()
// 连接到server端,此处禁用安全传输
conn, err := grpc.Dial(*addr, grpc.WithTransportCredentials(insecure.NewCredentials()))
if err != nil {
log.Fatalf("did not connect: %v", err)
}
defer conn.Close()
c := pb.NewGreeterClient(conn)
// 执行RPC调用并打印收到的响应数据
ctx, cancel := context.WithTimeout(context.Background(), time.Second)
defer cancel()
r, err := c.SayHello(ctx, &pb.HelloRequest{Name: *name})
if err != nil {
log.Fatalf("could not greet: %v", err)
}
log.Printf("Greeting: %s", r.GetReplay())
}
- 创建与给定目标(服务端)的连接交互
- 创建 server的客户端对象
- 发送 RPC 请求,等待同步响应,得到回调后返回响应结果
- 输出响应结果
http_clientgo build
hello_client.exe -name=ersan
运行结果
得到如下结果,说明RPC调用正确:
Protobuf命令学习
-I (-proto_path)
protoc --proto_path=proto --go_out=. proto/hello.proto
--proto_path` 可以简写为`-I` ,表示读取`*.proto文件的目录
–go_out
protoc --go_out=. hello.proto // 不使用-I,直接进入proto的文件夹执行
--go_out--go_out` 表示将`*.proto文件`转换为`golang语言
= 前半部分是用转换成哪个语言,go_out表示转换为go语言。
= 后半部分,表示的是转换生成后的pb.go文件,放在哪个文件夹下。
. 或者 :. 都表示将生成的pb.go文件放入当前的目录下。
.proto.pb.go.proto--go_out=paths=import:.--go_out=paths=source_relative:.--go_out=plugins=grpc:.--go_outpluginspathspathsimportsource_relativeplugins指定源文件
protoc --go_out=:. ./hello.proto
protoc --go_out=:. hello.proto
hello.proto指定gprc选项,生成grpc功能
我们一般如果是go语言的话,用proto都是结合grpc来用的。
protoc --go_out=plugins=grpc:. hello.proto
google.golang.org/grpc要想使用grpc功能,那么proto文件里得定义rpc相关的服务,这样生成的pb.go文件,才会生成相关rpc数据
:.:..:--go_out === plugins的类型 : 输出的路径单独使用这里的proto命令会报错 “plugins are not supported” ,下面会讲到
–go_opt
–go_opt表示生成go文件时候的目录选项
–go_opt=paths=source_relative 表示 生成的文件与proto在同一目录
完整编译
.protoprotoc --go_out=. --go-grpc_out=. ./hello.proto
.pb.go_grpc.pb.gogRPC--go_opt=paths=source_relative.pb.go.protooption go_packagego_out.pb.go.pb.gooption go_package --go-grpc_opt=paths=source_relative_grpc.pb.goprotoc --go_out=plugins=grpc:. *.protoprotoc --go_out=. --go-grpc_out=. ./hello.proto--go_out=plugins=grpcprotoc-gen-goprotoc-gen-go-grpc