
目录
- 部署Go语言项目
- 独立部署
- 编译
- nohup
- supervisor
- 搭配nginx部署
- 正向代理与反向代理
- 使用yum安装nginx
- Nginx配置文件
- Nginx常用命令
- Nginx反向代理部署,无负载均衡
- Nginx反向代理部署,有负载均衡
- Nginx分离动静态文件请求
- 前后端分开部署
- 允许所有请求跨域
部署Go语言项目 本文以部署 Go Web 程序为例,介绍了在 CentOS7 服务器上部署 Go 语言程序的若干方法。
独立部署 Go 语言支持跨平台交叉编译,也就是说我们可以在 Windows 或 Mac 平台下编写代码,并且将代码编译成能够在 Linux amd64 服务器上运行的程序。
对于简单的项目,通常我们只需要将编译后的二进制文件拷贝到服务器上,然后设置为后台守护进程运行即可。
编译
编译可以通过以下命令或编写 makefile 来操作。
CGO_ENABLED=0 GOOS=linux GOARCH=amd64 go build -o ./bin/bluebell
下面假设我们将本地编译好的 bluebell 二进制文件、配置文件和静态文件等上传到服务器的
/data/app/bluebell补充一点,如果嫌弃编译后的二进制文件太大,可以在编译的时候加上
-ldflags "-s -w"CGO_ENABLED=0 GOOS=linux GOARCH=amd64 go build -ldflags "-s -w" -o ./bin/bluebell
如果还是嫌大的话可以继续使用 upx 工具对二进制可执行文件进行压缩。
我们编译好 bluebell 项目后,相关必要文件的目录结构如下:
├── bin│└── bluebell├── conf│└── config.yaml├── static│├── css││└── app.0afe9dae.css│├── favicon.ico│├── img││├── avatar.7b0a9835.png││├── iconfont.cdbe38a0.svg││├── logo.da56125f.png││└── search.8e85063d.png│└── js│├── app.9f3efa6d.js│├── app.9f3efa6d.js.map│├── chunk-vendors.57f9e9d6.js│└── chunk-vendors.57f9e9d6.js.map└── templates└── index.html
nohup
nohup 用于在系统后台不挂断地运行命令,不挂断指的是退出执行命令的终端也不会影响程序的运行。
我们可以使用 nohup 命令来运行应用程序,使其作为后台守护进程运行。由于在主流的 Linux 发行版中都会默认安装 nohup 命令工具,我们可以直接输入以下命令来启动我们的项目:
sudo nohup ./bin/bluebell conf/config.yaml > nohup_bluebell.log 2> & 1 &
其中:
./bluebell conf/config.yaml是我们应用程序的启动命令
nohup ... &表示在后台不挂断的执行上述应用程序的启动命令
> nohup_bluebell.log表示将命令的标准输出重定向到 nohup_bluebell.log 文件
2>&1表示将标准错误输出也重定向到标准输出中,结合上一条就是把执行命令的输出都定向到 nohup_bluebell.log 文件
上面的命令执行后会返回进程 id
[1] 6338
当然我们也可以通过以下命令查看 bluebell 相关活动进程:
ps -ef | grep bluebell
输出:
root633840480 08:43 pts/000:00:00 ./bin/bluebell conf/config.yamlroot637640480 08:43 pts/000:00:00 grep --color=auto bluebell
此时就可以打开浏览器输入
http://服务器公网ip:端口
文章图片
supervisor
Supervisor 是业界流行的一个通用的进程管理程序,它能将一个普通的命令行进程变为后台守护进程,并监控该进程的运行状态,当该进程异常退出时能将其自动重启。
首先使用 yum 来安装 supervisor:
如果你还没有安装过 EPEL,可以通过运行下面的命令来完成安装,如果已安装则跳过此步骤:
sudo yum install epel-release
安装 supervisor
sudo yum install supervisor
Supervisor 的配置文件为:/etc/supervisord.conf ,Supervisor 所管理的应用的配置文件放在 /etc/supervisord.d/ 目录中,这个目录可以在 supervisord.conf 中的
include[include]files = /etc/supervisord.d/*.conf
启动supervisor服务:
sudo supervisord -c /etc/supervisord.conf
我们在
/etc/supervisord.dbluebell.conf[program:bluebell]; 程序名称user=root; 执行程序的用户command=/data/app/bluebell/bin/bluebell /data/app/bluebell/conf/config.yaml; 启动文件路径项目配置文件路径directory=/data/app/bluebell/ ; 命令执行的目录stopsignal=TERM; 重启时发送的信号autostart=true; 是否自动启动autorestart=true; 是否自动重启stdout_logfile=/var/log/bluebell-stdout.log; 标准输出日志位置stderr_logfile=/var/log/bluebell-stderr.log; 标准错误日志位置
创建好配置文件之后,重启supervisor服务
sudo supervisorctl update # 更新配置文件并重启相关的程序sudo supervisorctl status bluebell # 查看bluebell的运行状态:sudo supervisorctl restart bluebell # 重启sudo supervisorctl start bluebell # 启动
输出:
bluebellRUNNINGpid 10918, uptime 0:05:46
最后补充一下常用的supervisr管理命令:
supervisorctl status# 查看所有任务状态supervisorctl shutdown# 关闭所有任务supervisorctl start 程序名# 启动任务supervisorctl stop 程序名# 关闭任务supervisorctl reload# 重启supervisor
接下来就是打开浏览器查看网站是否正常了。
搭配nginx部署 在需要静态文件分离、需要配置多个域名及证书、需要自建负载均衡层等稍复杂的场景下,我们一般需要搭配第三方的web服务器(Nginx、Apache)来部署我们的程序。
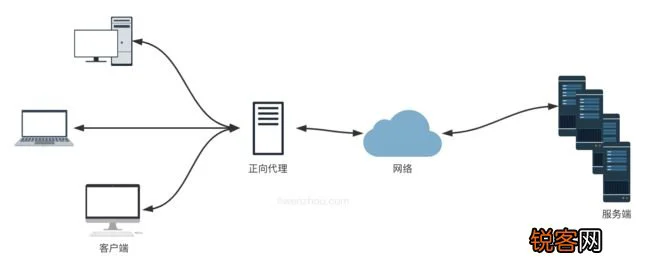
正向代理与反向代理
正向代理可以简单理解为客户端的代理,你访问墙外的网站用的那个属于正向代理。
文章图片
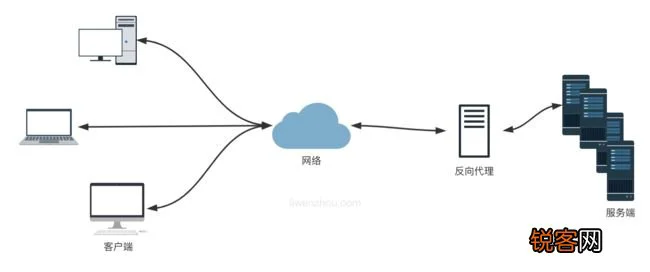
反向代理可以简单理解为服务器的代理,通常说的 Nginx 和 Apache 就属于反向代理。
文章图片
Nginx 是一个免费的、开源的、高性能的 HTTP 和反向代理服务,主要负责负载一些访问量比较大的站点。Nginx 可以作为一个独立的 Web 服务,也可以用来给 Apache 或是其他的 Web 服务做反向代理。相比于 Apache,Nginx 可以处理更多的并发连接,而且每个连接的内存占用的非常小。
使用yum安装nginx
EPEL 仓库中有 Nginx 的安装包。如果你还没有安装过 EPEL,可以通过运行下面的命令来完成安装:
sudo yum install epel-release
安装nginx
sudo yum install nginx
【Golang项目搭配nginx部署反向代理负载均衡讲解】安装完成后,执行下面的命令设置Nginx开机启动:
sudo systemctl enable nginx
启动Nginx
sudo systemctl start nginx
查看Nginx运行状态:
sudo systemctl status nginx
Nginx配置文件
通过上面的方法安装的 nginx,所有相关的配置文件都在
/etc/nginx//etc/nginx/nginx.conf默认还有一个
nginx.conf.default.conf/etc/nginx/conf.dNginx常用命令
补充几个 Nginx 常用命令。
nginx -s stop# 停止 Nginx 服务nginx -s reload# 重新加载配置文件nginx -s quit# 平滑停止 Nginx 服务nginx -t# 测试配置文件是否正确
Nginx反向代理部署,无负载均衡
我们推荐使用 nginx 作为反向代理来部署我们的程序,按下面的内容修改 nginx 的配置文件。
worker_processes1; # 工作进程events {worker_connections1024; # 连接数}http {includemime.types; # 默认配置default_typeapplication/octet-stream; # 默认配置sendfileon; keepalive_timeout65; # 超时时间server { # server组listen80; # nginx监听端口server_namelocalhost; # 服务的域名access_log/var/log/bluebell-access.log; # 访问日志error_log/var/log/bluebell-error.log; # 错误日志location / { # 访问 / 根下的所有路径,反向代理从80转到8084proxy_passhttp://127.0.0.1:8084; proxy_redirectoff; proxy_set_headerHost$host; proxy_set_headerX-Real-IP$remote_addr; proxy_set_headerX-Forwarded-For$proxy_add_x_forwarded_for; }}}
执行下面的命令检查配置文件语法:
nginx -t
执行下面的命令重新加载配置文件:
nginx -s reload
接下来就是打开浏览器查看网站是否正常了。
Nginx反向代理部署,有负载均衡
当然我们还可以使用 nginx 的 upstream 配置来添加多个服务器地址实现负载均衡。
worker_processes1; # 工作进程events {worker_connections1024; # 连接数}http {includemime.types; # 默认配置default_typeapplication/octet-stream; # 默认配置sendfileon; keepalive_timeout65; # 超时时间# 负载均衡backend为组名upstream backend {server 127.0.0.1:8084; # 这里需要填真实可用的地址,默认轮询#server backend1.example.com; #server backend2.example.com; }server { # server组listen80; # nginx监听端口server_namelocalhost; # 服务的域名access_log/var/log/bluebell-access.log; # 访问日志error_log/var/log/bluebell-error.log; # 错误日志location / { # 访问 / 根下的所有路径,反向代理从80转到8084proxy_passhttp://backend/; # 负载均衡组名proxy_redirectoff; proxy_set_headerHost$host; proxy_set_headerX-Real-IP$remote_addr; proxy_set_headerX-Forwarded-For$proxy_add_x_forwarded_for; }}}
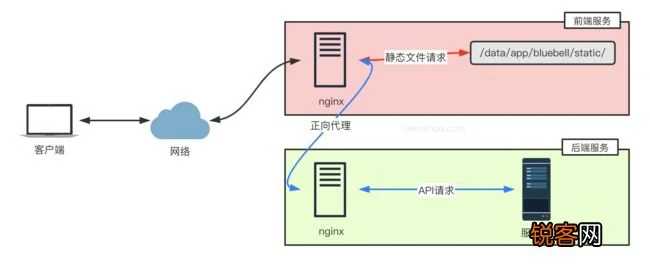
Nginx分离动静态文件请求
上面的配置是简单的使用 nginx 作为反向代理处理所有的请求并转发给我们的 Go 程序处理,其实我们还可以有选择的将静态文件部分的请求直接使用 nginx 处理,而将 API 接口类的动态处理请求转发给后端的 Go 程序来处理。

文章图片
下面继续修改我们的 nginx 的配置文件来实现上述功能。
指定静态文件所在路径,防止前端拼接的接口,后端没有。刷新后404情况
worker_processes1; events {worker_connections1024; }http {includemime.types; default_typeapplication/octet-stream; sendfileon; keepalive_timeout65; server {listen80; server_namebluebell; access_log/var/log/bluebell-access.log; error_log/var/log/bluebell-error.log; # 静态文件请求,以下面这些结尾的请求location ~ .*\.(gif|jpg|jpeg|png|js|css|eot|ttf|woff|svg|otf)$ {access_log off; expires1d; root/data/app/bluebell; # 指定静态文件所在路径,防止前端拼接的接口,后端没有。刷新后404情况}# index.html页面请求# 因为是单页面应用这里使用 try_files 处理一下,避免刷新页面时出现404的问题location / {root /data/app/bluebell/templates; # 指定index.html前端文件所在路径index index.html; try_files $uri $uri/ /index.html; # 所有的请求最后指向index.html}# API请求location /api {proxy_passhttp://127.0.0.1:8084; proxy_redirectoff; proxy_set_headerHost$host; proxy_set_headerX-Real-IP$remote_addr; proxy_set_headerX-Forwarded-For$proxy_add_x_forwarded_for; }}}
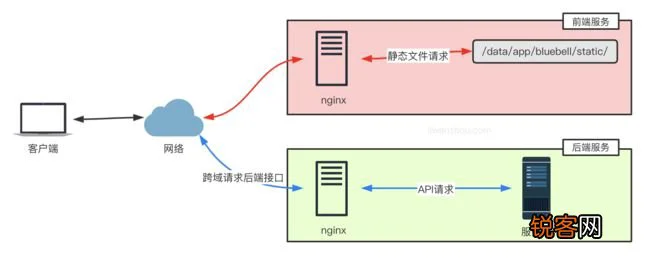
前后端分开部署
前后端的代码没必要都部署到相同的服务器上,也可以分开部署到不同的服务器上,下图是前端服务将 API 请求转发至后端服务的方案。
文章图片
上面的部署方案中,所有浏览器的请求都是直接访问前端服务,而如果是浏览器直接访问后端API服务的部署模式下,如下图。
此时前端和后端通常不在同一个域下,我们还需要在后端代码中添加跨域支持。
文章图片
这里使用github.com/gin-contrib/cors库来支持跨域请求。
允许所有请求跨域
最简单的允许跨域的配置是使用
cors.Default()func main() { router := gin.Default() // same as // config := cors.DefaultConfig() // config.AllowAllOrigins = true // router.Use(cors.New(config)) router.Use(cors.Default()) router.Run()}
此外,还可以使用
cors.Configpackage mainimport ( "time" "github.com/gin-contrib/cors" "github.com/gin-gonic/gin")func main() { router := gin.Default() // CORS for https://foo.com and https://github.com origins, allowing: // - PUT and PATCH methods // - Origin header // - Credentials share // - Preflight requests cached for 12 hours router.Use(cors.New(cors.Config{AllowOrigins:[]string{"https://foo.com"},AllowMethods:[]string{"PUT", "PATCH"},AllowHeaders:[]string{"Origin"},ExposeHeaders:[]string{"Content-Length"},AllowCredentials: true,AllowOriginFunc: func(origin string) bool {return origin == "https://github.com"},MaxAge: 12 * time.Hour, })) router.Run()}
以上就是Golang项目搭配nginx部署反向代理负载均衡讲解的详细内容,更多关于Golang nginx反向代理部署负载均衡的资料请关注脚本之家其它相关文章!