在开发中,有时会遇到对图片的处理需求,在 Python中, PIL/Pillow 库非常强大和易用。
imageimage读取、新建图片
读取
os.Open()unknown formatpackage main
import (
"fmt"
"image"
_ "image/png"
"os"
)
func main() {
f, err := os.Open("./gopher.png")
if err != nil {
panic(err)
}
img, formatName, err := image.Decode(f)
if err != nil {
panic(err)
}
fmt.Println(formatName)
fmt.Println(img.Bounds())
fmt.Println(img.ColorModel())
}
Decodeimage.Imagetype Image interface {
ColorModel() color.Model // 返回图片的颜色模型
Bounds() Rectangle // 返回图片的长宽
At(x, y int) color.Color // 返回(x,y)像素点的颜色
}
image 库中很多结构都实现了该接口,对于一些标准库中没有实现的功能,我们也可以自己实现该接口去满足。
新建
image.NewRGBA()img := image.NewRGBA(image.Rect(0, 0, 300, 300))
NewRGBAimage.Imageimage.RGBA保存图片
保存图片和保存文件也类似,需要先将图片编码,然后以数据流的形式写入文件。
img := image.NewRGBA(image.Rect(0, 0, 300, 300))

outFile, err := os.Create("gopher2.png")
defer outFile.Close()
if err != nil {
  panic(err)
}
b := bufio.NewWriter(outFile)
err = png.Encode(b, img)
if err != nil {
  panic(err)
}
err = b.Flush()
if err != nil {
  panic(err)
}
裁剪图片
SubImage()img := image.NewRGBA(image.Rect(0, 0, 300, 300))
subImage := img.SubImage(image.Rect(0, 0, 20, 20))
该方法将从创建的300 * 300的图片裁剪出20 * 20 像素的子图片。
绘制图片
draw.Drawdraw.DrawMaskfunc Draw(dst Image, r image.Rectangle, src image.Image, sp image.Point, op Op)
func DrawMask(dst Image, r image.Rectangle, src image.Image, sp image.Point, mask image.Image, mp image.Point, op Op)
Draw
Drawdst 绘图的背景图
r 背景图的绘图区域
src 要绘制的图
sp src 对应的绘图开始点
op 组合方式
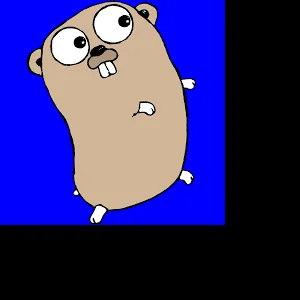
以下代码是将一个 Gopher 的图案绘制到了一张黑色背景空白图的左上角。
f, err := os.Open("./gopher.png")
if err != nil {
  panic(err)
}
gopherImg, _, err := image.Decode(f) // 打开图片

img := image.NewRGBA(image.Rect(0, 0, 300, 300))
for x := 0; x < img.Bounds().Dx(); x++ {    // 将背景图涂黑
  for y := 0; y < img.Bounds().Dy(); y++ {
    img.Set(x, y, color.Black)
  }
}
draw.Draw(img, img.Bounds(), gopherImg, image.Pt(0, 0), draw.Over) // 将gopherImg绘制到背景图上
DrawMask
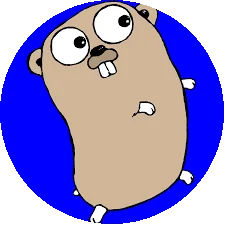
DrawMaskmaskmpDrawDrawMaskDrawMaskmaskDrawDrawMask下面是给图片加一个圆形遮罩的示例:
func drawCirclePic() {
 f, err := os.Open("./gopher.png")
 if err != nil {
  panic(err)
 }
 gopherImg, _, err := image.Decode(f)


 d := gopherImg.Bounds().Dx()

 //将一个cicle作为蒙层遮罩,圆心为图案中点,半径为边长的一半
 c := circle{p: image.Point{X: d / 2, Y: d / 2}, r: d / 2}
 circleImg := image.NewRGBA(image.Rect(0, 0, d, d))
 draw.DrawMask(circleImg, circleImg.Bounds(), gopherImg, image.Point{}, &c, image.Point{}, draw.Over)

 SavePng(circleImg)
}

type circle struct { // 这里需要自己实现一个圆形遮罩,实现接口里的三个方法
 p image.Point // 圆心位置
 r int
}

func (c *circle) ColorModel() color.Model {
 return color.AlphaModel
}

func (c *circle) Bounds() image.Rectangle {
 return image.Rect(c.p.X-c.r, c.p.Y-c.r, c.p.X+c.r, c.p.Y+c.r)
}

// 对每个像素点进行色值设置,在半径以内的图案设成完全不透明
func (c *circle) At(x, y int) color.Color {
 xx, yy, rr := float64(x-c.p.X)+0.5, float64(y-c.p.Y)+0.5, float64(c.r)
 if xx*xx+yy*yy < rr*rr {
  return color.Alpha{A: 255}
 }
 return color.Alpha{}
}
给图片加一个圆角遮罩的示例:
func drawRadiusPic() {
 f, err := os.Open("./gopher.png")
 if err != nil {
  panic(err)
 }
 gopherImg, _, err := image.Decode(f)

 w := gopherImg.Bounds().Dx()
 h := gopherImg.Bounds().Dy()

 c := radius{p: image.Point{X: w, Y: h}, r: int(40)}
 radiusImg := image.NewRGBA(image.Rect(0, 0, w, h))
 draw.DrawMask(radiusImg, radiusImg.Bounds(), gopherImg, image.Point{}, &c, image.Point{}, draw.Over)

 SavePng(radiusImg)
}

type radius struct {
 p image.Point // 矩形右下角位置
 r int
}

func (c *radius) ColorModel() color.Model {
 return color.AlphaModel
}

func (c *radius) Bounds() image.Rectangle {
 return image.Rect(0, 0, c.p.X, c.p.Y)
}

// 对每个像素点进行色值设置,分别处理矩形的四个角,在四个角的内切圆的外侧,色值设置为全透明,其他区域不透明
func (c *radius) At(x, y int) color.Color {
 var xx, yy, rr float64
 var inArea bool
 // left up
 if x <= c.r && y <= c.r {
  xx, yy, rr = float64(c.r-x)+0.5, float64(y-c.r)+0.5, float64(c.r)
  inArea = true
 }
 // right up
 if x >= (c.p.X-c.r) && y <= c.r {
  xx, yy, rr = float64(x-(c.p.X-c.r))+0.5, float64(y-c.r)+0.5, float64(c.r)
  inArea = true
 }
 // left bottom
 if x <= c.r && y >= (c.p.Y-c.r) {
  xx, yy, rr = float64(c.r-x)+0.5, float64(y-(c.p.Y-c.r))+0.5, float64(c.r)
  inArea = true
 }
 // right bottom
 if x >= (c.p.X-c.r) && y >= (c.p.Y-c.r) {
  xx, yy, rr = float64(x-(c.p.X-c.r))+0.5, float64(y-(c.p.Y-c.r))+0.5, float64(c.r)
  inArea = true
 }

 if inArea && xx*xx+yy*yy >= rr*rr {
  return color.Alpha{}
 }
 return color.Alpha{A: 255}
}
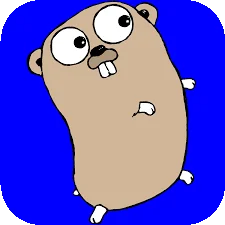
在图案进行圆形、圆角绘制的过程中,因为最小单位是1px,所以可能会有锯齿边缘的问题,解决这个问题可以通过先将原图放大,遮罩后再缩小来解决。
Reference
The Go image/draw package - The Go Blog (golang.org)https://blog.golang.org/image-draw)
Porter-Duff blend 模式 - Xamarin | Microsoft Docs(https://docs.microsoft.com/zh-tw/xamarin/xamarin-forms/user-interface/graphics/skiasharp/effects/blend-modes/porter-duff)
欢迎加入我们GOLANG中国社区:https://gocn.vip/
《酷Go推荐》招募:
各位Gopher同学,最近我们社区打算推出一个类似GoCN每日新闻的新栏目《酷Go推荐》,主要是每周推荐一个库或者好的项目,然后写一点这个库使用方法或者优点之类的,这样可以真正的帮助到大家能够学习到
新的库,并且知道怎么用。
大概规则和每日新闻类似,如果报名人多的话每个人一个月轮到一次,欢迎大家报名!(报名地址:https://wj.qq.com/s2/7734329/3f51)
扫码也可以加入 GoCN 的大家族哟~