
文档
https://developer.fyne.io/started/packaging
画布 Canvas
window.SetContent(CanvasObject)fyne.CanvasObjectfyne.CanvasObjectCanvas// CanvasObject describes any graphical object that can be added to a canvas.
// Objects have a size and position that can be controlled through this API.
// MinSize is used to determine the minimum size which this object should be displayed.
// An object will be visible by default but can be hidden with Hide() and re-shown with Show().
//
// Note: If this object is controlled as part of a Layout you should not call
// Resize(Size) or Move(Position).
type CanvasObject interface {
// geometry
// MinSize returns the minimum size this object needs to be drawn.
MinSize() Size
// Move moves this object to the given position relative to its parent.
// This should only be called if your object is not in a container with a layout manager.
Move(Position)
// Position returns the current position of the object relative to its parent.
Position() Position
// Resize resizes this object to the given size.
// This should only be called if your object is not in a container with a layout manager.
Resize(Size)
// Size returns the current size of this object.
Size() Size
// visibility
// Hide hides this object.
Hide()
// Visible returns whether this object is visible or not.
Visible() bool
// Show shows this object.
Show()
// Refresh must be called if this object should be redrawn because its inner state changed.
Refresh()
}
fyne.CanvasObjectlayoutcontainerResizeMovelayout.NewGridWrapLayoutimg := canvas.NewImageFromResource(resourceClockJpg)
img.FillMode = canvas.ImageFillOriginal
content1 := container.New(layout.NewCenterLayout(), container.New(layout.NewGridWrapLayout(fyne.NewSize(100, 100)), img))
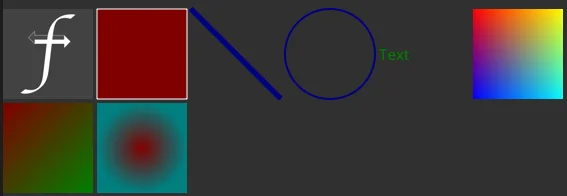
Canvas 提供了一些基础的绘制元素。
- 图像 image
- 长方形 rectangle
- 线 line
- 圆 circle
- 文本 text
- 渐变色效果,包括放射渐变 canvas.RadialGradient,线性渐变 canvas.LinearGradient。
rectangle
使用最简单,通过 canvas.NewRectangle() 创建。
可以设置宽高,填充色,边框线的宽和颜色。
关于颜色,透明度Alpha为0是全透明,255为没有透明度。
green := color.NRGBA{R: 0, G: 180, B: 0, A: 255}
修改了rectangle的属性之后需要调用 Refresh 来重新渲染,其他元素也是一样的。
Text
简单文本对象,通过 canvas.NewText() 创建。
// Text describes a text primitive in a Fyne canvas.
// A text object can have a style set which will apply to the whole string.
// No formatting or text parsing will be performed
type Text struct {
	baseObject
	Alignment fyne.TextAlign // The alignment of the text content

	Color     color.Color    // The main text draw color
	Text      string         // The string content of this Text
	TextSize  float32        // Size of the text - if the Canvas scale is 1.0 this will be equivalent to point size
	TextStyle fyne.TextStyle // The style of the text content
}
该对象可以设置对齐,颜色,文本内容,字号大小,样式。
对齐有三个常量:左对齐 TextAlignLeading,居中 TextAlignCenter, 右对齐 TextAlignTrailing。
// TextStyle represents the styles that can be applied to a text canvas object
// or text based widget.
type TextStyle struct {
	Bold      bool // Should text be bold
	Italic    bool // Should text be italic
	Monospace bool // Use the system monospace font instead of regular

	// Since: 2.1
	TabWidth int // Width of tabs in spaces
}
TextStyle 可以设置粗体,倾斜,字间距,tab键的宽度(占几个空格)。
最后就是字体的设置,全局同意字体,通过环境变量的 FYNE_FONT 设置一个 ttf 或者 ttc 的字体,前面的文章已经讲过了。
line
通过 canvas.NewLine() 创建直线。可以设置线宽,颜色,起始点(默认左上角),终点坐标(默认右下角)。
// Line describes a colored line primitive in a Fyne canvas.
// Lines are special as they can have a negative width or height to indicate
// an inverse slope (i.e. slope up vs down).
type Line struct {
	Position1 fyne.Position // The current top-left position of the Line
	Position2 fyne.Position // The current bottomright position of the Line
	Hidden    bool          // Is this Line currently hidden

	StrokeColor color.Color // The line stroke color
	StrokeWidth float32     // The stroke width of the line
}

type Position struct {
	X float32 // The position from the parent's left edge
	Y float32 // The position from the parent's top edge
}
circle
通过 canvas.NewCircle() 创建。可以设置填充色,边框线宽和颜色。另外它居然是通过左上角坐标和右下角坐标来确定圆位置和大小的,而不是通过圆心坐标和半径,有点奇怪。
// Circle describes a colored circle primitive in a Fyne canvas
type Circle struct {
	Position1 fyne.Position // The current top-left position of the Circle
	Position2 fyne.Position // The current bottomright position of the Circle
	Hidden    bool          // Is this circle currently hidden

	FillColor   color.Color // The circle fill color
	StrokeColor color.Color // The circle stroke color
	StrokeWidth float32     // The stroke width of the circle
}
image
// NewImageFromFile creates a new image from a local file.
// Images returned from this method will scale to fit the canvas object.
// The method for scaling can be set using the Fill field.
func NewImageFromFile(file string) *Image

// NewImageFromURI creates a new image from named resource.
// File URIs will read the file path and other schemes will download the data into a resource.
// HTTP and HTTPs URIs will use the GET method by default to request the resource.
// Images returned from this method will scale to fit the canvas object.
// The method for scaling can be set using the Fill field.
//
// Since: 2.0
func NewImageFromURI(uri fyne.URI) *Image

// NewImageFromReader creates a new image from a data stream.
// The name parameter is required to uniquely identify this image (for caching etc).
// If the image in this io.Reader is an SVG, the name should end ".svg".
// Images returned from this method will scale to fit the canvas object.
// The method for scaling can be set using the Fill field.
//
// Since: 2.0
func NewImageFromReader(read io.Reader, name string) *Image

// NewImageFromResource creates a new image by loading the specified resource.
// Images returned from this method will scale to fit the canvas object.
// The method for scaling can be set using the Fill field.
func NewImageFromResource(res fyne.Resource) *Image

// NewImageFromImage returns a new Image instance that is rendered from the Go
// image.Image passed in.
// Images returned from this method will scale to fit the canvas object.
// The method for scaling can be set using the Fill field.
func NewImageFromImage(img image.Image) *Image
// Image describes a drawable image area that can render in a Fyne canvas
// The image may be a vector or a bitmap representation and it will fill the area.
// The fill mode can be changed by setting FillMode to a different ImageFill.
type Image struct {
	baseObject

	// one of the following sources will provide our image data
	File     string        // Load the image from a file
	Resource fyne.Resource // Load the image from an in-memory resource
	Image    image.Image   // Specify a loaded image to use in this canvas object

	Translucency float64    // Set a translucency value > 0.0 to fade the image
	FillMode     ImageFill  // Specify how the image should expand to fill or fit the available space
	ScaleMode    ImageScale // Specify the type of scaling interpolation applied to the image

}
关于 FillMode 有三种,一定要设置,否则图片的默认大小为(1, 2),也就是看不见了。
- ImageFillStretch 拉伸,填满空间。
- ImageFillContain 保持宽高比。
- ImageFillOriginal 保持原始大小,不缩放。
这里的 image.Image 是标准库的包,比如使用像素点来创建一个图像
myApp := app.New()
myWindow := myApp.NewWindow("xxx")

images := image.NewRGBA(image.Rectangle{Min: image.Point{}, Max: image.Point{X: 100, Y: 100}})
for i := 0; i < 100; i++ {
    for j := 0; j < 100; j++ {
        images.Set(i, j, color.NRGBA{R: uint8(i % 256), G: uint8(j % 256), A: 255})
    }
}

img2 := canvas.NewImageFromImage(images)
img2.FillMode = canvas.ImageFillOriginal

myWindow.SetContent(img2)
myWindow.ShowAndRun()
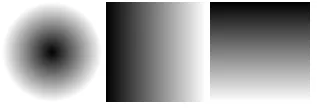
gradient
canvas.LinearGradientcanvas.RadialGradientcanvas.NewHorizontalGradient()canvas.NewVerticalGradient()canvas.NewRadialGradient()a := app.New()
w := a.NewWindow("Canvas")
gradient1 := canvas.NewRadialGradient(color.Black, color.Transparent)
gradient2 := canvas.NewHorizontalGradient(color.Black, color.Transparent)
gradient3 := canvas.NewVerticalGradient(color.Black, color.Transparent)
w.SetContent(container.New(layout.NewGridWrapLayout(fyne.NewSize(100, 100)), gradient1, gradient2, gradient3))
w.Resize(fyne.NewSize(600, 200))
w.ShowAndRun()
控件 Widget
控件就是对上面提到的 canvas 基本元素的封装,进一步方便我们调用。
- Label 标签
- Button 按钮
- Card 卡片
- Entry 输入框
- Form 表单
- Check, CheckGroup 复选框
- RadioGroup 单选框
- Select, SelectEntry 下拉框
- Hyperlink 超链接
- Progress 进度条
- Slider 滑块
- Text 文本
- Toolbar 工具栏
- Accordion 折叠/展开
Label
canvas.TextLabel\nl2 := widget.NewLabel("da\njun") // 会换行
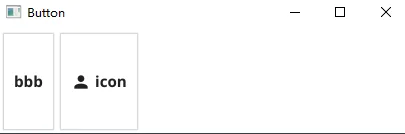
Button
ButtonButtonwidget.NewButton()widget.NewButtonWithIcon()fyne.Resourcea := app.New()
w := a.NewWindow("Button")
b1 := widget.NewButton("bbb", func() {
fmt.Println("bbb")
})
b2 := widget.NewButtonWithIcon("icon", theme.AccountIcon(), func() {
fmt.Println("icon")
})
w.SetContent(container.New(layout.NewHBoxLayout(), b1, b2))
w.Resize(fyne.NewSize(600, 200))
w.ShowAndRun()
themeEntry
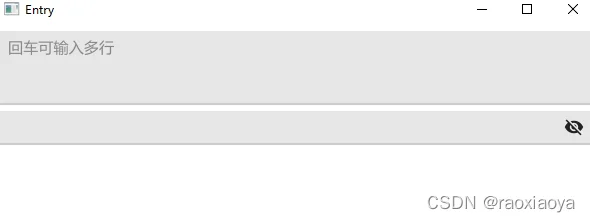
Entrywidget.NewEntry()TextOnChangedOnChangedDisable()SetPlaceHolder()MultilineNewPasswordEntry()setFont()
defer os.Unsetenv("FYNE_FONT")
a := app.New()
w := a.NewWindow("Entry")
et := widget.NewEntry()
et.MultiLine = true
et.SetPlaceHolder("回车可输入多行")
e2 := widget.NewPasswordEntry()
c := container.New(layout.NewVBoxLayout(), et, e2)
w.SetContent(c)
w.Resize(fyne.NewSize(600, 200))
w.CenterOnScreen()
w.ShowAndRun()
Enrty 的功能非常丰富,可以看看源码。
RadioGroup, Check, CheckGroup
sexRadio := widget.NewRadioGroup([]string{"male", "female", "unknown"}, func(value string) {
    fmt.Println("sex:", value)
})
sexRadio.Horizontal = true
sexBox := container.New(layout.NewHBoxLayout(), widget.NewLabel("Sex"), sexRadio)

football := widget.NewCheck("football", func(value bool) {
    fmt.Println("football:", value)
})
basketball := widget.NewCheck("basketball", func(value bool) {
    fmt.Println("basketball:", value)
})
pingpong := widget.NewCheck("pingpong", func(value bool) {
    fmt.Println("pingpong:", value)
})
hobbyBox := container.New(layout.NewHBoxLayout(), widget.NewLabel("Hobby"), football, basketball, pingpong)

hobbyBox2 := widget.NewCheckGroup([]string{"football", "basketball", "pingpong"}, func(values []string) {
    fmt.Println("pingpong:", values)
})
hobbyBox2.Horizontal = true

provinceSelect := widget.NewSelect([]string{"anhui", "zhejiang", "shanghai"}, func(value string) {
    fmt.Println("province:", value)
})
provinceBox := container.New(layout.NewHBoxLayout(), widget.NewLabel("Province"), layout.NewSpacer(), provinceSelect)
Form
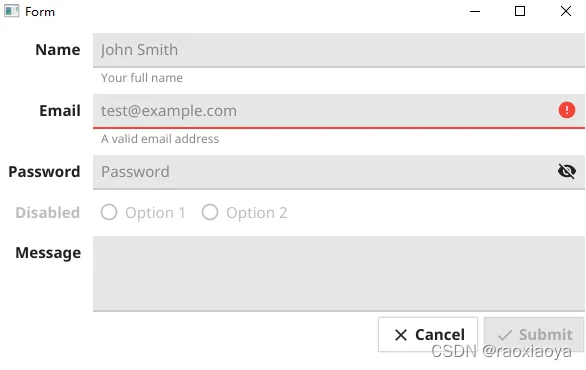
如果你要展示一个表单,你可以自己来布局各个元素,当然更快捷的方式是使用 Form 控件。
myApp := app.New()
myWin := myApp.NewWindow("Form")

name := widget.NewEntry()
name.SetPlaceHolder("John Smith")

email := widget.NewEntry()
email.SetPlaceHolder("test@example.com")
email.Validator = validation.NewRegexp(`\w{1,}@\w{1,}\.\w{1,4}`, "not a valid email")

password := widget.NewPasswordEntry()
password.SetPlaceHolder("Password")

disabled := widget.NewRadioGroup([]string{"Option 1", "Option 2"}, func(string) {})
disabled.Horizontal = true
disabled.Disable()
largeText := widget.NewMultiLineEntry()

form := widget.NewForm(
    &widget.FormItem{Text: "Name", Widget: name, HintText: "Your full name"},
    &widget.FormItem{Text: "Email", Widget: email, HintText: "A valid email address"},
)
form.OnCancel = func() {
    fmt.Println("Cancelled")
}
form.OnSubmit = func() {
    fmt.Println("Form submitted")
    fyne.CurrentApp().SendNotification(&fyne.Notification{
        Title:   "Form for: " + name.Text,
        Content: largeText.Text,
    })
}

form.Append("Password", password)
form.Append("Disabled", disabled)
form.Append("Message", largeText)

myWin.SetContent(form)
myWin.ShowAndRun()
ProgressBar
myApp := app.New()
myWindow := myApp.NewWindow("ProgressBar")

bar1 := widget.NewProgressBar()
bar1.Min = 0
bar1.Max = 100
bar2 := widget.NewProgressBarInfinite()

go func() {
    for i := 0; i <= 100; i++ {
        time.Sleep(time.Millisecond * 500)
        bar1.SetValue(float64(i))
    }
}()

content := container.New(layout.NewVBoxLayout(), bar1, bar2)
myWindow.SetContent(content)
myWindow.Resize(fyne.NewSize(150, 150))
myWindow.ShowAndRun()

ToolBar
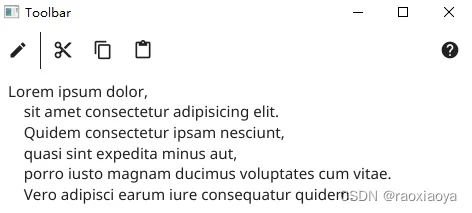
Toolbarwidget.NewToolbar()widget.ToolbarItemToolbarItemActionSeparatorSpacerwidget.NewToolbarItemAction(resource, callback)widget.NewToolbarSeparator()widget.NewToolbarSpacer()myApp := app.New()
myWindow := myApp.NewWindow("Toolbar")
toolbar := widget.NewToolbar(
widget.NewToolbarAction(theme.DocumentCreateIcon(), func() {
fmt.Println("New document")
}),
widget.NewToolbarSeparator(),
widget.NewToolbarAction(theme.ContentCutIcon(), func() {
fmt.Println("Cut")
}),
widget.NewToolbarAction(theme.ContentCopyIcon(), func() {
fmt.Println("Copy")
}),
widget.NewToolbarAction(theme.ContentPasteIcon(), func() {
fmt.Println("Paste")
}),
widget.NewToolbarSpacer(),
widget.NewToolbarAction(theme.HelpIcon(), func() {
log.Println("Display help")
}),
)
content := container.New(
layout.NewBorderLayout(toolbar, nil, nil, nil),
toolbar, widget.NewLabel(`Lorem ipsum dolor,
sit amet consectetur adipisicing elit.
Quidem consectetur ipsam nesciunt,
quasi sint expedita minus aut,
porro iusto magnam ducimus voluptates cum vitae.
Vero adipisci earum iure consequatur quidem.`),
)
myWindow.SetContent(content)
myWindow.ShowAndRun()
扩展控件的能力,或者自己编写控件
widget.Iconcanvasobject.go// Tappable describes any CanvasObject that can also be tapped.
// This should be implemented by buttons etc that wish to handle pointer interactions.
// 鼠标左键
type Tappable interface {
Tapped(*PointEvent)
}
// SecondaryTappable describes a CanvasObject that can be right-clicked or long-tapped.
// 鼠标右键或长按
type SecondaryTappable interface {
TappedSecondary(*PointEvent)
}
// DoubleTappable describes any CanvasObject that can also be double tapped.
// 双击
type DoubleTappable interface {
DoubleTapped(*PointEvent)
}
// Disableable describes any CanvasObject that can be disabled.
// This is primarily used with objects that also implement the Tappable interface.
type Disableable interface {
Enable()
Disable()
Disabled() bool
}
// Scrollable describes any CanvasObject that can also be scrolled.
// This is mostly used to implement the widget.ScrollContainer.
type Scrollable interface {
Scrolled(*ScrollEvent)
}
// Draggable indicates that a CanvasObject can be dragged.
// This is used for any item that the user has indicated should be moved across the screen.
type Draggable interface {
Dragged(*DragEvent)
DragEnd()
}
// Focusable describes any CanvasObject that can respond to being focused.
// It will receive the FocusGained and FocusLost events appropriately.
// When focused it will also have TypedRune called as text is input and
// TypedKey called when other keys are pressed.
//
// Note: You must not change canvas state (including overlays or focus) in FocusGained or FocusLost
// or you would end up with a dead-lock.
type Focusable interface {
// FocusGained is a hook called by the focus handling logic after this object gained the focus.
FocusGained()
// FocusLost is a hook called by the focus handling logic after this object lost the focus.
FocusLost()
// TypedRune is a hook called by the input handling logic on text input events if this object is focused.
TypedRune(rune)
// TypedKey is a hook called by the input handling logic on key events if this object is focused.
TypedKey(*KeyEvent)
}
// Shortcutable describes any CanvasObject that can respond to shortcut commands (quit, cut, copy, and paste).
type Shortcutable interface {
TypedShortcut(Shortcut)
}
// Tabbable describes any object that needs to accept the Tab key presses.
//
// Since: 2.1
type Tabbable interface {
// AcceptsTab() is a hook called by the key press handling logic.
// If it returns true then the Tab key events will be sent using TypedKey.
AcceptsTab() bool
}
此处我们来实现单击,双击,右键点击事件。
type tappableIcon struct {
widget.Icon
}
func newTappableIcon(res fyne.Resource) *tappableIcon {
icon := &tappableIcon{}
// *********** 扩展控件 ***********
icon.ExtendBaseWidget(icon)
icon.SetResource(res)
return icon
}
func (t *tappableIcon) Tapped(e *fyne.PointEvent) {
log.Println("I have been left tapped at", e)
}
func (t *tappableIcon) TappedSecondary(e *fyne.PointEvent) {
log.Println("I have been right tapped at", e)
}
func (t *tappableIcon) DoubleTapped(e *fyne.PointEvent) {
log.Println("I have been double tapped at", e)
}
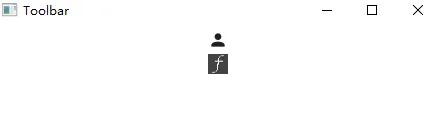
func main() {
myApp := app.New()
myWindow := myApp.NewWindow("Toolbar")
content := widget.NewIcon(theme.AccountIcon())
content1 := newTappableIcon(theme.FyneLogo())
myWindow.SetContent(container.New(layout.NewVBoxLayout(), content, content1))
myWindow.ShowAndRun()
}
2022/01/12 11:43:12 I have been left tapped at &{{193 37} {189 9}}
2022/01/12 11:43:13 I have been left tapped at &{{193 37} {189 9}}
2022/01/12 11:43:14 I have been left tapped at &{{201 37} {197 9}}
2022/01/12 11:43:20 I have been right tapped at &{{196 37} {192 9}}
2022/01/12 11:43:22 I have been double tapped at &{{196 37} {192 9}}
fyne.PointEvent自己编写控件也很简单,因为 widget 本质就是 CanvasObject ,你要么自己实现 CanvasObject 接口,要么包含一个 BaseWidget 对象,因为它已经替你实现了,比如
type Icon struct {
	BaseWidget

	Resource  fyne.Resource // The resource for this icon
	cachedRes fyne.Resource
}
其他的自行看源码即可。
Layout 布局
内置的布局有
盒子布局
layout.NewVBoxLayout()
排成一列大小相等,宽度取最小的控件宽度,高度按最大的控件高度。

layout.NewHBoxLayout()
排成一行大小相等,高度取最小的控件高度,宽度按最大的控件宽度。

layout.NewSpacer()
它会占满剩余的空间。对于水平盒状布局来说,第一个控件前添加一个layout.NewSpacer(),所有控件右对齐。最后一个控件后添加一个layout.NewSpacer(),所有控件左对齐。前后都有,那么控件中间对齐。如果在中间有添加一个layout.NewSpacer(),那么其它控件两边对齐。

将所有控件显示在中央位置,控件会相互重叠,最后的显示在最上层。
layout.NewCenterLayout()

网格布局,自适应布局
layout.NewGridLayout(cols int) 横排,指定列数,超出的则去到下一行。
layout.NewGridWrapLayout(size) 横排,需要设置格子大小。
layout.NewGridLayoutWithColumns(cols int) 横排,指定列数,超出了则去到下一行。
layout.NewGridLayoutWithRows(rows int) 纵排,指定行数,超出了则去到下一列。


layout.NewAdaptiveGridLayout()

边框布局,常用于构建用户界面
layout.NewBorderLayout(top, bottom, left, right)

表单布局,其实就是一个 layout.NewGridLayout(2)
layout.NewFormLayout()

让容器内的元素都显示为最大尺寸(等于容器的大小)
layout.NewMaxLayout()

layout.NewPaddedLayout()
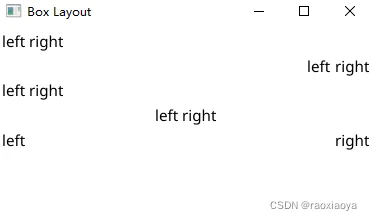
myApp := app.New()
myWindow := myApp.NewWindow("Box Layout")

hcontainer1 := container.New(
    layout.NewHBoxLayout(),
    canvas.NewText("left", color.Black),
    canvas.NewText("right", color.Black),
)

// 左对齐
hcontainer2 := container.New(
    layout.NewHBoxLayout(),
    layout.NewSpacer(),
    canvas.NewText("left", color.Black),
    canvas.NewText("right", color.Black),
)

// 右对齐
hcontainer3 := container.New(
    layout.NewHBoxLayout(),
    canvas.NewText("left", color.Black),
    canvas.NewText("right", color.Black),
    layout.NewSpacer(),
)

// 中间对齐
hcontainer4 := container.New(
    layout.NewHBoxLayout(),
    layout.NewSpacer(),
    canvas.NewText("left", color.Black),
    canvas.NewText("right", color.Black),
    layout.NewSpacer(),
)

// 两边对齐
hcontainer5 := container.New(
    layout.NewHBoxLayout(),
    canvas.NewText("left", color.Black),
    layout.NewSpacer(),
    canvas.NewText("right", color.Black),
)

myWindow.SetContent(container.New(layout.NewVBoxLayout(),
                                  hcontainer1, hcontainer2, hcontainer3, hcontainer4, hcontainer5))
myWindow.Resize(fyne.NewSize(200, 200))
myWindow.ShowAndRun()
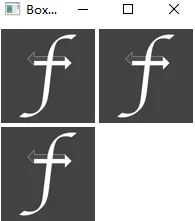
myApp := app.New()
myWindow := myApp.NewWindow("Box Layout")

icon1 := widget.NewIcon(theme.FyneLogo())
icon2 := widget.NewIcon(theme.FyneLogo())
icon3 := widget.NewIcon(theme.FyneLogo())

myWindow.SetContent(container.New(layout.NewGridLayoutWithColumns(2), icon1, icon2, icon3))
myWindow.Resize(fyne.NewSize(200, 200))
myWindow.ShowAndRun()
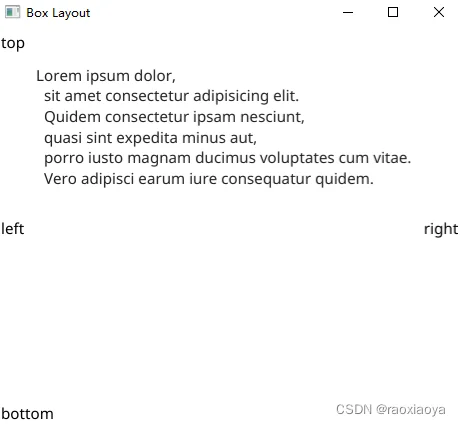
myApp := app.New()
myWindow := myApp.NewWindow("Box Layout")

left := canvas.NewText("left", color.Black)
right := canvas.NewText("right", color.Black)
top := canvas.NewText("top", color.Black)
bottom := canvas.NewText("bottom", color.Black)
content := widget.NewLabel(`Lorem ipsum dolor,
  sit amet consectetur adipisicing elit.
  Quidem consectetur ipsam nesciunt,
  quasi sint expedita minus aut,
  porro iusto magnam ducimus voluptates cum vitae.
  Vero adipisci earum iure consequatur quidem.`)

myWindow.SetContent(container.New(layout.NewBorderLayout(top, bottom, left, right), top, bottom, left, right, content))
myWindow.Resize(fyne.NewSize(400, 400))
myWindow.ShowAndRun()
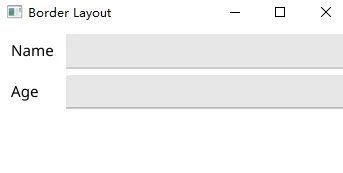
myApp := app.New()
myWindow := myApp.NewWindow("Border Layout")

nameLabel := canvas.NewText("Name", color.Black)
nameValue := widget.NewEntry()
ageLabel := canvas.NewText("Age", color.Black)
ageValue := widget.NewEntry()

container1 := container.New(
    layout.NewFormLayout(),
    nameLabel, nameValue, ageLabel, ageValue,
)
myWindow.SetContent(container1)
myWindow.Resize(fyne.NewSize(150, 150))
myWindow.ShowAndRun()
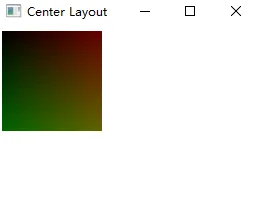
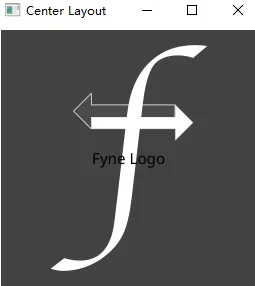
myApp := app.New()
myWindow := myApp.NewWindow("Center Layout")

im := canvas.NewImageFromResource(theme.FyneLogo())
im.FillMode = canvas.ImageFillOriginal
text := canvas.NewText("Fyne Logo", color.Black)

cont := container.New(
    layout.NewCenterLayout(),
    im, text,
)
myWindow.SetContent(cont)
myWindow.ShowAndRun()
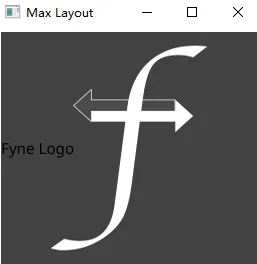
上面说过,图片一定要设置 FillMode ,否则图片不会展示,但是在 layout.NewMaxLayout 布局下却不需要设置。
myApp := app.New()
myWindow := myApp.NewWindow("Max Layout")

im := canvas.NewImageFromResource(theme.FyneLogo())
text := canvas.NewText("Fyne Logo", color.Black)

cont := container.New(
    layout.NewMaxLayout(),
    im, text,
)
myWindow.SetContent(cont)
myWindow.Resize(fyne.NewSize(200, 200))
myWindow.ShowAndRun()
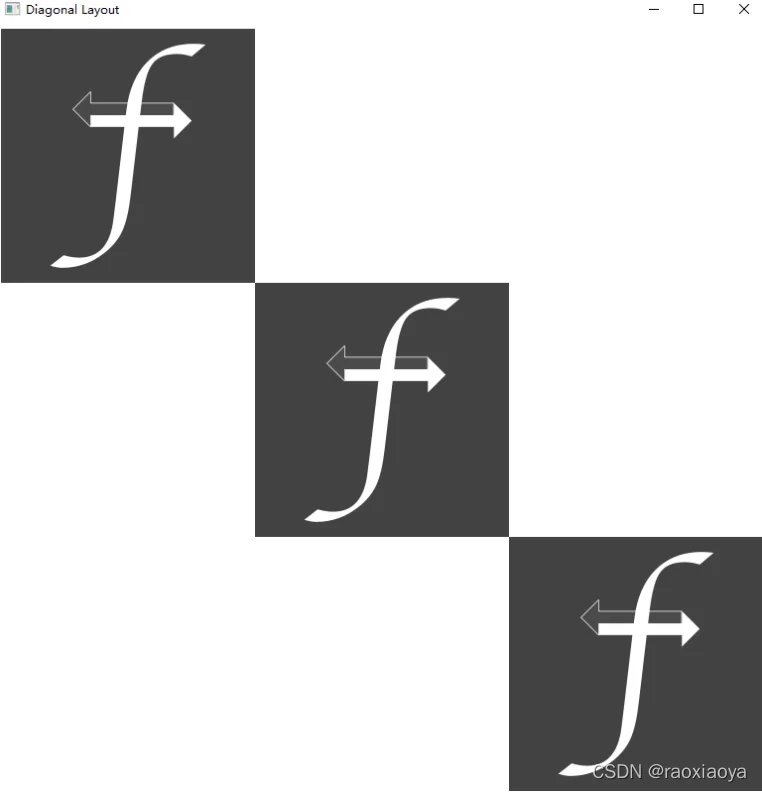
自定义 Layout
layoutfyne.Layouttype Layout interface {
Layout([]CanvasObject, Size)
MinSize(objects []CanvasObject) Size
}
fyne.Layouttype diagonal struct {
}
func (d *diagonal) MinSize(objects []fyne.CanvasObject) fyne.Size {
var w, h float32
for _, o := range objects {
childSize := o.MinSize()
w += childSize.Width
h += childSize.Height
}
return fyne.NewSize(w, h)
}
func (d *diagonal) Layout(objects []fyne.CanvasObject, containerSize fyne.Size) {
pos := fyne.NewPos(0, 0)
for _, o := range objects {
size := o.MinSize()
o.Resize(size)
o.Move(pos)
pos = pos.Add(fyne.NewPos(size.Width, size.Height))
}
}
MinSize()MinSizeLayout()func main() {
myApp := app.New()
myWindow := myApp.NewWindow("Diagonal Layout")
img1 := canvas.NewImageFromResource(theme.FyneLogo())
img1.FillMode = canvas.ImageFillOriginal
img2 := canvas.NewImageFromResource(theme.FyneLogo())
img2.FillMode = canvas.ImageFillOriginal
img3 := canvas.NewImageFromResource(theme.FyneLogo())
img3.FillMode = canvas.ImageFillOriginal
container := fyne.NewContainerWithLayout(
&diagonal{},
img1, img2, img3,
)
myWindow.SetContent(container)
myWindow.ShowAndRun()
}
发布应用程序
fynefyne packagefyne package.exe.app.tar.xzexefyne package -os windows -icon icon.jpg